Сигнальный контакт FSMC
Расположение выводов STM32 очень нерегулярное, и он распределен по нескольким различным портам
Инициализация должна быть очень осторожной. Выводы, которые необходимо использовать, должны быть инициализированы в режиме «многофункционального двухтактного вывода»
)И включите часы (RCC_APB2PeriphClockCmd (RCC_APB2Periph_GPIOx, ENABLE);) Чипы, такие как STM32F103Z (144-контактный), имеют независимые шины адреса и данных, в то время как STM32F103V (100-контактный) нет. Адрес и шина данных должны быть мультиплексированы во времени, как микрокомпьютеры 51. В серии STM32F103R (64 фута) модуля FSMC нет.
Контакты при мультиплексировании шины: PD14,//FSMC_DA0 PD15,//FSMC_DA1 PD0 ,//FSMC_DA2 PD1 ,//FSMC_DA3 PE7 ,//FSMC_DA4 PE8 ,//FSMC_DA5 PE9 ,//FSMC_DA6 PE10,//FSMC_DA7 PE11,//FSMC_DA8 PE12,//FSMC_DA9 PE13,//FSMC_DA10 PE14,//FSMC_DA11 PE15,//FSMC_DA12 PD8 ,//FSMC_DA13 PD9 ,//FSMC_DA14 PD10,//FSMC_DA15 PD11,//FSMC_A16 PD12,//FSMC_A17 PD13,//FSMC_A18 PE3 ,//FSMC_A19 PE4 ,//FSMC_A20 PE5 ,//FSMC_A21 PE6 ,//FSMC_A22 PE2 ,//FSMC_A23 PG13,//FSMC_A24//STM32F103Z PG14,//FSMC_A25//STM32F103Z
Независимые контакты адресной шины: PF0 ,//FSMC_A0 //2^1=2W =4 Bytes //144PIN STM32F103Z PF1 ,//FSMC_A1 //2^2=4W =8 Bytes//144PIN STM32F103Z PF2 ,//FSMC_A2 //2^3=8W= 16 Bytes //144PIN STM32F103Z PF3 ,//FSMC_A3 //2^4=16W =32 Bytes//144PIN STM32F103Z PF4 ,//FSMC_A4 //2^5=32W =64 Bytes//144PIN STM32F103Z PF5 ,//FSMC_A5 //2^6=64W =128 Bytes//144PIN STM32F103Z PF12,//FSMC_A6 //2^7=128W =256 Bytes //144PIN STM32F103Z PF13,//FSMC_A7 //2^8=256W =512 Bytes //144PIN STM32F103Z PF14,//FSMC_A8 //2^9= 512W =1k Bytes//144PIN STM32F103Z PF15,//FSMC_A9 //2^10=1kW =2k Bytes//144PIN STM32F103Z PG0 ,//FSMC_A10 //2^11=2kW =4k Bytes//144PIN STM32F103Z PG1 ,//FSMC_A11 //2^12=4kW =8k Bytes//144PIN STM32F103Z PG2 ,//FSMC_A12 //2^13=8kW =16k Bytes//144PIN STM32F103Z PG3 ,//FSMC_A13 //2^14=16kW =32k Bytes//144PIN STM32F103Z PG4 ,//FSMC_A14 //2^15=32kW =64k Bytes//144PIN STM32F103Z PG5 ,//FSMC_A15 //2^16=64kW =128k Bytes//144PIN STM32F103Z PD11,//FSMC_A16 //2^17=128kW =256k Bytes PD12,//FSMC_A17 //2^18=256kW =512k Bytes PD13,//FSMC_A18 //2^19=512kW =1M Bytes PE3 ,//FSMC_A19 //2^20=1MW =2M Bytes PE4 ,//FSMC_A20 //2^21=2MW =4M Bytes PE5 ,//FSMC_A21 //2^22=4MW =8M Bytes PE6 ,//FSMC_A22 //2^23=8MW =16M Bytes PE2 ,//FSMC_A23 //2^24=16MW =32M Bytes //100PIN STM32F103V MAX PG13,//FSMC_A24 //2^25=32MW =64M Bytes //144PIN STM32F103Z PG14,//FSMC_A25 //2^26=64MW =128M Bytes //144PIN STM32F103Z
Независимые контакты шины данных: PD14,//FSMC_D0 PD15,//FSMC_D1 PD0 ,//FSMC_D2 PD1 ,//FSMC_D3 PE7 ,//FSMC_D4 PE8 ,//FSMC_D5 PE9 ,//FSMC_D6 PE10,//FSMC_D7 PE11,//FSMC_D8 PE12,//FSMC_D9 PE13,//FSMC_D10 PE14,//FSMC_D11 PE15,//FSMC_D12 PD8 ,//FSMC_D13 PD9 ,//FSMC_D14 PD10,//FSMC_D15 управляющий сигнал PD4,//FSMC_NOE,/RD PD5,//FSMC_NWE,/WR PB7,//FSMC_NADV,/ALE PE1,//FSMC_NBL1,/UB PE0,//FSMC_NBL0,/LB PD7,//FSMC_NE1,/CS1 PG9,//FSMC_NE2,/CS2 PG10,//FSMC_NE3,/CS3 PG12,//FSMC_NE4,/CS4 //PD3,//FSMC_CLK //PD6,//FSMC_NWAIT
This code is mostly obsolete Use arduino-esp32fs-plugin instead
If you are on linux, you may still be happy with the instructions below, but after I wrote all this,
a better solution came up: https://github.com/lorol/arduino-esp32fs-plugin
I recommend you install this instead and then grab a mkfatfs binary (it’s a bit of a pain to build) from:
- https://github.com/labplus-cn/mkfatfs/releases/tag/v2.0.1
-
https://github.com/labplus-cn/mkfatfs/releases/tag/v1.0
and grab esp32fs.jar from https://github.com/lorol/arduino-esp32fs-plugin/releases
But if you’d like to create your FatFS image from a makefile and upload it via esptool, then my
branch does this, read on.
Create a FFAT partition on ESP32
reformat your ESP32 to have a FatFS partition. You’ll probably need this in your tree:
https://github.com/espressif/arduino-esp32/pull/2623/files
or you can simply git clone https://github.com/marcmerlin/arduino-esp32 which has the change you need
You will need to pay attention to the last line for both the offset (which you copy as is
in esptool) and the size, which you need to convert to decimal and divide by 1024 for KB: https://github.com/espressif/arduino-esp32/blob/170d204566bbee414f4059db99168974c69d166e/tools/partitions/noota_3gffat.csv
actually the eeprom partition was removed in newer versions of esp32-arduino, so now it should be:
Create a FatFS image
To create the fatfs image on linux (or you have to make the code here work and build for your OS).
Thanks to lbernstone for building a binary:
FFat test code.
upload and run the arduino/ffat code to verify the partition list and get a file listing.
https://github.com/marcmerlin/esp32_fatfsimage/blob/master/arduino/ffat/ffat.ino
Memory use
The FFAT module uses 8KB plus 4KB per concurrent file that can be opened. By default, it allows 10 files to be opened, which means it uses 48KB. IF you want to reduce its memory use, you can tell it to only support one file, and you will save 36KB, leaving you with only 12KB used.
Original project README listed below in case you need to (re)build fatfsimage
Packages
|
Name |
Description |
|---|---|
|
Arduino framework supporting mbed-enabled boards |
|
|
Arduino Wiring-based Framework for the Azure MXChip IoT DevKit |
|
|
Arduino Wiring-based Framework for ST STM32 microcontrollers |
|
|
Arduino Wiring-based Framework for ST STM32 microcontrollers (Maple Core) |
|
|
Arduino Wiring-based Framework for ST STM32 microcontrollers (ST STM32L0 Core) |
|
|
Vendor-independent hardware abstraction layer for the Cortex-M processor series |
|
|
CMSIS component for the STMicroelectronics STM32F0 series |
|
|
CMSIS component for the STMicroelectronics STM32F1 series |
|
|
CMSIS component for the STMicroelectronics STM32F2 series |
|
|
CMSIS component for the STMicroelectronics STM32F3 series |
|
|
CMSIS component for the STMicroelectronics STM32F4 series |
|
|
CMSIS component for the STMicroelectronics STM32F7 series |
|
|
CMSIS component for the STMicroelectronics STM32G0 series |
|
|
CMSIS component for the STMicroelectronics STM32G4 series |
|
|
CMSIS component for the STMicroelectronics STM32H7 series |
|
|
CMSIS component for the STMicroelectronics STM32L0 series |
|
|
CMSIS component for the STMicroelectronics STM32L1 series |
|
|
CMSIS component for the STMicroelectronics STM32L4 series |
|
|
CMSIS component for the STMicroelectronics STM32L5 series |
|
|
Open source ARM Cortex-M microcontroller library |
|
|
Arm Mbed OS is a platform operating system designed for the internet of things |
|
|
Standard Peripheral Library for ST STM32 microcontrollers |
|
|
STM32Cube is a set of tools and embedded software bricks available free of charge to enable fast and easy development on the STM32 platform (STM32CubeF0 MCU Firmware Package) |
|
|
STM32Cube is a set of tools and embedded software bricks available free of charge to enable fast and easy development on the STM32 platform (STM32CubeF1 MCU Firmware Package) |
|
|
STM32Cube is a set of tools and embedded software bricks available free of charge to enable fast and easy development on the STM32 platform (STM32CubeF2 MCU Firmware Package) |
|
|
STM32Cube is a set of tools and embedded software bricks available free of charge to enable fast and easy development on the STM32 platform (STM32CubeF3 MCU Firmware Package) |
|
|
STM32Cube is a set of tools and embedded software bricks available free of charge to enable fast and easy development on the STM32 platform (STM32CubeF4 MCU Firmware Package) |
|
|
STM32Cube is a set of tools and embedded software bricks available free of charge to enable fast and easy development on the STM32 platform (STM32CubeF7 MCU Firmware Package) |
|
|
STM32Cube is a set of tools and embedded software bricks available free of charge to enable fast and easy development on the STM32 platform (STM32CubeG0 MCU Firmware Package) |
|
|
STM32Cube is a set of tools and embedded software bricks available free of charge to enable fast and easy development on the STM32 platform (STM32CubeG4 MCU Firmware Package) |
|
|
STM32Cube is a set of tools and embedded software bricks available free of charge to enable fast and easy development on the STM32 platform (STM32CubeH7 MCU Firmware Package) |
|
|
STM32Cube is a set of tools and embedded software bricks available free of charge to enable fast and easy development on the STM32 platform (STM32CubeL0 MCU Firmware Package) |
|
|
STM32Cube is a set of tools and embedded software bricks available free of charge to enable fast and easy development on the STM32 platform (STM32CubeL1 MCU Firmware Package) |
|
|
STM32Cube is a set of tools and embedded software bricks available free of charge to enable fast and easy development on the STM32 platform (STM32CubeL4 MCU Firmware Package) |
|
|
STM32Cube is a set of tools and embedded software bricks available free of charge to enable fast and easy development on the STM32 platform (STM32CubeL5 MCU Firmware Package) |
|
|
Zephyr is a new generation, scalable, optimized, secure RTOS for multiple hardware architectures |
|
|
CMake is an open-source, cross-platform family of tools designed to build, test and package software |
|
|
Device Firmware Upgrade Utilities |
|
|
Device tree compiler |
|
|
GNU gperf is a perfect hash function generator |
|
|
Software and Documentation Pack for SEGGER J-Link debug probes |
|
|
Linker scripts pack for STMicroelectronics STM32 platform |
|
|
Ninja is a small build system with a focus on speed |
|
|
Open On-Chip Debugger. Free and Open On-Chip Debugging, In-System Programming and Boundary-Scan Testing |
|
|
STM32Duino Tools |
|
|
GNU toolchain for Arm Cortex-M and Cortex-R processors |
FatFS disk IO layer
FatFs has been extended with API functions that register the disk I/O driver at runtime.
They provide implementation of disk I/O functions for SD/MMC cards and can be registered for the given FatFs drive number using the function .
- void (BYTE pdrv, const *discio_impl)
-
Register or unregister diskio driver for given drive number.
When FATFS library calls one of disk_xxx functions for driver number pdrv, corresponding function in discio_impl for given pdrv will be called.
- Parameters
-
-
: drive number
-
: pointer to structure with diskio functions or NULL to unregister and free previously registered drive
-
- struct
-
Structure of pointers to disk IO driver functions.
See FatFs documentation for details about these functions
Public Members
- DSTATUS (*)(unsigned char pdrv)
-
disk initialization function
- DSTATUS (*)(unsigned char pdrv)
-
disk status check function
- DRESULT (*)(unsigned char pdrv, unsigned char *buff, uint32_t sector, unsigned count)
-
sector read function
- DRESULT (*)(unsigned char pdrv, const unsigned char *buff, uint32_t sector, unsigned count)
-
sector write function
- DRESULT (*)(unsigned char pdrv, unsigned char cmd, void *buff)
-
function to get info about disk and do some misc operations
- void (unsigned char pdrv, *card)
-
Register SD/MMC diskio driver
- Parameters
-
-
: drive number
-
: pointer to structure describing a card; card should be initialized before calling f_mount.
-
- (unsigned char pdrv, flash_handle)
-
Register spi flash partition
- Parameters
-
-
: drive number
-
: handle of the wear levelling partition.
-
- (unsigned char pdrv, const *part_handle)
-
Register spi flash partition
- Parameters
-
-
: drive number
-
: pointer to raw flash partition.
-
FatFS on ESP32 Howto:
Spiffs has issues though, on top of being read only of course, it’s pretty bad at doing
seeks across large files (it’s slow), and another filesystem like Fat, works better.
This is where FFat(Flash Fat) comes in.
As of 2020 there is now also LittleFS. I have not used it, but I assume it’s a better version
of SPIFFS that doesn’t take as much RAM as FatFS
You can see how to use FatFS from this example:
https://github.com/espressif/arduino-esp32/blob/master/libraries/FFat/examples/FFat_Test/FFat_Test.ino
but it assumes that you are creating your files on the device you can begin(true) to format
the filesystem.
If you want to create the filesystem on your computer and send it to your ESP32 (in
my case I have a big collection of Animated Gifs I want to serve), you follow these steps:
Using FatFs with VFS in read-only mode
The header file fatfs/vfs/esp_vfs_fat.h also defines the convenience functions and . These functions perform Steps 1-3 and 7-9 respectively for read-only FAT partitions. These are particularly helpful for data partitions written only once during factory provisioning which will not be changed by production application throughout the lifetime of the hardware.
- (const char *base_path, const char *partition_label, const *mount_config)
-
Convenience function to initialize read-only FAT filesystem and register it in VFS.
This is an all-in-one function which does the following:
-
finds the partition with defined partition_label. Partition label should be configured in the partition table.
-
mounts FAT partition using FATFS library
-
registers FATFS library with VFS, with prefix given by base_prefix variable
- Note
-
Wear levelling is not used when FAT is mounted in read-only mode using this function.
- Return
-
-
ESP_OK on success
-
ESP_ERR_NOT_FOUND if the partition table does not contain FATFS partition with given label
-
ESP_ERR_INVALID_STATE if esp_vfs_fat_rawflash_mount was already called for the same partition
-
ESP_ERR_NO_MEM if memory can not be allocated
-
ESP_FAIL if partition can not be mounted
-
other error codes from SPI flash driver, or FATFS drivers
-
- Parameters
-
-
: path where FATFS partition should be mounted (e.g. “/spiflash”)
-
: label of the partition which should be used
-
: pointer to structure with extra parameters for mounting FATFS
-
-
Source code organization
The folder contains the generated documentation of the bootloader source code and other documentation-related static files.
The folder contains the CMSIS (Cortex Microcontroller Software Interface Standard) as well as the HAL (Hardware Abstraction Layer) drivers from ST.
The bootloader source code and corresponding header file can be found in folder. Additionally, the folder contains the FatFs library as well.
The various demonstrations reside in the folder. Each example project contains an and folder where the header and source files are located respectively. The compiler and SDK-specific files are located in their respective subfolders. Furthermore, every example project has a dedicated README file explaining its functionality in detail.
Модуль FatFs
Файловая система во встроенных устройствах может быть реализована двумя способами: путем написания поддержки файловой системы с нуля или использования готовых решений. В принципе, нет разумного обоснования для первого упомянутого подхода.
Файловая система FAT настолько хорошо документирована и в то же время относительно проста, что было создано много бесплатных инструментов, которые очень хорошо справляются с администрированием содержимого носителя данных с помощью файловой системы FAT. Как правило, открытый характер кода позволяет вносить необходимые изменения и исправления, которые могут понадобиться для стабильности работы устройства.
Одним из таких общедоступных инструментов является модуль FatFs, задачей которого является создание моста между физическим уровнем (носителем данных) и приложением, работающим на микроконтроллере. Подробную информацию о FatFs можно найти на сайте автора. Роль модуля FatFs показана на рис. 3.
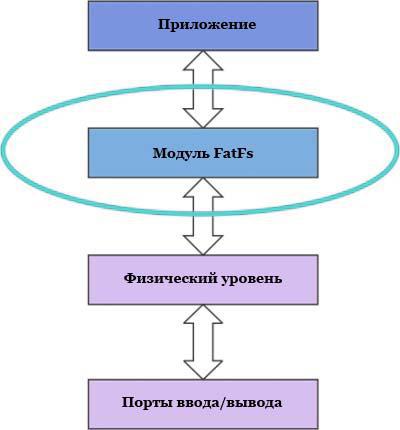
Рис. 3. Расположение модуля FatFs в программном проекте
Рис. 4. Структура файлов FatFs
Сам модуль FatFs написан на языке C. Файлы, необходимые для правильной работы FatFs, показаны на рис. 4 в виде дерева, скопированного из проекта с использованием файловой системы FAT. Теоретически для правильной работы модуля FatFs требуется наличие часов реального времени (RTC) во встроенной системе. Это требование можно легко обойти, введя фиксированные значения вместо даты и времени.
Using FatFs with VFS
The header file fatfs/vfs/esp_vfs_fat.h defines the functions for connecting FatFs and VFS.
The function allocates a structure and registers a given path prefix in VFS. Subsequent operations on files starting with this prefix are forwarded to FatFs APIs.
The function deletes the registration with VFS, and frees the structure.
Most applications use the following workflow when working with functions:
-
- Call to specify:
-
-
Path prefix where to mount the filesystem (e.g. , )
-
FatFs drive number
-
A variable which will receive the pointer to the structure
-
-
Call to register the disk I/O driver for the drive number used in Step 1.
-
Call the FatFs function , and optionally , , to mount the filesystem using the same drive number which was passed to . For more information, see FatFs documentation.
-
Call the C standard library and POSIX API functions to perform such actions on files as open, read, write, erase, copy, etc. Use paths starting with the path prefix passed to (for example, ). The filesystem uses 8.3 filenames format (SFN) by default. If you need to use long filenames (LFN), enable the option. More details on the FatFs filenames are available here.
-
Optionally, by enabling the option , use the POSIX lseek function to perform it faster, the fast seek will not work for files in write mode, so to take advantage of fast seek, you should open (or close and then reopen) the file in read-only mode.
-
Optionally, call the FatFs library functions directly. In this case, use paths without a VFS prefix (for example, ).
-
Close all open files.
-
Call the FatFs function for the same drive number, with NULL argument, to unmount the filesystem.
-
Call the FatFs function with NULL argument and the same drive number to unregister the disk I/O driver.
-
Call with the path where the file system is mounted to remove FatFs from VFS, and free the structure allocated in Step 1.
The convenience functions , and wrap the steps described above and also handle SD card initialization. These two functions are described in the next section.
- (const char *base_path, const char *fat_drive, size_t max_files, FATFS **out_fs)
-
Register FATFS with VFS component.
This function registers given FAT drive in VFS, at the specified base path. If only one drive is used, fat_drive argument can be an empty string. Refer to FATFS library documentation on how to specify FAT drive. This function also allocates FATFS structure which should be used for f_mount call.
- Note
-
This function doesn’t mount the drive into FATFS, it just connects POSIX and C standard library IO function with FATFS. You need to mount desired drive into FATFS separately.
- Return
-
-
ESP_OK on success
-
ESP_ERR_INVALID_STATE if esp_vfs_fat_register was already called
-
ESP_ERR_NO_MEM if not enough memory or too many VFSes already registered
-
- Parameters
-
-
: path prefix where FATFS should be registered
-
: FATFS drive specification; if only one drive is used, can be an empty string
-
: maximum number of files which can be open at the same time
-
: pointer to FATFS structure which can be used for FATFS f_mount call is returned via this argument.
-
Файловая система FAT
С точки зрения файловой системы каждый носитель данных (жесткий диск, карта памяти) разделен на сектора и кластеры. Сектор — это наименьшее количество байтов, которое может быть записано или прочитано. Обычно размер сектора составляет 512 байт. Файлы сохраняются в пронумерованных кластерах.
Размер кластера зависит от файловой системы и носителя. Каждый кластер полностью выделен для данного файла. Это означает, что даже если файл намного меньше размера кластера, он все равно занимает столько же, сколько один кластер на диске.
Ключевым элементом файловой системы FAT (File Allocation Table) является, в соответствии с ее именем, таблица размещения файлов. Файловая система FAT представлена четырьмя разновидностями, во встроенных системах обычно используется две, в зависимости от размера носителя и требований к приложениям, это будет FAT16 или FAT32.

Рис. 2. Разделение носителя информации в системе FAT
Носитель данных в файловой системе FAT разделен на пять частей, все они показаны на рис. 2. Первая логическая часть носителя данных, расположенная в первом секторе, представляет собой зарезервированную область, которая содержит всю основную информацию о текущем разделе (носителе).
К этой информации относятся, в частности: тип и размер разделов, размер сектора и количество секторов в кластере. За зарезервированной областью находятся таблицы размещения файлов, которые являются основным источником информации о данных, сохраняемых на носителе. Обычно, помимо основной таблицы размещения, есть и ее копия. Четвертая область — это корневой каталог, который создается автоматически при создании файловой системы. Последний, пятый сектор — это область данных.
How to use
The bootloader can be easily customized and tailored to the required hardware and environment, i.e. to perform firmware updates over various interfaces or even to implement over-the-air (OTA) updates if the hardware incorporates wireless communication modules. In order to perform successful in-application-programming, the following sequence has to be kept:
- Check for flash write protection and disable it if necessary.
- Initialize flash with .
- Erase application space with .
- Prepare for programming by calling .
- Perform programming by repeatedly calling the function. The programming procedure requires 8 bytes of data (double word) to be programmed at once into the flash. This function automatically increases the address where the data is being written.
- Finalize programming by calling .
The application image has to be in binary format. If the checksum verification is enabled, the binary must include the checksum value at the end of the image. When creating the application image, the checksum has to be calculated over the entire image (except the checksum area) with the following parameters:
- Algorithm: CRC32
- Size: 4 bytes
- Initial value: 0xFFFFFFFF
- Bit order: MSB first
Important notes:
- In order to perform a successful application jump from the bootloader, the vector table of the application firmware should be relocated. On system reset, the vector table is fixed at address 0x00000000. When creating an application, the microcontroller startup code sets the vector table offset to 0x0000 in the file by default. This has to be either disabled (the bootloader can be configured to perform the vector table relocation before the jump) or manually set the vector table offset register (VTOR) to the appropriate offset value which is the start address of the application space. For more information, please refer to .
- The linker settings of the application firmware need to be adjusted from their default settings so that the start address of flash reflects the actual start address of the application space.
Команды, поддерживаемые SD-картами
Каждая команда для отправки на SD-карту состоит из шести байтов. Первый байт всегда является кодом команды, следующие четыре байта являются его аргументом. В конце отправляется байт контрольной суммы CRC.
В то время как сумма CRC проверяется в рабочем режиме с помощью интерфейса SDBus, контрольная сумма игнорируется картой при обмене данными через шину SPI. Только при отправке команды CMD0, переключающей режим работы с SDBus на SPI, требуется байт CRC. Его не нужно рассчитывать каким-либо образом, поскольку он является фиксированным значением и равен 0x95.
В табл. 1 указаны несколько команд при работе с шиной SPI с описанием аргументов. В дополнение к стандартным командам CMD карты SD также могут использовать так называемые прикладные команды (ACMD). Для отправки команды необходимо сначала отправить команду CMD55, информирующую SD-карту о том, что следующей командой будет ACMD.
Табл. 1. Команды, поддерживаемые SD-картами в режиме SPIf
| команда | описание |
| CMD0 | сбрасывает карту, позволяет включить режим шины SPI |
| CMD12 | принудительное завершение передачи множества блоков данных |
| CMD16 | настройка длины блока данных для чтения / записи |
| CMD17 | чтение блока памяти длины, указанной CMD16 |
| CMD24 | запись блока памяти с длиной, указанной CMD16 |
| CMD32 | адрес первого удаляемого блока передается в аргументе |
| CMD33 | адрес последнего удаляемого блока передается в аргументе |
| CMD38 | удаляет блоки, обозначенные CMD32 и CMD33 |

