2 How to install STM32CubeIDE[edit]
STM32 MPU support inside STM32CubeIDE is available on Linux and Windows host PCs, but
it is NOT on macOS.
| STM32CubeIDE for Linux host PC | STM32CubeIDE for Windows host PC | |
|---|---|---|
| Download |
Version 1.6.1
|
Version 1.6.1
|
| Installation guide | ||
| User manual |
|
|
| Detailed release note |
Minor releases may be available from the update site. Check chapter 10 in () for more information on how to update STM32CubeIDE.
Product overview
Description
STM32CubeIDE is an all-in-one multi-OS development tool, which is part of the STM32Cube software ecosystem.
STM32CubeIDE is an advanced C/C++ development platform with peripheral configuration, code generation, code compilation, and debug features for STM32 microcontrollers and microprocessors. It is based on the Eclipse/CDT framework and GCC toolchain for the development, and GDB for the debugging. It allows the integration of the hundreds of existing plugins that complete the features of the Eclipse IDE.
STM32CubeIDE integrates STM32 configuration and project creation functionalities from STM32CubeMX to offer all-in-one tool experience and save installation and development time. After the selection of an empty STM32 MCU or MPU, or preconfigured microcontroller or microprocessor from the selection of a board or the selection of an example, the project is created and initialization code generated. At any time during the development, the user can return to the initialization and configuration of the peripherals or middleware and regenerate the initialization code with no impact on the user code.
STM32CubeIDE includes build and stack analyzers that provide the user with useful information about project status and memory requirements.
STM32CubeIDE also includes standard and advanced debugging features including views of CPU core registers, memories, and peripheral registers, as well as live variable watch, Serial Wire Viewer interface, or fault analyzer.
1 Design of a STM32Cube Expansion enhanced for STM32 Toolset
A STM32Cube Expansion enhanced for STM32 Toolset is an evolution of the initial concept of STM32Cube Expansion. The new packages contain now a part readable and configurable into STM32CubeMX (or STM32CubeIDE) on top of Ready-To-Use Project Samples.
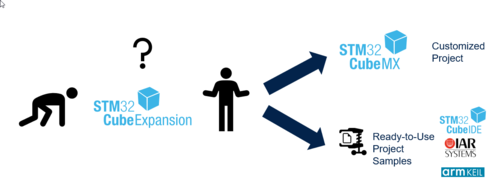
It helps the integration of software components into STM32Cube ecosystem. The role is to limit the manual work to integrate a SW component (it limits but it remains some manual operations to be executed by the end user).
The major advantage of integrating your software in STM32CubeMX is that you can allow the STM32CubeMX users to integrate your SW component on any board or MCU from the STM32 Galaxy.
1 Introduction to STM32Cube[edit]
STM32Cube provides comprehensive embedded software libraries and tools, significantly reducing development effort, time and cost.
STM32Cube is fully integrated in STM32MPU_Embedded_Software_distribution and consists of (usable together or independently):
STM32CubeMP1 Firmware Package embedded software libraries, including:
-
- The Hardware Abstraction Layer (HAL), enabling portability between different STM32 devices via standardized API calls
- The Low-Layer API (LL), a light-weight, optimized, expert oriented set of APIs designed for runtime efficiency and so enhanced performance
- A collection of Middleware components, like FreeRTOS, OpenAMP (depending on the MPU series)
- A collection of Examples, running on an MPU board and allowing demonstration of a basic implementation of features from a set of IPs
STM32CubeMX tool, including :
-
- Configuration and C code generation for pin multiplexing, clock tree, peripherals and middleware setup with graphical wizards
- Generation of IDE-ready projects for an integrated development environment tool chain
- Direct import of STM32 Cube embedded software libraries from st.com
- Integrated updater to keep STM32CubeMX up-to-date
Что это вообще такое?
Микроконтроллер – это специализированная микросхема, объединяющая микропроцессор, память и периферийные устройства в одном корпусе. В отличие от «большого» компьютера имеет ограниченные объемы собственно этой самой памяти: типовые значения и для RAM, и для ROM – десятки-сотни килобайт.
Как правило, микроконтроллер не имеет MMU (хотя есть и исключения, но это именно исключения, которые правильнее будет уже отнести к совершенно другой категории систем-на-кристалле), то есть отсутствует аппаратная поддержка механизма виртуальной памяти, что не позволяет использовать «полновесные» ОС даже при расширении объема встроенной памяти внешними микросхемами.
В связи с перечисленным, код под микроконтроллеры разрабатывается особым образом, в специализированных IDE, а операционные системы вообще выделены в особый класс. Основной функцией ОС для микроконтроллера является реализация многозадачности, а бонусом обычно идут разные стеки сети, файловых систем и т.д. Ни о каком окружении и вспомогательных утилитах, как в настольных ОС, здесь речи не идет. Так, например, в ОС для микроконтроллеров нет процессов, есть только задачи = нити = потоки, а сама ОС, как правило, компонуется с пользовательским кодом в единую микропрограмму («прошивку»). Для понимания особенностей таких ОС рекомендуем статью. Отметим, что в ThreadX, несмотря на прямое отсутствие процессов, есть их аналог — модули.
Впрочем, ограниченные объемы ресурсов никак не мешают использовать микроконтроллеры для решения узкоспециализированных задач. Более того, по меркам микроконтроллера, 128 КБ ROM и 64 КБ RAM – уже довольно внушительные цифры. Микроконтроллер, несмотря на отсутствие «большой» ОС, успешно может записывать файлы на USB флешку, обмениваться данными по сети, а некоторые реализации содержат специальные инструкции для цифровой обработки сигналов, то есть могут решать достаточно «тяжелые» задачи.
Все изложенное описывает картину достаточно укрупненно, так как везде есть исключения и оговорки. Например, на микроконтроллерах без MMU можно запустить ucLinux – порт «большого» Linux специально для микроконтроллеров без MMU (без защиты памяти, естественно, со всеми вытекающими последствиями). Как правило, для этого потребуются дополнительные микросхемы памяти, так как встроенной хватит только для загрузчика этой самой ucLinux.
Запуск ThreadX на STM32
Для понимания зависимостей между компонентами Azure RTOS приводим соответствующий рисунок из документации:
Как видим, ThreadX является основой для всего остального. Ядро ThreadX обеспечивает многопоточность, переключение контекста, синхронизацию потоков. Поддерживаются таймеры, очереди сообщений, семафоры, мьютексы, флаги событий, пулы байтов и блоков (в каком-то смысле аналог кучи в C++, но с потокобезопасным управлением).
В практической части данной статьи мы будем рассматривать именно ThreadX, чтобы понять, с чего начать работу с ним. И хотя разработчики предоставляют большое количество примеров для готовых средств разработки, интерес представляет именно настройка «с нуля» на каком-то микроконтроллере, для которого нет примера, ведь к этому при разработке своего устройства мы рано или поздно придем.
Будем использовать относительно недорогую и популярную плату STM32F4Discovery, но весь процесс можно с успехом повторить на любом микроконтроллере, например, на сверхдешевом и доступном STM32F103C8T6.
STM32F4Discovery удобна тем, что уже имеет встроенный отладчик ST-Link, большое количество периферии для экспериментов, а все выводы микроконтроллера (STM32F407VGT6) выведены на контакты.
2 Three webinars to start up
Three webinars have been prepared by our teams to show you a part of the capacity of the STM32Cube Expansion Do It Yourselves. Each video lasts approximately 1 hour and needs between half a day to one day to reproduce it.
Sequencer Sample :
- An utility for multi-tasking without an Operating System, which is HW independent code.
- In the example, a LED is managed through a GPIO.
-
Sequencer video
-
Sequencer video (chinese)
-
Download the Sequencer Sample code
DSPDemo Sample :
- This SW component uses the DSP integrated in the Core to generate an internal signal. This internal signal is then captured and displayed thanks to CubeMonitor. There is no interaction with the external hardware.
-
DSPDemo video
-
DSPDemo video (chinese)
-
Download the DSPDemo Sample code
STDIO Sample
- The application code frequently uses standard I/O library functions, such as printf(),scanf(), or fgetc() to perform input/output operations.The I/O library functions can be redirected to use different channels (peripheral) depending on the hardware and the application needs.The most common channels used for STDIN (scanf, getchar) and STDOUT (printf) are UART and USB Device Virtual Com Port class. STDIN could retrieve data from a USB keyboard using the USB Host HID class.
-
STDIO video
-
STDIO video (chinese)
-
Download the STDIO Sample code
Requirements:
OS: macOS, Linux, Windows 7-10
Python: 3.6+
The app introduces zero dependencies by itself. Of course, you need to have all the necessary tools installed in order to perform the operations:
- STM32CubeMX with the desired downloaded frameworks (F0, F1, etc.). All recent versions are fine (5.x, 6.x)
- Java (JRE, Java runtime environment) for the CubeMX. Starting from CubeMX v6.3.0 Java is included in the bundle (in form of a folder sitting alongside the executable) so you don’t need to install it by yourself from now on. Hence, it can be omitted in the config file except Windows where it is still highly recommended to run CubeMX via . As mentioned, Java exists already, the only difference is that it is still will be listed in the default config. You can refer to STM32CubeMX own documentation to obtain more information on current situation if, suddenly, something will change in this regard
If you, for some reasons, don’t want to (or cannot) install (i.e. register in PATH) command line versions of these applications in your system, you can always specify the direct paths to them overriding the default values in the project configuration file . Check the config reference to see all possible ways of telling stm32pio where the tools are residing on your machine.
Инструменты, которые нам понадобятся
Эксперименты будем проводить на Windows 10 (подойдет также любая, начиная с 7).
Будем также использовать STM32 HAL — набор универсальных API для микроконтроллеров STM32. Есть много мнений и «за», и «против» использования HAL. На наш взгляд, HAL, внося некоторый «оверхед», все же позволяет получить хорошо читаемый и модифицируемый код. HAL не требует скачивания, все необходимые библиотеки будут загружены автоматически при создании проекта.
Скачиваем и устанавливаем STM32CubeIDE — бесплатная IDE от STMicroelectronics на базе открытых инструментов.
Загружаем исходный код ThreadX c GitHub. Существуют, конечно, «правильные» способы использования репозитория с исходным кодом в виде клонирования репозитория или создания форка, но для простоты описания просто скачиваем его как архив: зеленая кнопка «Clone», затем «Download zip». UPD (см. комментарии): для того, чтобы структура исходного кода полностью соответствовала данному руководству, необходимо использовать определенный коммит. Для того, чтобы его получить, сначала установите клиент Git для командной строки, затем откройте командную строку, создайте временную директорию, перейдите в нее и выполните команды:
Затем переименуйте результирующую директорию из threadx в threadx-master.
Теперь подключаем плату STM32F4Discovery через разъем Mini-USB к компьютеру, проверяем наличие устройства «ST Link» в диспетчере устройств. Плата питается по этому же кабелю.
5 Arm®Cortex®-M debug on STM32 MPU device[edit]
Two modes are used to debug ArmCortex-M firmware on STM32 MPU devices.
5.1 Engineering modeedit
Very powerful to debug preliminary ArmCortex-M, the engineering mode implies a specific boot mode: the where only the Cortex-M is started. Firmware is loaded via JTAG/SWD into its dedicated RAM.
This mode is not the default one. It must be set via the «Debug Configuration» menu, in the «Debugger» tab , with «through JTGA/SWD link (Engineering mode)» option selected.
| The initialization normally done in the Cortex-A (such as clock tree setup or others) must be handled by the ArmCortex-M. |
Debugging in engineering mode in an STM32 MPU device is very similar to a standard STM32 MCU debug in terms of functionality, except that in this case the ArmCortex-M core has only one dedicated memory, no Flash memory type.
5.2 Production modeedit
Production mode targets a debug close to the final product.
It means to have an STM32 MPU board up and running on the Cortex-A (Linux) and a Cortex-M firmware to debug (usually an STM32CubeIDE project).
The board, also named «target», is booted in the production mode from the Flash memory (the SD card); it is connected to the Host:
- via the Ethernet network, using an Ethernet cable or dedicated USB cable
- and via a USB cable to the ST-LINK probe, giving access to the JTAG/SWD and Linux console
ST-LINK automatically brings support for Cortex-A Linux console via VCP (Virtual COM port). This enables the Target Status widget, visible on the bottom-right of STM32CubeIDE, allowing target IP address discovery. For production mode setup, it is recommended to get the target IP address discovered by the Target Status widget before creating the debug configuration.
This principle is depicted in the Debug Configuration screenshot below.
Network connection can be set up in two ways:
- Ethernet
- managed network: IP address attributed by DHCP server
- unmanaged network: IP address to be manually configured
- USB
Debug is performed though the following workflow:
1. The firmware built binary is transferred to the target using the network (SSH protocol), more precisely to the Cortex-A Linux file system.
2. Firmware is loaded to Cortex-M core using the “remoteproc” framework.
3. Finally the debug session is started via the JTAG/SWD connection
The production mode is the default one when you create a new debug configuration. It is automatically set via the «Debug Configuration» menu.
Debug configuration, production mode activated.
More information on how to use STM32CubeIDE target status are given in article How to use the Target Status widget in STM32CubeIDE.
At debug launch, some specific pop-up appear:
The SSH Password must be completed: the default one is root.
The RSA key must be approved.
Defining an ArmCortex-M project in an STM32 MPU context also means to define where are downloaded in the ArmCortex-A Linux file system:
- the Cortex-M firmware: <ProjectName>.elf
- the load/unload script fw_cortex_m4.sh used by the STM32CubeIDE if present it can be customized
- and a README, informing a user having a direct connection onto the target.
This is the purpose of «Remote Path Setting» property which is linked to the project. Its default value at creation is /usr/local/project/<ProjectName>, but can also be changed using the Remote Settings properties item.
Inside project structure,directory «<ProjectName>_CM4/Core/RemoteProc/» defines the tree downloaded when debugging in the production mode.
5.3 ST-LINK sharing supportedit
From STM32CubeIDE v1.2.0, it is possible to connect to an ST-LINK probe several applications, in parallel of openOCD. This support relies onto ‘ST-Link Server’.
It is enabled by checking Shared ST-Link inside «Debug Configuration > Debugger > ST-Link Client Setup».
Лицензирование
Azure RTOS — коммерческая ОС с соответствующими требованиями к применению в производстве. Однако в ряде случаев платить за ее использование не понадобится.
- Вам не требуется лицензия, если вы используете код не для производства, а для изучения, разработки, тестирования, портирования, адаптации системы для вашего решения;
- Лицензия на использование в производстве включена автоматически при развертывании ОС на любой из микроконтроллеров из данного списка. На август 2020 года список еще не заполнен в связи с тем, что процедуры лицензирования еще не завершены, но уже есть соответствующий issue, в котором упомянуты микросхемы Microchip, NXP, Renesas, ST, и Qualcomm;
- В ином случае вам нужно приобрести платную лицензию.
Во всех случаях ОС поставляется с исходным кодом.
Package Details: stm32cubemx 6.3.0-23
Package Actions
-
View PKGBUILD /
View Changes - Download snapshot
- Search wiki
- Flag package out-of-date
- Vote for this package
- Enable notifications
- Submit Request
| Git Clone URL: | https://aur.archlinux.org/stm32cubemx.git (read-only, click to copy) |
|---|---|
| Package Base: | stm32cubemx |
| Description: | graphical software configuration tool for STM32 microcontrollers that allows generating C initialization code |
| Upstream URL: | https://www.st.com/en/development-tools/stm32cubemx.html |
| Keywords: |
arm cortex cortex-m stm32 |
| Licenses: | |
| Submitter: | laserk3000 |
| Maintainer: | laserk3000 |
| Last Packager: | laserk3000 |
| Votes: | 39 |
| Popularity: | 0.75 |
| First Submitted: | 2016-06-04 10:14 |
| Last Updated: | 2021-08-05 21:15 |
Dependencies (3)
- bash (bash-devel-git, bash-devel-static-git, bash-xdg-dirs-git, bash-git)
- java-runtime=11 (jdk5, jre7-openjdk-infinality, java-8-openjdk-shenandoah, jre8-openjdk-infinality, java-gcj-compat, jdk9, jre9, jdk-devel, jre10, jdk6, jdk12-openj9-bin, zulu-12-bin, jre6, jre12, jdk8-openjdk-dcevm, server-jre, jdk13-openj9-bin, jdk9-openj9-bin, jdk10, jdk11-openjdk-dcevm, jre8-openjdk-jetbrains, jdk10-openj9-bin, jdk14-openj9-bin, jdk7, jre7, jre14, jdk8-jetbrains, zulu-14-bin, zulu-13-bin, jdk-bcl, jre-bcl, amazon-corretto-15, jdk11-openjdk-dcevm-conflicts-fixed, zulu-embedded-jdk8, sapmachine-jdk-bin, jdk15-adoptopenjdk, amazon-corretto-8, amazon-corretto-11, jdk11-msopenjdk-bin, liberica-jre-8-full-bin, jdk8-arm, zulu-embedded-jdk, jre11-jetbrains-imfix, zulu-11-bin, zulu-8-bin, zulu-15-bin, amazon-corretto-16, jdk11-graalvm-bin, jdk8-graalvm-bin, jdk16-graalvm-bin, jdk-openj9-bin, jdk-adoptopenjdk, jdk11-adoptopenjdk, liberica-jdk-8-full-bin, liberica-jdk-11-bin, liberica-jdk-11-full-bin, liberica-jdk-11-lite-bin, liberica-jdk-full-bin, liberica-jre-11-bin, liberica-jre-11-full-bin, zulu-embedded-jdk11, jre8-adoptopenjdk, jre-openj9, jre8, jdk8, jre11, jre, jre8-openjdk-shenandoah, zulu-16-bin, jdk-arm, jdk7-j9-bin, jdk7r1-j9-bin, jdk11-openj9-bin, jdk11-graalvm-ee-bin, jdk17-graalvm-bin, jdk-jetbrains, jdk8-openj9-bin, java-openjdk-ea-bin, java-openjdk-loom-ea-bin, jdk8-j9-bin, jdk11-j9-bin, jre-jetbrains, java-openjdk-bin, jre-openjdk, jre11-openjdk, jre7-openjdk, jre8-openjdk)
- imagemagick (graphicsmagick-imagemagick-compat, imagemagick-no-hdri, imagemagick-git, imagemagick-fftw, imagemagick-full-git, imagemagick-full) (make)
- https://sw-center.st.com/packs/resource/library/stm32cube_mx_v630-lin.zip
- LICENSE
- stm32cubemx.desktop
- stm32cubemx.sh
Что происходит в данном примере
Приведенное приложение — классический пример «лампочки и кнопочки» для RTOS. На плате распаяно 4 светодиода, и задача приложения — мигать ими, причем у каждого из них должна быть своя частота этого мигания. Без RTOS это сделать будет достаточно сложно и неудобно (UPD: см. комментарии).
Также на плате имеется кнопка, и ее мы используем для демонстрации обработки внешнего прерывания в RTOS. Очень плохой практикой является обработка непосредственно в обработчике прерывания (наша функция-callback HAL_GPIO_EXTI_Callback() выполняется непосредственно в контексте прерывания), поэтому в самом обработчике мы устанавливаем флаг соответствующего события. В дальнейшем по этому флагу оно будет обработано в потоке.
Обратите внимание, что задержки между включением и выключением светодиода, как таковой, в коде нет. Вместо этого соответствующее время поток ожидает события
Как только это событие происходит, все светодиоды гаснут (чтобы было видно, что происходит), а время задержки увеличивается в два раза. При следующем нажатии — возвращается к исходному.
Для каждого из четырех потоков используется один и тот же код потока (thread_entry), который на «вход» в качестве параметра получает индекс светодиода, а соответствующая информация (порт, вывод, время задержки, имя потока) будет получена потоком из соответствующей структуры BoardLedsSettings. Это очень удобно: нам не понадобилось писать по функции для каждого потока, вместо этого мы используем единую функцию, просто передавая ей параметр.
В RTOS для микроконтроллеров принято вручную выделять память для стека потока. В некоторых ОС это происходит неявно, но происходит всегда. Стек, как известно, используется для хранения локальных переменных и сохранения контекста при вызове вложенной функции
Важно подобрать размер стека так, чтобы не произошло его переполнение, как правило, это делается экспериментально при помощи средств аналитики стека. В нашем случае выбрано значение в 1 КБ исходя из опыта разработки
Выделенная область стека передается в функцию tx_thread_create() в виде указателя и размера области памяти в байтах
Обратите внимание, что в нашем примере достаточно было просто объявить массив нужной длины и передать указатель на массив в эту функцию, что означало бы статическое выделение памяти для стека. Но мы пошли более сложным путем, чтобы показать, как в ThreadX устроено динамическое управление памятью
Мы статически создали массив для пула байтов (byte_pool_0), создали сам пул в строке
Затем выделили из этого пула память для стека каждого потока в строке
И передали соответствующий указатель (pointer) в функцию создания потока:
Обратим внимание на следующее:
- Поскольку мы выделяли память динамически, мы также можем ее и освободить, например, после уничтожения потока. Память вернется в пул и может быть в дальнейшем использована повторно. В ThreadX уже решена проблема фрагментации возвращенной в пул памяти, поэтому проблем с повторным выделением не будет.
- Все созданные потоки запускаются автоматически (параметр TX_AUTO_START).
- Параметр TX_NO_TIME_SLICE отключает механизм time-slice для создаваемого потока. Это означает, что квант времени на исполнение процесса мы не задаем, а вместо этого полагаемся на планировщик.
- Данный код не подходит для производства, поскольку для упрощения примера не производится анализ возвращенного значения функций на предмет возникновения ошибок.
- ThreadX достаточно гибко конфигурируется путем применения директив препроцессора. Для упрощения примера мы их не рассматривали. Подробная информация доступна .
Инициализация потоков производится в теле функции tx_application_define(), которая в качестве параметра получает указатель на первый адрес неиспользуемой памяти. Мы также могли использовать этот адрес для организации пула байтов, вместо статического выделения.
5 STM32Cube Expansion Structure
The STM32Cube Expansion Structure top level is the following:
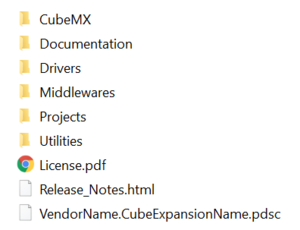
Top level structure
STM32CubeMX: generated by STM32PackCreator (available in STM32CubeMX panel Tools). It contains the files required by STM32CubeMX in order to configure the SW Component.
Middlewares: contains your SW component itself. Under ST subdirectories when coming from ST, under “Third_Party” when coming from your side or from a community.
Example of X-Cube-NFC4 package — Middleware Structure
Projects (examples): contains the examples of projects (2 or 3). They have been generated by STM32CubeMX for several IDEs and for several boards. Here is an example of advanced structure.
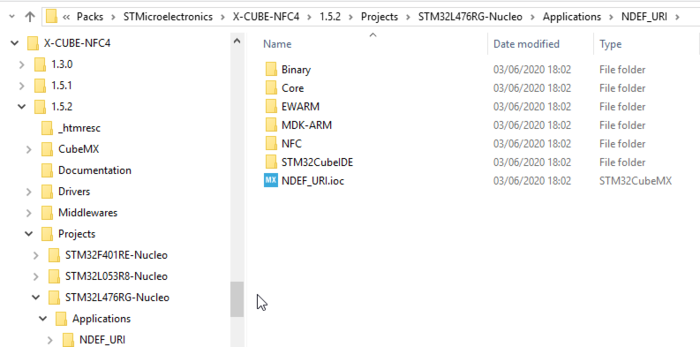
Example of X-Cube-NFC4 package — Advanced Project Structure
| starting from STM32CubeMX-6.0.0, code generation is in «advanced mode» by default — you can change it on the project generator panel |
Here is an example of basic structure.
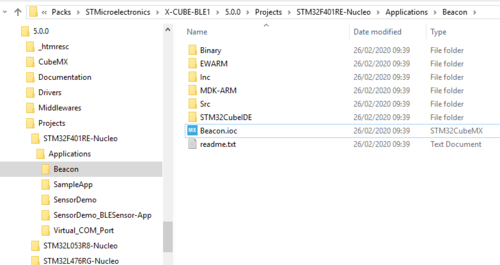
Example of X-Cube-BLE1 package — Basic Project Structure
Drivers: contains the drivers which are required for the projects (examples). Copy paste them from the CubeFW Package of the series that you have taken as examples.
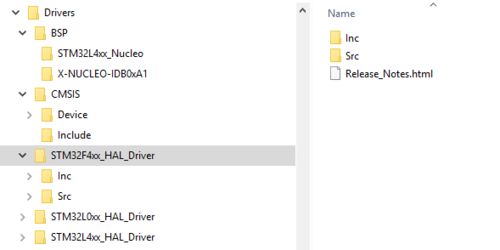
Example of NFC STM32CubeExpansion Package — Drivers Structure
Utilities: contains any PC software which could be useful for your pack.
Documentation: contains the getting started and or any other documentation related to the package except the release note.
Other documents at the root of the package:
- License.pdf: contains the license. It will be displayed during the installation process
- Release_Notes.html: contains information on the release such as goals, modified files, corrected bugs and limitation if any.
- VendorName.CubeExpansionName.pdsc: the file pdsc contains the description of the file included into the packages.
The STM32CubeExpansion structure follows the standard STM32CubePackage structure. This structure is fully described into the document UM2285 Development guidelines for STM32Cube Expansion Packages.
In conclusion, if you want to map the «step1», «step2» and «step3», it will be like that
Step1: package useable in STM32CubeMX
Step2: stand alone project examples
Step3: packaging
All tools & software
-
MCU & MPU Embedded Software
Part number
Status
Description
Type
Supplier
X-CUBE-AZRTOS-H7
Active
Azure RTOS software expansion for STM32Cube for STM32H7 series
STM32Cube Expansion Packages
STX-CUBE-AZRTOS-H7
Description:
Azure RTOS software expansion for STM32Cube for STM32H7 series -
Product Evaluation Tools
Part number
Status
Description
Type
Supplier
B-L462E-CELL1
Active
Cellular IoT Discovery kit powered by STM32L4 and ST4SIM
STM32 Discovery Kits
STB-L462E-CELL1
Description:
Cellular IoT Discovery kit powered by STM32L4 and ST4SIMNUCLEO-WB15CC
Active
STM32 Nucleo-64 development board with STM32WB15CC, supports Arduino, ST Morpho connectivity
STM32 Nucleo Boards
STNUCLEO-WB15CC
Description:
STM32 Nucleo-64 development board with STM32WB15CC, supports Arduino, ST Morpho connectivity -
Software Development Tools
Part number
Status
Description
Type
Supplier
STM32CubeMX
Active
STM32Cube initialization code generator
STM32 Configurators and Code Generators
STSTM32CubeMX
Description:
STM32Cube initialization code generator -
Trainings
Part number
Status
Description
Type
Supplier
Percepio Advanced RTOS Techniques
Active
Percepio RTOS Training offers courses in embedded development with a real-time operating system, featuring embedded consultant Jacob Beningo.
Trainings
PercepioPercepio Advanced RTOS Techniques
Description:
Percepio RTOS Training offers courses in embedded development with a real-time operating system, featuring embedded consultant Jacob Beningo.Percepio RTOS Fundamentals
Active
Percepio RTOS Training offers courses in embedded development with a real-time operating system, featuring embedded consultant Jacob Beningo.
Trainings
PercepioPercepio RTOS Fundamentals
Description:
Percepio RTOS Training offers courses in embedded development with a real-time operating system, featuring embedded consultant Jacob Beningo.
1 STM32CubeIDE purpose[edit]
STM32CubeIDE is an advanced C/C++ development platform with peripheral configuration, code generation, code compilation, and debug features for STM32 microcontrollers and microprocessors. It is based on the Eclipse/CDT framework, GCC toolchain for the development and GDB for the debugging.
It allows the integration of the hundreds of existing plugins that complete the features of the EclipseIDE. STM32CubeIDE integrates all STM32CubeMX functionalities to offer all-in-one tool experience, and save installation and development time.
With STM32CubeIDE, you can
- select the appropriate STM32 device corresponding to your needs
- configure the device using STM32CubeMX
- develop and debug applications on top of ArmCortex-M
3 Software architecture overview[edit]
The STM32CubeMP1 Package is based on the STM32Cube MCU package but has been adapted to a Linux Framework (OpenSTLinux).
STM32CubeMP1 Package introduces new components such as OpenAMP and RessourceManager that allow easy communication and ressource sharing between main processors running with Linux on Cortex A, and MCU coprocessors running on Cortex M.
-
- OpenAMP is a library implementing the remote processor service framework (RPMsg) which is a virtio-based messaging bus that allows a local processor to communicate with remote processors available on the system.
- ResourceManager is a utility that handles peripheral-accessibility requests and system-resource configuration.
|
Note:
Please refer to Coprocessor_management_overview for further information related to coprocessor management |
The figure below gives an overview of the STM32CubeMP1_architecture.
|
Note:
Please refer to STM32CubeMP1 Package versus legacy STM32Cube MCU Package for further information on differences between STM32CubeMP1 Package and STM32Cube MCU Package |
Похожие записи:
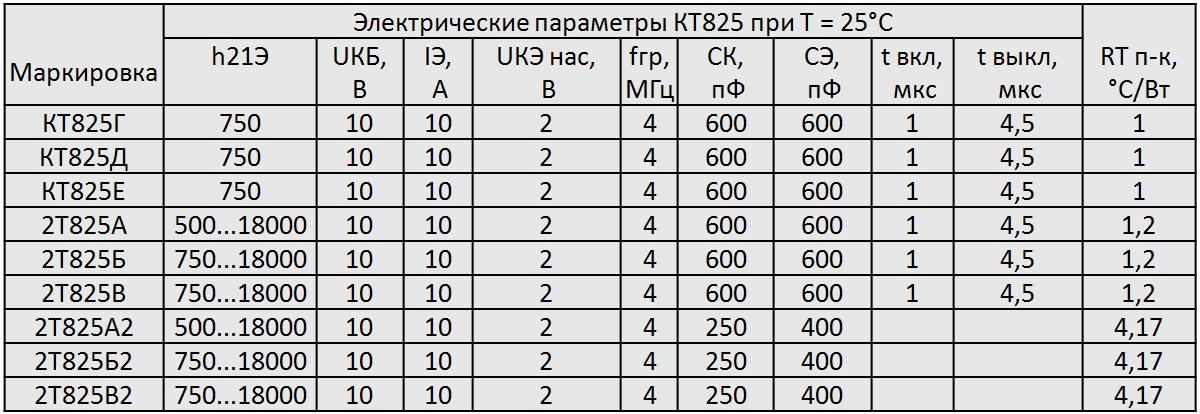 Транзистор кт814 аналоги советские
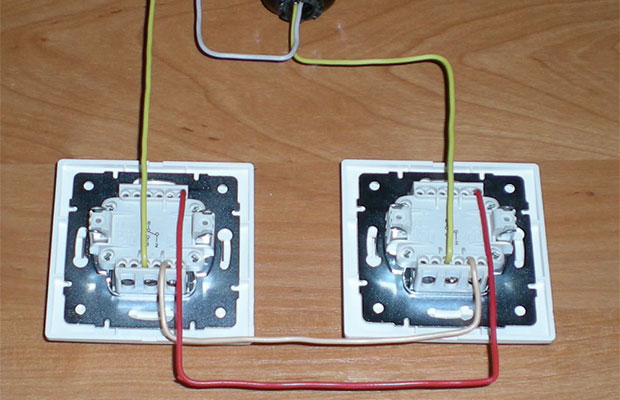 Схема подключения выключателя света, подробная пошаговая инструкция
 Геотермальные электростанции: плюсы и минусы выработки электроэнергии геотэс
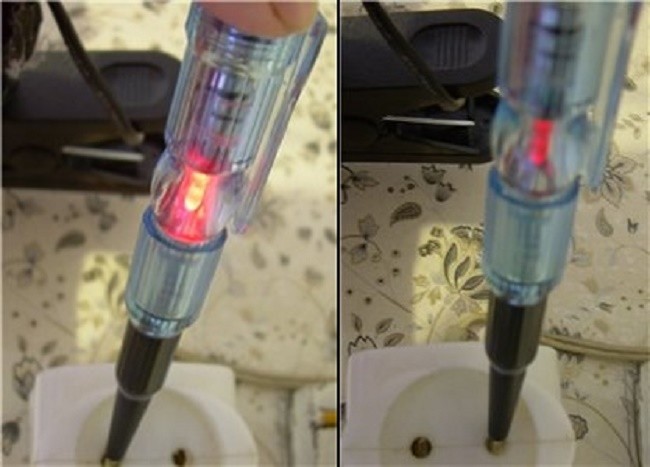 Индикаторная отвёртка для проверки напряжения
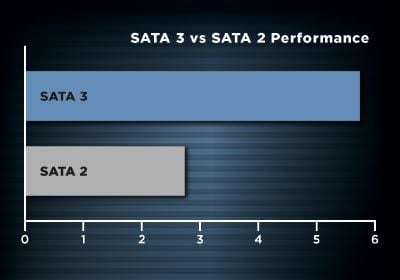 Как подключить жёсткий диск к компьютеру
 Какой кабель нужен для подключения дома к электросети на 15 квт