Getting the Right Library
Since I randomly picked this particular model, I had to find out the hard way that things do not seem all that easy, since it’s not compatible with the Arduino “Ethernet” library that comes with your Arduino IDE. And then I’m not even mentioning the lack of good info to determine what pins are to be used, so I had to figure that out by myself.
In the next paragraphs you’ll find my experiences with three Arduino libraries. They all work great!
is great for projects that require “print” to be fully implemented and need to be a drop-in replacement for the standard “Ethernet” library. is great for it’s simplicity and small size, but comes with limitations. seems best for very advanced users, but I’m sure UIPEthernet can match it’s capabilities.
I’ve included a “Hello World!” example for all three, which could use some optimizing, where the “Hello World!” message can be viewed in your webbrowser.
Before we begin: Libraries and Pins
We will aways need power so we will always need GND and +3.3V or +5V pin. For my eBay module I had to use the +5V (it has a voltage regulator onboard to handle that), as the 3.3V pin didn’t seem to work.
Below a table, based on a Arduino Uno, Arduino Nano and my eBay Ethernet module, with the needed pins for the three libraries I tested.
As you can see, all of them use the standard SPI pins 10, 11, 12 and 13. Except Ethercard, that seems to use pin 8 for SS, instead of the “standard” pin 10.
| Pin name | ETHER_28J60 | Ethercard | UIPEthernet | My eBay Module |
|---|---|---|---|---|
| SS | 10 | 8 (!) | 10 | 10 |
| MOSI (SI) | 11 | 11 | 11 | 11 |
| MISO (SO) | 12 | 12 | 12 | 12 |
| SCK | 13 | 13 | 13 | 13 |
The Ethernet Controller (ENC28J60) is a so called SPI device and uses the SPI pins (10, 11, 12, 13) of your Arduino.
SS stands for Slave Select, used to enable or disable the slave device (the Ethernet module in this case).MOSI stands for Master Output Slave Input, or in other words: Arduino OUTPUT (data from Arduino to Ethernet Controller).MISO stands for the opposite, Master Input Slave Output, or: Arduino INPUT (data from Ethernet Controller to Arduino).SCK is the clock used for SPI timing.
The pins described here will have the “Pin name” usually printed on your Ethernet Module. My eBay module however is fully geared towards the Arduino Nano that came with it and has NO SUCH PIN NAMES for the Ethernet controller, just the pin names of the Arduino pins. Hence the extra column for those who buy the same Ethernet Module, showing the pin number.
To illustrate this, below an illustration of the “Nano Ethernet Shield” by “Deek-Robot” that I purchased from eBay.
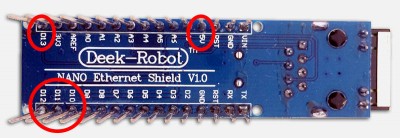
My eBay Ethernet module (Deek Robot Nano Ethershield)
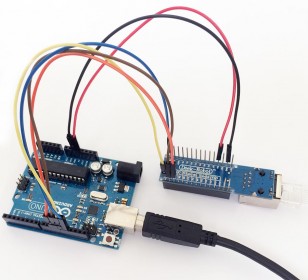
My Arduino with ENC28J60 – A wiring example
Шилды Ethernet Shield для Arduino Uno или Nano
Наиболее удобным способом работы с W5100 является использование готовых шилдов Ethernet Shield для Arduino Uno или Nano. На таких модулях уже выполнены все необходимые обвязки, шилд просто вставляется в соответствующие разъемы платы и вам остается только загрузить скетч. Естественно, что при желании к плате могут быть подключены и другие устройства.
Arduino Ethernet Shield
Подключение платы расширения происходит через соединение RJ-45. Плата обладает встроенным слотом SD/MicroSD , который используется для хранения файлов, используемых для подключения и передачи по локальной сети. Такой слот совместим со всеми платами Arduino/Genuino, т.е. работать с данными на карте можно с помощью стандартной библиотеки SD Library. На плате расширения также можно найти кнопку перезагрузки . питания. Ранние версии платы расширения не дружили с ардуино мега, там требовался ручной сброс после поступления питания.
Если плата оснащена POE модулем (питание подается по витой паре), то шилд будет соответствовать следующим спецификациям:
- Совместим со стандартом IEEE3af.
- Имеет низкие пульсации на выходе.
- Защищает от явлений перегрузки и короткого замыкания.
- Эффективно преобразует напряжение.
- Имеет изоляцию 1500 вольт на точке между «вход-выход»
По умолчанию плата не комплектуется данным модулем, нужно находить соответствующую модель.
Назначение светодиодов Ethernet Shield:
- PWR показывает наличие питания на плате.
- LINK светится при наличии сети и мигает при передаче/приеме данных.
- FULLD обозначает сетевое полнодуплексное соединение.
- 100M обозначает сетевое соединение со скоростью 10мбит/сек.
- RX мигает при приеме экраном данных.
- TX мигает при отправке данных экраном.
- COLL мигает при обнаружении сетевых конфликтов.
Кроме этих имеются еще пара светодиодов на гнезде rj 45, один из которых при подключенном шнуре светится, а другой мерцает при поступлении данных.
Ehternet для Arduino Nano
Отдельного упоминания заслуживает модуль Arduino Nano Ethernet. Он выполнен в формфакторе, облегчающим подключение к плате Nano v 3.0, но обладает практически такими же возможностями, что и “обычный” вариант для Uno. В основе шилда лежит микросхема ENC28J60.
Шилд Ethernet Arduino Nano Shield
Модуль точно так же имеет разъем RJ-45, слот для SD и в некоторых модификациях тоже оснащен PoE контроллером.
Как подключить модуль Ethernet к Arduino
Подключение модулей w5100 к ардуино осуществляется через SPI. При наличии некоторого опыта работы c платформой никаких трудностей это вызвать не должно. В самом простом случае нужно просто “надеть” плату шилда, вставив в соответствующие разъемы платы Uno или Nano. В случае использования отдельного модуля подключить w5100 к ардуино можно через стандартные SPI-выводы.
Нужно помнить, что в Arduino Uno для SPI выделены пины 11, 12, 13. В Arduino Mega – 50, 51, 52. На шилде для Uno SS сигнал связан с 10 пином. На плате Mega за SS отвечает пин 53, но он не используется. Не смотря на этой, вам нужно обязательно установить его в режим OUTPUT с помощью функции pinMode.
Распиновка шилда с описанием элементов платы для Arduino Uno представлена на следующем рисунке.
Схема шилда Arduino Ethernet Shield
После подключения внешнего модуля к арудино нужно будет подключить его к уже существующей сетевой инфраструктуре через витую пару с RJ45 разъемом. Причем подключать можно и к WiFi роутеру, что позволяет вашему проекту выходить на связь в беспроводном режиме (провод от ардуино до роутера все равно понадобится).
Выполнив физическое подключение, останется сделать только последний, но самый сложный и важный шаг. Нужно написать и загрузить в плату соответствующий скетч, который превратит плату в сервер, отвечающий на запросы удаленных устройств или в клиента, собирающего данные с серверов или отправляющего на них данные.
Arduino Library: UIPEthernet
After testing the previous two libraries, I ran into UIPEthernet, at this moment my absolute favorite.
You might see the example code below as more complicated, but that is mainly me to blame. I modified and existing example to make a quick “Hello World” for you.
Pros:
This library is a fully compatible drop-in replacement for the standard Ethernet Library found in your Arduino IDE, which makes it easy to adapt existing examples for use with either the Arduino Ethernet shield for use with the ENC28J60 Ethernet shield. One simply changes the two include lines (“ ” and “ “) in standard Ethernet examples to just one include line ““.
This library also has a complete implementation of the “print” function that works the same as the “print” function for “Serial”, keeping code simple and very easy to use.
Advanced features are available if needed, so “pro” Arduino users might enjoy this library as well.
Download:
UIPEthernet can be found on GitHub, is mentioned on the Arduino website, and optionally you can be downloaded from Tweaking4All.
I recommend getting the latest version from Github.
Download — UIPEthernet
| Filename: | arduino-uip.zip |
| Platform: | Undefined |
| Version: | 1.01 |
| File size: | 102 kB |
| Date: | 2014-03-23 |
|
Download Now Send me a cup of Coffee |
| 12345678910111213141516171819202122232425262728293031323334353637383940414243444546474849505152535455565758596061626364 |
#include <UIPEthernet.h> // Used for Ethernet// **** ETHERNET SETTING **** byte mac = { 0x54, 0x34, 0x41, 0x30, 0x30, 0x31 }; IPAddress ip(192, 168, 1, 179); EthernetServer server(80);void setup() { Serial.begin(9600); // start the Ethernet connection and the server: Ethernet.begin(mac, ip); server.begin(); Serial.print(«IP Address: «); Serial.println(Ethernet.localIP());}void loop() { // listen for incoming clients EthernetClient client = server.available(); if (client) { Serial.println(«-> New Connection»); // an http request ends with a blank line boolean currentLineIsBlank = true; while (client.connected()) { if (client.available()) { char c = client.read(); // if you’ve gotten to the end of the line (received a newline // character) and the line is blank, the http request has ended, // so you can send a reply if (c == ‘\n’ && currentLineIsBlank) { client.println(«<html><title>Hello World!</title><body><h3>Hello World!</h3></body>»); break; } if (c == ‘\n’) { // you’re starting a new line currentLineIsBlank = true; } else if (c != ‘\r’) { // you’ve gotten a character on the current line currentLineIsBlank = false; } } } // give the web browser time to receive the data delay(10); // close the connection: client.stop(); Serial.println(» Disconnected\n»); }} |
Arduino Library: EtherCard
This library seems a very well respected in the Arduino community and with good reason. It seems one of the most complete implementations out there.
The code below might look a little bit more complicated, but that’s mainly because of the added HTML.
CAUTION: Ethercard seems to use pin 8 instead of pin 10!
Pros:
Definitely a big plus for this library is that complex tasks like DHCP and such are easy to use, and offers easy accessible advanced features. Definitely excellent for the pro Arduino users.
Cons:
A big downside (again) is the lack of a simple to use “print” function to sent data, and I’m fully aware that me bitching about it is based on my own limited experience with working with strings and char arrays etc., but I can imagine that I’m not the only one.
Ethercard is, like UIPEthernet, not the smallest library.
Download:
EtherCard can be found at GitHub and on their project page or you can download it from Tweaking4All.
Again: I recommend getting the latest and greatest version from Github.
Download — Ethercard
| Filename: | ethercard.zip |
| Platform: | Undefined |
| Version: | |
| File size: | 116.3 kB |
| Date: | 2017-02-25 |
|
Download Now Send me a cup of Coffee |
Note: Source has been updated to accommodate the newer Arduine IDE version (line 10, added “const”).
| 12345678910111213141516171819202122232425262728293031323334353637383940414243 |
#include <EtherCard.h>// Ethernet IP, default gateway and MAC addressesstatic byte myip = { 192,168,1,200 };static byte gwip = { 192,168,1,1 };static byte mymac = { 0x74,0x69,0x69,0x2D,0x30,0x31 }; byte Ethernet::buffer500; // tcp/ip send and receive bufferconst char page PROGMEM =»HTTP/1.0 503 Service Unavailable\r\n»»Content-Type: text/html\r\n»»Retry-After: 600\r\n»»\r\n»»<html>» «<head><title>» «Hello World!» «</title></head>» «<body>» «<h3>Hello World! This is your Arduino speaking!</h3>» «</body>»»</html>»;void setup(){ Serial.begin(57600); Serial.println(«\n»); if (ether.begin(sizeof Ethernet::buffer, mymac) == ) Serial.println( «Failed to access Ethernet controller»); ether.staticSetup(myip, gwip); ether.printIp(«IP: «, ether.myip); ether.printIp(«GW: «, ether.gwip); ether.printIp(«DNS: «, ether.dnsip); }void loop(){ // wait for an incoming TCP packet, but ignore its contents if (ether.packetLoop(ether.packetReceive())) { memcpy_P(ether.tcpOffset(), page, sizeof page); ether.httpServerReply(sizeof page — 1); }} |
Модули Ethernet для Arduino
Подключить плату arduino к интернету можно несколькими способами. Беспроводное подключение прекрасно организуется с использованием платформ ESP8266 или ESP32. Можно использовать Lora модули с соответствующими WiFi-шлюзами. Но самым помехоустойчивым и “традиционным” является старый добрый Ethernet. Используя обычный RJ45 разъем и витую пару вы сможете объединить вашу плату с другим сетевым оборудованием, будь то роутер, маршрутизатор или тот же WiFi модем. Преимущества Ethernet-подключения – скорость, стабильность, бОльшая защищенность от помех. Недостатки очевидны – оборудование привязывается проводом, причем в условиях реальной эксплуатации качество этого провода должно быть высоким.
Плата расширения Arduino Ethrnet Shield
Наиболее популярные Ethernet модули для ардуино сегодня выпускаются на основе микросхемы wiznet w5100, которая способна поддерживать обмен данными с постоянной скоростью в 100 Мбит/сек. Для устройств на базе w5100 написаны готовые библиотеки, данная архитектура является простой и идеально подойдет начинающим любителям электроники, которые могут использовать как стартовую площадку для последующих проектов.
Ключевые характеристики модулей на базе W5100:
- Рабочее напряжение – 5 Вольт, подходит питание с платы Arduino.
- Внутренний буфер 16 Кб.
- Скорость соединения достигает значения в 10/100 Мбит/сек.
- Связь с платой ардуино осуществляется посредством порта SPI.
- W5100 поддерживает TCP и UDP.
Варианты модулей на базе других микросхем:
- Модуль на базе Wiznet W5500. Имеет меньшие размеры, меньше греется, имеет большую мощность.
- Модуль на базе enc28j60. Это гораздо более бюджетный вариант, дешевле W5100, но и потенциальных проблем с ним может возникнуть больше.
Как работает Ethernet
Подразумевается, что для проектов, связанных с подключением Arduino к сети вы должны обладать хотя бы общими знаниями в области сетевых технологий. Сегодня можно без труда найти соответствующие материалы в интернете. Хотя мы не ставим себе целью написать учебник по Ethernet, но общие сведения могут оказаться полезными.
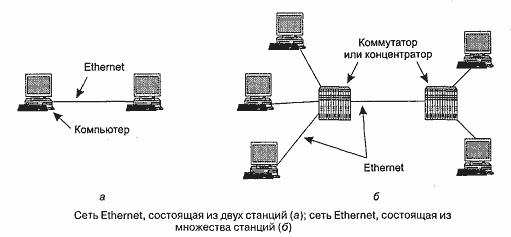
Сегодня Ethernet – ключевая и наиболее распространенная наряду с WiFi технология организации локальных сетей. В стандартной модели OSI она находится на канальном и физическом уровне, определяя подуровни управления доступом к среде и управления логическим каналом. Создателем Ethernet стала компания Xerox, ее инженер Роберт Метклаф создал технологию как инструмент подключения многих компьютеров к общим ресурсам в локальной сети. Официальным стандартом технология стала в 1982 году после появления спецификации IEEE802.3.
Сегодня существует несколько вариантов и модификаций Ethernet, отличающихся скоростными характеристиками и способом организации физического канала:
- Ethernet. Скорость до 10Mb/s. Любые типы проводов (коаксиал, витая пара, оптоволокно).
- Fast Ethernet. Скорость до 100Mb/s. Только витая пара или оптика.
- Gigabit Ethernet. Скорость до 1Gb/s. . Только витая пара и оптика.
- 10G Ethernet. Скорость до 10Gb/s. Естественно, тоже без коаксиала.
Существует еще с десяток различных групп и подгрупп стандарта, в этой статье мы не будем рассматривать их все.
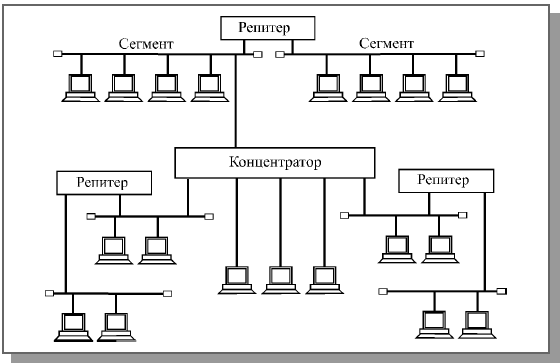
Возможная схема Ethernet-сети
С практической точки зрения работа с Ethernet выглядит как возможность соединить определенным образом конечное оборудование с ближайшей точкой, имеющей выход в другие сегменты сети. Чаще всего это роутер или маршрутизатор с доступом в интернет или к другим ресурсам локальной сети.
Если вы начинаете проект с Ethernet, то вам нужно будет понимать следующие базовые понятия, имеющие отношение к этой технологии:
- Кабель. Как правило, это витая пара, реже – оптоволокно (ее подключить к арудино простым способом не получится).
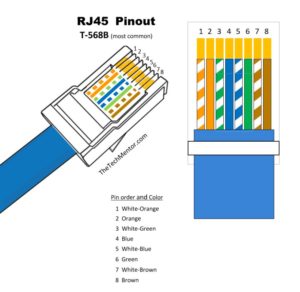
- Разъемом для подключения кабеля – RJ-45. На самом деле, стандарт для штекеров носит совсем другое название (8P8C), но “в народе” принято называть стандартный Ethernet разъем именно как RJ45. Следует отметить, что есть и другие стандарты – RJ-25, RJ-14 и т.п. Для подключения к ардуино через стандартные модули они не подойдут.
- Сетевой Ethernet MAC-адрес. Это уникальный шестибайтовый идентификатор устройства в сети, который обычно прошивается в само устройство, но в некоторых случаях может быть изменен программно. Всего может быть задано 2 в 48 степени адресов, это триллионы разных вариантов (точнее, 281 474 976 710 656), так что пока их с головой хватает для создания действительно уникальных идентификаторов.
В подавляющем большинстве задач проект с Ардуино будет подключен к уже существующей Ethernet сети через стандартное оборудование. Т.е. вы просто берете модуль Ethernet, подключаете его к Ардуино, а затем вставляете сетевой кабель в этот самый модуль. Все, что вам понадобится – правильно настроить в своем скетче ваш MAC адрес (его можно менять!) и прописать IP адрес устройств, к которым вы будете подключаться. Мы рассмотрим пример в разделе, посвященным программированию.
Arduino and ENC28J60 Ethernet Controller
The number “ENC28J60” actually only refers to a chip developed by Microchip. This chip has 28 pins and contains a complete stand alone Ethernet controller for a 10BASE-T network connection with an SPI interface so microcontrollers like the Arduino can “talk” to it.
10BASE-T is the same connector you’ll find on your computer (if it has one) to connect with a wire to a network, where “10” indicates a maximum speed of 10 Mbit/sec. That might sound slow, but if you consider that it’s being used by devices like the Arduino, then you can’t really expect massive data loads anyway. I’ve found it to be very responsive.
ENC28J60 – No longer recommended …
After several years of experience with the ENC28J60, I have to say that I can no longer recommend this Ethernet Shield for any Arduino project.
Unfortunately, the card comes with it’s issues, especially when it comes to stability.
If you’re looking for a good Ethernet Controller for your Arduino projects – please consider using a W5100 or W5500 ethernet shield (you can find some here – EU, US).
Or if you want a cheap, small, yet much faster Arduino compatible microcontroller and WiFi is an option, then please consider getting an ESP8266 (EU, US) or ESP32 (EU, US).
Selecting the right Ethernet Controller …
The standard Arduino Ethernet Shield uses a all-in-one Ethernet Controller as well, and the proper libraries are included with your Arduino IDE. The used controller however is a Wiznet W5100!
In this article we focus on modules based on the MicroChip ENC28J60!Which is NOT the same as the W5100 and is NOT compatible with it either, so other libraries will be needed.
For those in need of making cables for this, please read our “How to make your own network cables” article.
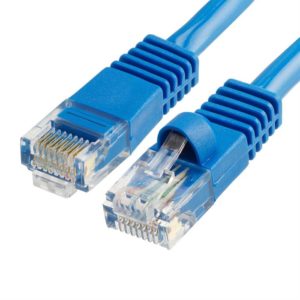
10BASE-T uses RJ45 Connectors
Choosing your ENC28J60 board
When looking for one, you’ll find that there are numerous variations available, and they pretty much all work the same, just the board and pins look different for specific purposes. The only thing that can be tricky is finding the right pins for the right library. Illustration below: Just two of many variations of the ENC28J60 modules.
I found mine at eBay for $18 which came with an Arduino Nano (left in the picture – Nano not displayed), which works just fine with, for example, an Arduino Uno as well. The connectors however are geared towards mounting an Arduino Nano of course.
My main reasons to pick this one (besides being totally unaware, at the time, that this is not the same as the Arduino Ethernet shield) were: Price, came with a Nano and size. The module and Nano combined make this thing VERY compact. Including the Arduino Nano (clone) the setup would be app 6.7 cm (~2.6″) long, 1.7 cm (~0.7″) wide, and 1.7 cm (~0.7″) tall – depending on how you use the pins at the bottom and how you mount your Nano of course. You can choose the top connectors or bottom pins (breadboard) while experimenting, but you could consider cutting off the bottom pins for your final product.
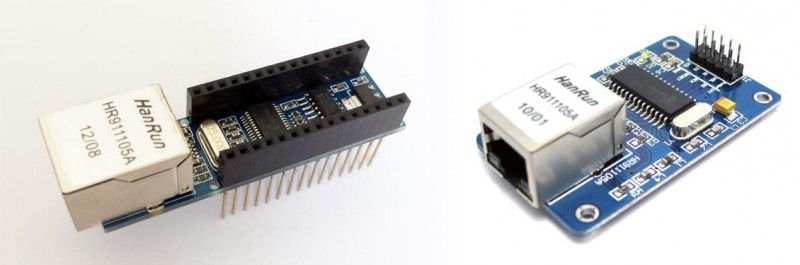
ENC28J60 – Two examples of variations
Arduino Library: ETHER_28J60 and EtherShield
Caution – No longer maintained!
Just a heads-up that you may run into issues with this library. The developer stopped maintaining it.
This is the first library I found, which works great for basic purposes, but I quickly ran into the limitations of the build-in print function. Another problem is that after some digging I found that the development either has stopped development or has been very slow in the past year, which is too bad, because of the (initial) simplicity of this library.
Note that you will need both libraries to make this work!
Pros:
Below the simplicity of ETHER_28J60 … seriously: could it be any easier?
The library is also very compact, so it will save memory on your Arduino, compared to the other two libraries.
Cons:
Downside however is that this library is not compatible with the Ethernet Library code that comes with your Arduino IDE, so it’s not a drop-in replacement.
The other downside I ran into was the severely limited “print” function, when it comes to passing for example a String.
My knowledge and experience with normal C-strings is somewhat limited when functions like and are not there or only partially implemented (limitation of the standard Arduino library).
As development seems to have stopped, I doubt we will see a properly implemented “print” function (unless someone forks it at Github).
Download:
ETHER_28J60 and Ether shield can be downloaded from Github or you can download it from Tweaking4All.
As always: I recommend getting the latest version from Github, although I have little hope that there will be a newer version in the near future.
Download — ETHER_28J60 and Ethershield
| Filename: | ETHER-28J60-and-Ethershield.zip |
| Platform: | Undefined |
| Version: | |
| File size: | 24.1 kB |
| Date: | 2014-03-23 |
|
Download Now Send me a cup of Coffee |
| 1234567891011121314151617181920212223242526 |
// A simple web server that always just says «Hello World»#include «etherShield.h»#include «ETHER_28J60.h»// Define MAC address and IP address — both should be unique in your networkstatic uint8_t mac6 = {0x54, 0x55, 0x58, 0x10, 0x00, 0x24}; static uint8_t ip4 = {192, 168, 1, 15}; static uint16_t port = 80; // Use port 80 — the standard for HTTP ETHER_28J60 ethernet;void setup(){ ethernet.setup(mac, ip, port);}void loop(){ if (ethernet.serviceRequest()) { ethernet.print(«<H1>Hello World</H1>»); ethernet.respond(); } delay(100);} |
Выводы
В данной статье была рассмотрена возможность управления платой Arduino через интернет посредством Etherent модуля на базе w5100. Как мы убедились, подключение модуля и программирование скетча не представляет существенной сложности. Главное, это правильно определиться со структурой проекта, определить, что будет являться сервером, а что клиентом, как будет осуществлено подключение к интернету.
Самый удобный и быстрый способ подключения модуля – использовать готовый Ethernet Shield для Arduino Uno или Nano. Подключение осуществляется через интерфейс SPI, который есть в любых платах платформы. Взяв за основу уже готовые библиотеки и скетчи из примеров Arduino IDE можно создать приложение любой сложности. Но для этого вам обязательно понадобятся навыки программирования и понимания принципов работы существующих сетевых протоколов. Будем надеяться, что наша статья помогла вам сделать первый шаг.