How To Make A Design On Eagle Software
4.1 Making a PCB design using the eagle software
A printed circuit board, commonly known as a PCB, is a board made up of some electrical components connected with the use of conductive electrical tracks.

PCBs are appropriate to use especially when you want to avoid some problems, noise, and distortion. To go commercial, you would need to use a proper circuit board that works effectively.
Here, you will learn how to design a PCB using the Eagle software. You can achieve this even in the comfort of your home. It is a step-by-step process that is easy to follow.
The following is what you should keep in mind during this process:
- Making the schematic of the design to use in the PCB.
- Drawing the layout for the Printed Circuit Board.
- Finally, making the board. This process has different ways to achieve.
In actualizing the procedure, you will use what is known as a CAD tool for making the design schematic to use in the PCB. Drawing the layout for the PCB will also require the CAD tool.
The Eagle PCB design software is available in three:
- Eagle free.
- Standard.
- Eagle premium.
As you may already be aware, it is a freeware version that is not paid for. Eagle can use it to capture schematics and the layout of the Printed Circuit Board.
The eagle standard and premium version have more features in addition to the standard freeware version. These features include added schematic sheets together with more signal layers and board area.
Now getting to how to use the Eagle PCB design software, you will run it and get to the. You will thereafter click on the file and select a new project on which you will now work on.
You can then rename the project by the name that you choose to and get to work.
Right-click on the project and create a new schematic. This is the first step to achieving your design. A new schematic window appears with a blank space for working. Here you can draw schematics for the design you choose.
4.2 Designing a schematic
With a schematic editor, you will be able to design your schematic for the PCB. You then need to add components to your schematic. This you can do by adding an option from the toolbar. When you do this, a new window appears.
The window opens with the new components that you can then choose from to add to your schematic. Instead of adding the IC directly, you can choose to add a component like Op-Amp, an 8 pin DIP.
After you have selected the component, which is an 8 pin DIP, you can now click on okay and place the component in the schematic sheet. You will click on the sheet once to position the component, and an optional right-click to rotate.
Thereafter you can click on the etc. Key so that you can go back to the component selection window. To complete the circuit.
You need to add the other components which include the following:
- A quarter-watt resistor.
- A small buzzer.
- A square type POT.
- A thermistor.
- A two-pin screw terminal.
- The +5 and GND symbols from the supplying library.
After you have placed all the components together, you need to rename them and mention their values. It would help if you named them in a manner that software can easily understand them.
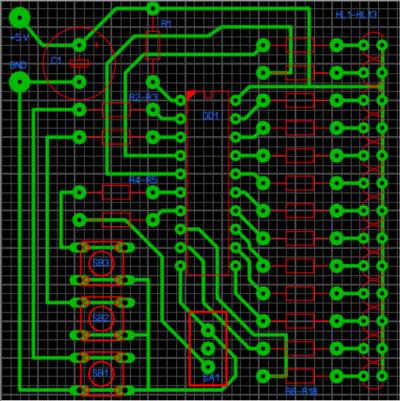
The procedure that follows is using the net option from the side toolbar to make the connections. After you have made all the connections, the final schematic looks like the one below:
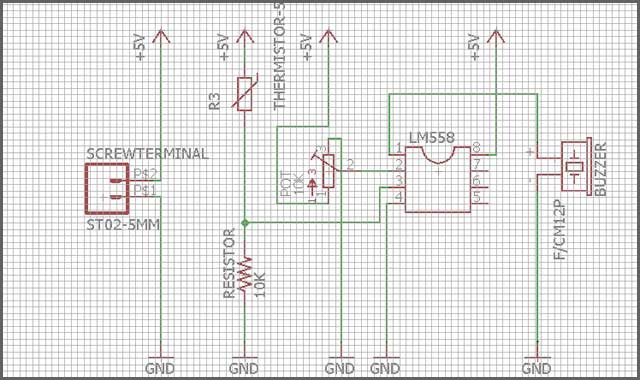
After you are done with the schematic, you can then proceed to design the PCB layout. You will do this using the PCB layout editor.
4.3 Generating PCB Gerber files
Gerber files are standard files that are used by Printed Circuit Boards (PCB). They describe the PCB images and are usually inside a .rar or .zip archive. Gerber files are used in the manufacturing process.
In the manufacture of PCB’s, the Gerber files are required in RS-27 4x format and can be generated by the use of some popular programs such as the following:
- Diptrace.
- Eagle.
- Circuit maker.
- Proteus.
- KiCad.
- Design Spark.
- PCBE.
Our main focus here is the eagle PCB software
And thus, we will look at how you can create Gerber files using this particular program. You can learn this through https://www.wellpcb.com/news/combining-multiple-eagle-pcbs-one.html.
The process of generating files in eagle is quite direct and straightforward. It is a straightforward process that doesn’t require much hustle and is easy to follow to the end. Other design software may be a bit harder to use as compared to the eagle.
In this process, open your design in, and here you find the CAM icon, which further brings the CAM processor. In the new window, you need to open the CAM file by going to the file-open-job option, where you can locate the correct CAM file for your boards.
You should make sure that you are using the seed CAM file. You should then check by the use of the online Gerber viewer just before you confirm your order.
Recommendations from Eagle for File Locations
The default location for libraries which are created when installing Eagle, can be found when clicking on Options→Directories. On OSX, this is in $EAGLEDIR/lbr, where $EAGLEDIR represents the application installation directory from Eagle. Eagle recommends to keep this directory unchanged, as software updates may overwrite files in this folder.
Your own libraries should therefore be at another location. A suitable one would be in a subfolder within your Eagle projects folder like the following structure:
-
$Home/Backup/eagle/
-
eagle_custom_libraries
- dev_mylibrary1
- dev_mylibrary2
-
eagle_projects
- Arduino
- PowerSupply
- etc.
-
eagle_custom_libraries
In order to make Eagle aware of the main custom libraries folder, just add the directory in Options→Directories. Any subfolders within this folder will be automatically used as well. For example:
$EAGLEDIR/lbr:$HOME/Backup/eagle/eagle_custom_libraries
While configuring the libraries folder, one could do something similar for the projects folder:
$HOME/Backup/eagle/eagle_projects:$EAGLEDIR/projects/examples
If none of the libraries appear when adding a part, verify in the control panel at Libraries if the default libraries are enabled. To do this, in the control panel right click on a library and if not enabled, select Use.
Функции
EAGLE содержит редактор схем для создания принципиальных схем . Схемы хранятся в файлах с расширением .SCH, детали определены в библиотеках устройств с расширением .LBR. Детали можно размещать на многих листах и соединять вместе через порты.
В PCB редактор макета хранит абордаж файлы с расширением .brd. Это позволяет добавлять аннотации к схеме и автоматическую маршрутизацию для автоматического соединения трасс на основе соединений, определенных в схеме.
EAGLE сохраняет файлы макетов Gerber и PostScript, а также файлы сверления Excellon и Sieb & Meyer . Это стандартные форматы файлов, принятые компаниями, производящими печатные платы , но, учитывая типичную пользовательскую базу EAGLE, состоящую из небольших дизайнерских фирм и любителей, многие изготовители печатных плат и сборочные цеха также принимают файлы плат EAGLE (с расширением .BRD) напрямую для экспорта оптимизированных производственных файлов и подборки. и размещать сами данные.
EAGLE предоставляет многооконный графический интерфейс пользователя и систему меню для редактирования, управления проектами и настройки интерфейса и параметров дизайна. Системой можно управлять с помощью мыши, горячих клавиш клавиатуры или путем ввода определенных команд во встроенной командной строке . Горячие клавиши клавиатуры могут быть определены пользователем. Несколько повторяющихся команд можно объединить в файлы сценариев (с расширением файла .SCR). Также возможно исследовать файлы проекта, используя объектно-ориентированный язык программирования, специфичный для EAGLE (с расширением .ULP).
Libraries within Eagle
In the Control Panel within Eagle, library folders contain files with IC manufacturers, group of generic components or group of specific symbols (Like ground, power supply and drawing frames). Eagle treats each of these files as a library, containing devices or device sets. If a library is available in Eagle and opened one will observe that a selected device or device set has primarily three entities:
- Device: The real component, residing in a specific package with a specific symbol.
- Package: Footprint in the layout
- Symbol: Drawing in the schematic
Each of these entities characterize a specific aspect of a component or component breed. The image below shows a selected library with the 555 timer IC component breed (Or in the Eagle jargon called device set).
| Library example with the 555 timer IC, residing in the library from linear and is defined in eight different devices, each having different characteristics |
Design process
Before the practical designing can be done, consideration should be made for a naming scheme. A consistent nomenclature will keep custom libraries in a healthy state.
Nomenclature
A consistent naming scheme can be best explained with the following example:
| Library Folder | → | Library | → | Device(s) or device set(s) |
|---|---|---|---|---|
| $HOME/Backup/eagle/eagle_custom_libraries | → | dev_marc.lbr | → | …, *555, NE5534, LM385, … |
If we now look closer to the *555, we can draw the following scheme:
| Symbol | ← | Device set | → | Device | Package |
|---|---|---|---|---|---|
| ← | *555 | → | LM555D LM555N NE555D |
SO08 DIL08 SO08 |
On the left side from the device set, we see a symbol from the timer IC. On the right side we see a list with devices and their packages. For each device within a device set, Eagle designates a different package to a separate device.
The placeholder ‘*’ is not ideal because it also refers to devices which contain the number 555 but are not timer ICs. A better example can be made for example with an LM385 voltage reference diode:
| Library Folder | → | Library | → | Device(s) or device set(s) |
|---|---|---|---|---|
| $HOME/Backup/eagle/eagle_custom_libraries | → | dev_marc.lbr | → | …, *555, NE5534, LM385, … |
If we now look closer to the data sheet of the LM385 or adjustable (LM385-adj), we see it contains one symbol with 3 pins and another with 8 pins, depending on the kind of package. With that information we draw the following scheme:
| Symbol | ← | Device set | → | Device | Package |
|---|---|---|---|---|---|
| LM385 | |||||
| ← | → | LM385AYZ-2.5 LM385BXM-2.5 LM385M3-2.5 |
TO-92 SO-8 SOT-23 |
||
| ← | → | LM385BXZ LM385BYZ LM385BZ LM385Z LM385M LM385BM |
TO-92 TO-92 TO-92 TO-92 SO-8 SO-8 |
CadSoft EAGLE Pro 9.6.8 Crack + License Key [Latest] 2021
CadSoft Eagle Pro 9.6.8 Crack Keygen has been providing with the needed tools and a full toolbox, because of which we can surely prepare logic diagrams of PCBs. When creating PCBs, you’ll be ready to check on the option of signals and receive trail widths. The completed PCB will hold in the TIFF, XBM, XPM, CSV, HTML, SCH, BMP, PNG, PBM, PGM, PPM, and TXT data. The really big thing about the CadSoft Eagle program can be a natural interface. In this application, you will see ready-made pictures, blocks, and other essential mattress sheets with photos. Inside the free version, we can make graphs with a limited number of bed linens and signal levels. To run this application, you must sign in or set up a new special consideration on the Autodesk manufacturer’s website.
CadSoft Eagle 2021 Pro Crack Full Version
Cadsoft Eagle 9.6.8 Crack also a train windows utility built especially for serving you to design printed circuit boards. It can also help an easy and straight forward interface. It provides the user with the possibility to create a new project by using the institution as well as a schematic board and text editor too. Furthermore, the board editor also appears together with a full range of dedicated devices. That enabled users to draw arcs as well as circles polygons and square and insert wires and show or store the layers too.
Key Features:
- It secures your boards are ready to make.
- The modular design looks.
- CadSoft Eagle has a full high-speed design.
- PCB layout software for all engineers.
- Also, unite your PCB and enclosure seamlessly.
- Furthermore, check the Electrical rate.
- Reduce problems about parts availability.
- It is also an amazing real-time design for synchronization.
- CadSoft Eagle has intuitive alignment tools.
- They also have the Multi-sheet option schematics.
Activation Key:
76H89-H6G86-F75D6-67897-B8V67
68F57-5D64D-5F7G7-898H7-8V6C7
897BV-7C456-7V889-NBV65-B889B
67H8B-6V5C7-6V786-H78G6-VC576
System Requirments:
- RAM: 2 GB RAM is required.
- Processor: 2 GHz processor.
- Hard Disk: 6 GB of free space is required.
- Screen Display: 1024 x 786 Screen display.
- Windows: Vista/ 7/ 8/ 8.1/ 10.
What’s New in CadSoft Eagle Pro Crack?
- CadSoft Eagle Crack also saves your time with ball grid arrays in seconds.
- The new select, group and also edit your design from your ideas.
- Speed through complex board layouts together with modern PCB routing tools
- It also, produce your Cam and put within a short time as a just click.
- It is similarly quickly reusing bus-circuits that remain synchronized between schematic and PCB.
How To Crack It?
- First, download the crack file from the given link.
- Select it and then run.
- Now click on the crack button.
- Wait for a moment.
- All done.
- Now Enjoy It.
You May also like: Wondershare MobileTrans Crack
Full Download
Функционал GPU-Z
Программа обладает великолепной оптимизацией как под старые, так и под новые устройства, поэтому вопрос, подойдет ли GPU-Z для Windows 10, можно смело отбросить в сторону – утилита одинаково хорошо работает на всех операционных системах Windows.
Интерфейс главной вкладки
На главной вкладке приложения отображаются такие базовые данные, как название видеокарты, дата ее выпуска и ревизия, а также технология, по которой произведен видеопроцессор. Этих данных может хватить некоторым пользователям для предоставления данных о своем системном блоке.
Вкладка «Graphics Card»
Для более продвинутых пользователей информация раскрывается до мелочей: вы можете увидеть здесь полную информацию о памяти видеокарты (тип памяти и ее объем), максимально поддерживаемую версию Microsoft DirectX, версию драйвера, установленного на данный момент, а также частоты, причем отображаются как оригинальные, установленные компанией-производителем значения, так и повышенные в процессе «оверклокинга» частоты.
Интерпретация данных
Если вы не занимаетесь разгоном и никогда даже не прикасались к такого рода утилитам, а значения реальных частот и показателей по умолчанию все равно расходятся, можете не беспокоиться: зачастую производители (такие, как Gigabyte или Palit) производят свой собственный, безопасный разгон, чтобы их видеокарта заметно отличалась от других, точно таких же моделей.
Датчики
Для полноценной проверки видеокарты в реальном времени открываем следующую вкладку TechPowerUp GPU-Z под названием «Датчики» (или «Сенсоры», в зависимости от перевода). Отсюда – по порядку.
Вкладка «Sensors»
-
Частота ядра и памяти
Первые два значения отображают текущие частоты ядра и памяти, соответственно, на которых работает видеопроцессор. Графики справа от данных отображают процесс скачков в динамике: так, когда красная шкала заполняет полосу до самого верха, это означает, что видеокарта работает на пределе. Как правило, графики в этих двух строчках поднимаются и опускаются одинаково. -
Температура видеокарты
Далее следует информация о температуре видеокарты. Рабочая температура – от 40 до 60 градусов Цельсия, нагрев больше нормы (от 65 градусов Цельсия и выше) чреват неполадками в работе (к примеру, искажениями изображения на экране) или вовсе выходу из строя графического процессора. Внимательно наблюдайте за температурой при нагрузках! -
Скорость кулеров
Чтобы снизить влияние горячих потоков воздуха на видеокарту, производители устанавливают на устройства разнообразные кулеры: в современных реалиях никого не удивишь и тремя вентиляторами, и охлаждающими трубками вместе, на одном корпусе видеопроцессора. GPU-Z имеет возможность отслеживать скорость кулера в процентном соотношении от максимальной, а чуть ниже – скорость вращения вентилятора в привычных нам оборотах в минуту. -
Загруженность видеокарты
Далее представлены данные о загруженности различных компонентов видеокарты: так, вы можете увидеть, сколько использовано видеопамяти (а также увидеть соотношение минимума к максимуму на графике), насколько загружена видеокарта в целом (график соответствует первым двум показателям из вкладки – частотам ядра и памяти), а также ее составляющие, такие, как контроллер памяти или интерфейс шины. -
Потребление электроэнергии
Потребление электроэнергии в зависимости от интенсивности работы видеокарты отображается в следующем графике и измеряется в соответствии с требованиями по теплоотводу (процент TDP). Так, к примеру, у видеокарты nVidia GeForce GTX 1080 Ti уровень TDP – измеренный и доказанный – 275Вт. Поэтому программа GPU-Z будет выводить процент именно от этого значения и показывать, насколько сильно на данный момент используется видеопроцессором электроэнергия.
Помимо предоставляемой информации, утилита TechPowerUp GPU-Z обладает интуитивной настройкой: так, вы можете настроить автозапуск программы, проверить обновления или же изменить язык приложения на наиболее удобный для вас.
Interesting tutorials
How to convert DXF to HPGL with Total CAD Converter
… nbsp;Total CAD Converter 3.1 … ).
Total CAD Converter — … buttons.
Total CAD Converter — …
How to convert 3DS to AutoCAD with AnyCAD Exchange3D
… -known CAD (Computer-Aided … between other CAD programs). DXF …
How to plan your home on PC
Not everyone can afford an interior designer to decorate a new house or to switch things …
How to convert raster TIFF to DXF with RasterVect
… and other CAD … few CAD (Computer-Aided … almost all CAD tools, … use CAD software …
How to convert PLT to DWG with Amethyst PLT-2-DWG
… for several CAD (Computer-Aided … task using CAD software, turning …
How to Convert DES to DXF with CorelDRAW Graphics Suite X7
… ;Pro/DESKTOP CAD software or … almost any CAD (Computer-Aided …
How to Convert IPT to STL with 3D-Tool
… used to CAD (Computer-Aided … by Stereolithography CAD applications …
Как исправить ошибку
Сначала убедитесь, что один или несколько компонентов ОпенАЛ не попали в немилость к вашему антивирусу и из-за этого отсутствуют. Часто случается так, что именно он становится причиной удаления файлов и, как следствие, появления ошибки.
Также, когда возникает ошибка: «запуск программы невозможен так, как отсутствует openal32.dll» или OpenAL cant create sound device» не нужно пытаться скачать отдельно dll-файл в сети. Это не только не решит проблему, но и может привести к серьезным последствиям, если вы скачаете вирус. Нужно переустанавливать весь пакет OpenAL. Именно о том, как это делается мы и поговорим ниже.
- Скачиваем программу OpenAL по кнопке внизу этой странички. После того как она будет загружена, запускаем от имени администратора (кликнуть по ярлыку правой клавишей нашего манипулятора и выбрать пункт, обозначенный цифрой «2»).
- Принимаем лицензию, которую нам предлагает инсталлятор. Для этого жмем «ОК».
- По прошествии нескольких секунд наша установка будет завершена. Опять жмем «ОК».
Вот и все, теперь библиотека OpenAL благополучно установлена на наш компьютер или ноутбук и в дальнейшем ошибки возникать не должны.
Программа, которую вы установили подходит для таких операционных систем:
- Windows 7;
- Windows 8;
- Windows 10.
Freeware
kostenlos
Einschränkungen
Folgende Einschränkungen gelten allgemein für die EAGLE Light Edition:
- Die nutzbare Platinenfläche ist auf 100 x 80 mm (4 x 3.2 Zoll) beschränkt.
- Es können nur zwei Signal-Lagen (Top und Bottom) verwendet werden.
- Der Schaltplan-Editor kann nur eine Seite erzeugen.
Die Freeware-Version von EAGLE Light unterliegt zusätzlich folgenden Einschränkungen:
- Technische Unterstützung ist nur per Email oder über unser Forum verfügbar (nicht über Fax oder Telefon).
- Die Benutzung ist auf nicht-kommerzielle Anwendungen oder Evaluierung beschränkt.
Was bedeutet «nicht-kommerziell»?
Die Definition von nicht-kommerziell ist recht einfach:
Wenn Sie durch die Verwendung der Freeware Version von EAGLE Light Geld verdienen (oder einsparen), dann müssen Sie eine Lizenz erwerben.
Wie bekomme ich es?
Führen Sie folgende Schritte aus um die kostenlose EAGLE Light Edition auf Ihrem System zu installieren:
- Gehen Sie in den Download Bereich und holen
Sie sich die Datei welche die EAGLE Programminstallationsdaten für
Ihr Betriebssystem (Linux, Windows oder Mac) enthält. - Installieren Sie diese Datei auf Ihrem System.
- Wenn Sie EAGLE das erste Mal starten werden Sie gefragt, ob Sie eine Lizenzdiskette
besitzen oder ob Sie EAGLE als Freeware benutzen wollen. Klicken Sie auf den
«Run as freeware»-Button.
Ist es wirklich zu etwas zu gebrauchen?
Vielleicht sind Sie der Meinung, daß es Ihnen die Einschränkungen von EAGLE Light nicht
erlauben, irgendetwas Sinnvolles damit anzufangen?
Dann werfen Sie doch mal einen Blick auf diese 68HC12-Platine,
die voll im Rahmen der Möglichkeiten von EAGLE Light liegt
(man kann damit sogar noch größere Platinen als diese bearbeiten).
Wie kann ich eine Lizenz erwerben oder eine größere Version erhalten?
Falls Ihre Anwendung den nicht-kommerziellen Bereich verläßt, oder falls Sie Wert
auf volle technische Unterstützung über Telefon
und Fax legen, können Sie eine persönliche Lizenz erwerben. Alle Dateien, die Sie mit
der Freeware-Version von EAGLE Light erstellt haben können mit jeder lizenzierten Version
von EAGLE Light, Standard oder Professional weiterverarbeitet werden. Sollte also Ihr
Projekt die Grenzen von EAGLE Light überschreiten, so können Sie jederzeit auf die
nächst höhere Stufe aufsteigen (und Sie zahlen auch nur die Differenz zwischen dem, was
Sie bereits haben und dem, auf das Sie aufsteigen wollen).
Sie erhalten Ihre persönliche Lizenz für EUR 49.- (Preise in Ihrer Landeswährung
erfragen Sie bitte bei Ihrem lokalen Händler).
Falls Sie mehr Leistung benötigen als die Freeware-Version bietet könnte unsere
Non-Profit-Lizenz für Sie interessant sein.
Copyright
Die Freeware-Version von EAGLE Light ist urheberrechtlich geschützte Software, 2011 CadSoft Computer GmbH,
alle Rechte weltweit vorbehalten. Keine der in EAGLE enthaltenen ausführbaren Dateien oder die Datei
freeware.key (welche die Freeware Lizenz implementiert) darf in irgendeiner Weise verändert werden.
CadSoft behält sich das Recht vor zu entscheiden, ob dieses Freeware-Programm mit künftigen
EAGLE-Versionen weitergeführt wird.
Interesting tutorials
How to install custom themes on Windows 10
… 32—bit and 64-bit versions of Windows … to bypass Windows‘ theme … to the Windows -> Resources …
How to easily reinstall Windows 10
… options (32 or 64 bit, default … language, and Windows …
How to install Minecraft mods on Windows PC
… hitting the Windows+R keys. Write …
How to configure Cortana in Windows 10
… familiar with Windows Phone mobile … are a bit concerned regarding … let’s talk a bit about the …
How to uninstall programs in Windows 10 with system tools
… to be a bit more efficient … to wait a bit for the … » option.
Uninstall Windows 10 built …
How to effectively backup and restore your Windows 10 PC
… Luckily, Windows 10 provides … seems a bit tedious, you … backup solution, Windows 10 provides …
How to speed up Windows 10
… act a bit faster, at … versions, Windows automatically indexes … the default Windows Defender …
Programs for query ″eagle windows 32 bit″
Amazing Photo Editor
Download
3.5 on 72 votes
Amazing Photo Editor is powerful and easy to use image processing software used for image processing,viewing and converting. 33 amazing effect are available!
Folder Icon Changer
Download
3.8 on 11 votes
Folder Icon Changer is a software that search and replace the standard icon of a folder on any other icon.
EagleDVR Server
Download
5 on 1 vote
For users not familiar with the EagleDVR product, it turns a Windows PC into an advanced digital video recording and monitoring system.
… , it turns a Windows PC into …
DCS World
Download
3.9 on 29 votes
Digital Combat Simulator World (DCS World) is a free-to-play digital battlefield game, focusing on a military aircraft simulation.
TrackerCam
Download
3.7 on 3 votes
TrackerCam is a software application that lets you put your webcam on the web, use it for surveillance …
Eagle Lander 3D
Download
4.5 on 2 votes
Eagle Lander 3D (EL3D) is an authentic simulation of the Apollo lunar landings.
Eagle Lander 3D ( …
OBD II logger
Download
4 on 7 votes
OBD-II is the protocol used by all cars built after 1996. If you want your PC or laptop to read some of the data …
… you know a bit about electronics … made using Eagle PCB software …
Butterflies Ponds Screensaver
Download
3.8 on 16 votes
Enjoy a lovely summer ponds with beautiful animated butterflies, fluttering above them.
… the fauna, eagles, birds, insects …
Eagle Eye
Download
4.4 on 10 votes
Organizer that enables educational liaisons to track and manage their student clients.
… educational liaison, Eagle Eye manages … various applications. Eagle Eye also …
Photo Frames & Effects
Download
3.2 on 5 votes
Photo Frame & Effects is a digital photo tool that allows you to add frames, borders and filter effects to your digital photos.
Installing Autodesk EAGLE On Linux
Linux is the operating system of choice for those wanting complete control over their computing experience. It’s incredibly easy to get started with Linux these days, and if you’d like to follow along with us, we’d recommend downloading one of the most popular Linux distributions – Ubuntu.
We’ll be installing Autodesk EAGLE on the latest release of Ubuntu, version 16.04, 64-bit. Here’s how to get started:
- First, download your installer on the Autodesk EAGLE Free Download page.
-
Next, you need to extract
Autodesk_EAGLE_8.0_English_Linux_64bit.tar.gz
To do this, open your Downloads folder, right-click the Autodesk EAGLE file, and select Open With Archive Manager.
-
Now select the Extract button and extract the folder to your preferred location.
-
You should now have an extracted eagle-8.0.0 folder to work with. Right-click this folder and select Open in Terminal.
- To run Autodesk EAGLE, all you need to do now is enter “./eagle run” and press Enter. Give it a few seconds, and you’ll be greeted with the Autodesk login screen.
-
Sign into your existing Autodesk account or create a new one and you should now be seeing the Autodesk EAGLE Control Panel. If a warning dialog opens to create a new directory, select the Yes button.
You’re done! Anytime you want to run Autodesk EAGLE in the future simply pop open your terminal, navigate to the eagle-8.0.0 folder, and enter “./eagle run” to bring up your Control Panel.
Quick Note: The first time you open Autodesk EAGLE you’ll likely get a warning dialog saying that a directory doesn’t exist for your files. Autodesk EAGLE is just letting you know that it needs to create this directory to store all of your project files and such. You can select the Yes button to create this directory, and this warning will never show up again.
It’s Design Time
That’s all there is to it. Getting Autodesk EAGLE up and running on Windows, Mac, or Linux is as easy as can be. Now it’s time for you to check out all of the features we’ve included in this latest release. Like the new BGA fanout, which automatically escapes your nets out of any BGA in seconds. Or the brand new routing engine to make those PCB layouts easy to complete. Or maybe you’re tired of reinventing the wheel and want to reuse your circuitry between multiple projects? There’s something to love in Autodesk EAGLE for every engineer.
The free version of Autodesk EAGLE is just a small taste of what’s possible. When you’re ready for the full experience, be sure to upgrade with an Autodesk EAGLE Subscription.
Windows is a registered trademark of Microsoft Corporation.
Linux is a registered trademark of Linus Torvalds.
Mac is a registered trademark of Apple Inc.
Installing Autodesk EAGLE On a Mac
Autodesk EAGLE is one of few PCB design software available on Mac, which makes it the tool of choice for the growing numbers of Mac-centric engineers out there. The installation process to get Autodesk EAGLE running on a Mac is just as simple as Windows, here’s what to do:
- First, download your installer on the Autodesk EAGLE Free Download page.
- When your download is finished, go ahead, and open
Autodesk_EAGLE_8.0_English_Mac_64bit.pkg
to begin the installation wizard.
-
Select the Continue button to progress through the installation setup process which includes accepting the license agreement and choosing an installation location.
-
On the final step of the wizard, you’ll select the Install button to begin the installation process. When the installation completes, select Close.
- With your installation complete go ahead and open Autodesk EAGLE from your Launchpad. The first time you run Autodesk EAGLE, you’ll need to sign in to your existing Autodesk account or create a new account.
After signing it, you’ll be greeted with the Autodesk EAGLE Control Panel as shown below. You are all set on Mac OS!
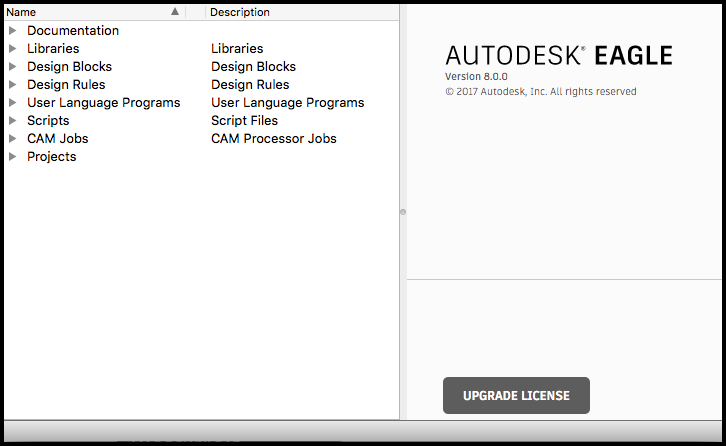
All set for your next electronic design project with Autodesk EAGLE in MacOS.
Quick Note: The first time you open Autodesk EAGLE you’ll likely get a warning dialog saying that a directory doesn’t exist for your files. Autodesk EAGLE is just letting you know that it needs to create this directory to store all of your project files and such. You can select the Yes button to create this directory, and this warning will never show up again.
История возникновения программы OpenAL и ее преимущества
В первую очередь, нужно сказать о том, что это такое и какова ее роль для компьютерной системы и для каждого пользователя, добавив положительные моменты при установке этой программы.
Стоит заметить, что эта утилита имеет множество достоинств, если сравнивать ее с другими аналогами. Этот интерфейс необходим для работы с аудиоданными по программированию различных приложений.
Итак, преимущества:
- использование Environmental Audio Extensions (звуковые эффекты: дождь, шелест листьев, ураган и т. д.);
- работа с объемным звуком;
- креативность;
- качественное звучание;
- большое многообразие выбора аудио-звуков.
Проект поддерживает компания Creative. Это обстоятельство делает интерфейс интересным и довольно востребованным.
Первоначальным замыслом была разработка программы для раскручивания собственной бизнес-идеи, которая состояла лишь в том, чтобы портировать игры на GNU/Linux с Microsoft Windows. Однако, идея провалилась, большого капитала фирма Loki Software не заработала и вскоре прекратила свое существование.
Если бы на этот карьеристский проект не обратило внимание сообщество свободного ПО и не подхватило бы его креативную идею в обход компании, которая уже закрылась, то об «openal» так никто бы и не узнал