Arduino string (c style strings)
For C object Strings an ok place to look is the Arduino c string Reference.
However the above link does not detail the functions available for c-style strings. For that look to a standard reference. This link is good as it orders the functions in the order of most used.
P.S. Have a look at strtok() as this can allow you to process a
command line with multiple commands separated with a delimiter e.g. a
semi-colon — Useful for a more complex serial command decoder.
Comparison of String and c string
The following table shows the difference in memory usage:
| Type | Flash | SRAM |
|---|---|---|
| String | 3912 | 248 |
| c string | 2076 | 270 |
| Difference String cf c string | +1836 | -22 |
Note: It appears that the String class uses
less SRAM but it, in fact uses the heap and uses more than c string uses
(it is just not easy to measure because it can change all the time as strings are created and destroyed).
Using Class String to control strings is undoubtedly the easiest way
and is very similar to higher level languages such as python but it comes
at a cost — that cost is Flash program memory.
print()
Description
Prints data to the serial port as human-readable ASCII text. This command can take many forms. Numbers are printed using an ASCII character for each digit. Floats are similarly printed as ASCII digits, defaulting to two decimal places. Bytes are sent as a single character. Characters and strings are sent as is. For example:
- Serial.print(78) gives «78»
- Serial.print(1.23456) gives «1.23»
- Serial.print(‘N’) gives «N»
- Serial.print(«Hello world.») gives «Hello world.»
An optional second parameter specifies the base (format) to use; permitted values are BIN (binary, or base 2), OCT (octal, or base 8), DEC (decimal, or base 10), HEX (hexadecimal, or base 16). For floating point numbers, this parameter specifies the number of decimal places to use. For example:
- Serial.print(78, BIN) gives «1001110»
- Serial.print(78, OCT) gives «116»
- Serial.print(78, DEC) gives «78»
- Serial.print(78, HEX) gives «4E»
- Serial.println(1.23456, 0) gives «1»
- Serial.println(1.23456, 2) gives «1.23»
- Serial.println(1.23456, 4) gives «1.2346»
You can pass flash-memory based strings to Serial.print() by wrapping them with F(). For example :
Serial.print(F(“Hello World”))
To send a single byte, use Serial.write().
Parameters
val: the value to print — any data type
format: specifies the number base (for integral data types) or number of decimal places (for floating point types)
Example:
/*
Uses a FOR loop for data and prints a number in various formats.
*/int x = ; // variablevoid setup() {
Serial.begin(9600); // open the serial port at 9600 bps: }void loop() {
// print labels
Serial.print(«NO FORMAT»); // prints a label
Serial.print(«\t»); // prints a tab
Serial.print(«DEC»);
Serial.print(«\t»);
Serial.print(«HEX»);
Serial.print(«\t»);
Serial.print(«OCT»);
Serial.print(«\t»);
Serial.print(«BIN»);
Serial.print(«\t»);
for(x=; x< 64; x++){ // only part of the ASCII chart, change to suit
// print it out in many formats:
Serial.print(x); // print as an ASCII-encoded decimal — same as «DEC»
Serial.print(«\t»); // prints a tab
Serial.print(x, DEC); // print as an ASCII-encoded decimal
Serial.print(«\t»); // prints a tab
Serial.print(x, HEX); // print as an ASCII-encoded hexadecimal
Serial.print(«\t»); // prints a tab
Serial.print(x, OCT); // print as an ASCII-encoded octal
Serial.print(«\t»); // prints a tab
Serial.println(x, BIN); // print as an ASCII-encoded binary
// then adds the carriage return with «println»
delay(200); // delay 200 milliseconds
}
Serial.println(«»); // prints another carriage return}
Programming Tips
As of version 1.0, serial transmission is asynchronous; Serial.print() will return before any characters are transmitted.
Функция Serial.setTimeout()
Функция Serial.setTimeout() позволяет задать время ожидания данных из последовательного порта для Serial.readBytes() и Serial.readBytesUntil(). По умолчанию установлено 1000 мс (1 сек).
Serial.setTimeout(время) // время в миллисекундах (тип long)
Ниже приведен пример использования Serial.readBytes(), Serial.readBytesUntil() и Serial.setTimeout():
void setup()
{
char buf;
Serial.begin(9600);
Serial.setTimeout(10000); // лимит времени 10 секунд
while(!Serial.available()); // ждать данные из порта
Serial.println(«Start»);
int x=Serial.readBytes(buf,4); // считать 4 байта
Serial.print(«Polucheno simvolov: «);
Serial.println(x);

while(!Serial.available());
Serial.println(«Start «);
x=Serial.readBytesUntil(‘X’,buf,4); // считать 4 байта
Serial.print(«Polucheno simvolov: «);
Serial.println(x);
}
void loop(){}
В первой части вышеприведенного примера будут прочитаны четыре байта данных, при условии, что эта операция будет выполнена в течение 10 секунд. Во второй части, помимо этого, чтение может быть прервано, когда в буфере появляется конкретный код (здесь код определен как «X»).
Arduino String Serial Command Control
Now lets look at the section that you will write after the comment:
The easiest way to do it is to examine the 1st character and use that
in a switch statement. To access a character at a specific position se
the charAt member function of String.
Here’s the switch statement that decodes each command
Notice how a Serial.println is used to send information back to
the user. This is not really necessary but allows you to see that a
command has been actioned — making the program easier to use. The variables start and test are defined earlier in the program.
The above code gives you simple control of variables within a microcontroller.
Arduino To PC
To send data from Arduino to PC, we need to use the following Arduino code:
Set baud rate and begin Serial port by using Serial.begin() function
Serial.begin(baudrate);
Send data to Serial Monitor using one of the following functions: Serial.print(), Serial.println(), Serial.write(). For example, send “Hello World!” to Serial Monitor
Serial.println(«Hello World!»);
Example Use
In this example, we will send the “ArduinoGetStarted.com” from Arduino to Serial Monitor every second
void setup() {
Serial.begin(9600);
}
void loop() {
Serial.println(«ArduinoGetStarted.com»);
delay(1000);
}
Ошибки скорости передачи
Скорость передачи на Atmega генерируется путем деления системных часов и последующего подсчета до заданного числа. Эта таблица из таблицы показывает значения регистра и процент ошибок для тактовой частоты 16 МГц (например, для Arduino Uno).
бит U2Xn влияет на делитель тактовой частоты (0 = деление на 16, 1 = деление на 8). Регистр UBRRn содержит число, на которое рассчитывается процессор.
Итак, из приведенной выше таблицы видно, что мы получаем 9600 бод с тактовой частотой 16 МГц следующим образом:
Мы делим на 104, а не на 103, потому что счетчик равен нулю. Таким образом, здесь возникает ошибка , которая близка к тому, что сказано выше в таблице (0.02%).
Вы заметите, что некоторые скорости обмена имеют более высокое количество ошибок, чем другие.
В соответствии с таблицей данных максимальный процент ошибки для 8 бит данных находится в диапазоне от 1,5% до 2,0% (подробнее см. техническое описание).
Serial.available() – the Serial Spy
We can use another Serial library function, Serial.available(), to check to see if there is anything available to be read in the serial receive buffer.
Serial.available will return the number of bytes currently stored in the serial receive buffer. Say the phrase “Sub Sandwich” was in the serial receive buffer, then serial.available() would return the number 12. If “andwich” was in the serial receive buffer, then serial.available() would return the value 7.
Serial.available doesn’t affect the contents of the Serial receive buffer – it just reports back to us how full it is.
So IF the return value of Serial.available() is greater than 0, we know part of our message is still sitting in the serial receive buffer.
OK, all this Serial.read and Serial.available stuff is great, but what if I want to send the entire phrase “sub sandwich” to my Arduino and save it to a string, or say the value 462, and save it to an integer.
How do I corral all these bytes together into one string variable, or an integer, or whatever datatype for that matter?!
Standard Serial Functions
Serial.begin()
The baud rate input is ignored, and only used for Arduino compatibility.
USB serial communication always occurs at full USB speed. However,
see the baud() function below.
Serial.begin() may wait up to 2.5 seconds for USB serial communication
to be ready. For fastest program startup, simply do not use this
unnecessary function. Its only purpose is for compatibility with
programs written for Arduino. The delay is intended for programs
which do not test the Serial boolean.
Alternately, the wait can be done with a timeout.
Serial.available()
On a standard Arduino, Serial.available() tends to report individual bytes, whereas
large blocks can become instantly available with Teensyduino.
See below for details.
Usually the return value from Serial.available() should be tested as a boolean, either
there is or is not data available. Only the bytes available from the most recently
received USB packet are visible. See
below for details.
Объяснение программы для ведомой (Slave) платы Arduino
1. Как и в ведущей плате, первым делом в программе мы должны подключить библиотеку Wire для задействования возможностей протокола I2C и библиотеку для работы с ЖК дисплеем. Также нам необходимо сообщить плате Arduino к каким ее контактам подключен ЖК дисплей.
Arduino
#include<Wire.h>
#include<LiquidCrystal.h>
LiquidCrystal lcd(2, 7, 8, 9, 10, 11);
|
1 |
#include<Wire.h> LiquidCrystallcd(2,7,8,9,10,11); |
- В функции void setup():
— мы инициализируем последовательную связь со скоростью 9600 бод/с;
Arduino
Serial.begin(9600);
| 1 | Serial.begin(9600); |
— далее мы инициализируем связь по протоколу I2C на контактах A4 и A5
В качестве адреса ведомого мы будем использовать значение 8 – очень важно здесь указать адрес ведомого;. Arduino
Wire.begin(8);
Arduino
Wire.begin(8);
| 1 | Wire.begin(8); |
После этого мы должны вызвать функцию в которой ведомый принимает значение от ведущего и функцию в которой ведущий запрашивает значение от ведомого.
Arduino
Wire.onReceive(receiveEvent);
Wire.onRequest(requestEvent);
|
1 |
Wire.onReceive(receiveEvent); Wire.onRequest(requestEvent); |
— затем мы инициализируем ЖК дисплей для работы в режиме 16х2, отображаем на нем приветственное сообщение и очищаем его экран через 5 секунд.
Arduino
lcd.begin(16,2); //Initilize LCD display
lcd.setCursor(0,0); //Sets Cursor at first line of Display
lcd.print(«Circuit Digest»); //Prints CIRCUIT DIGEST in LCD
lcd.setCursor(0,1); //Sets Cursor at second line of Display
lcd.print(«I2C 2 ARDUINO»); //Prints I2C ARDUINO in LCD
delay(5000); //Delay for 5 seconds
lcd.clear(); //Clears LCD display
|
1 |
lcd.begin(16,2);//Initilize LCD display lcd.setCursor(,);//Sets Cursor at first line of Display lcd.print(«Circuit Digest»);//Prints CIRCUIT DIGEST in LCD lcd.setCursor(,1);//Sets Cursor at second line of Display lcd.print(«I2C 2 ARDUINO»);//Prints I2C ARDUINO in LCD delay(5000);//Delay for 5 seconds lcd.clear();//Clears LCD display |
3. Затем нам будут необходимы две функции: одна для события запроса (request event) и одна для события приема (receive event).
Для события запроса:
Эта функция будет выполняться когда ведущий будет запрашивать значение от ведомого. Эта функция будет считывать значение с потенциометра, подключенного к ведомой плате Arduino, преобразовывать его в диапазон 0-127 и затем передавать его ведущей плате.
Arduino
void requestEvent()
{
int potvalue = analogRead(A0);
byte SlaveSend = map(potvalue,0,1023,0,127);
Wire.write(SlaveSend);
}
|
1 |
voidrequestEvent() { intpotvalue=analogRead(A0); byteSlaveSend=map(potvalue,,1023,,127); Wire.write(SlaveSend); } |
Для события приема:
Эта функция будет выполняться когда ведущий будет передавать данные ведомому с адресом 8. Эта функция считывает принятые значения от ведущего и сохраняет ее в переменной типа byte.
Arduino
void receiveEvent (int howMany)
{
SlaveReceived = Wire.read();
}
|
1 |
voidreceiveEvent(inthowMany) { SlaveReceived=Wire.read(); } |
4. В функции Void loop():
Мы будем непрерывно отображать принятые от ведущей платы значения на экране ЖК дисплея.
Arduino
void loop(void)
{
lcd.setCursor(0,0); //Sets Currsor at line one of LCD
lcd.print(«>> Slave <<«); //Prints >> Slave << at LCD
lcd.setCursor(0,1); //Sets Cursor at line two of LCD
lcd.print(«MasterVal:»); //Prints MasterVal: in LCD
lcd.print(SlaveReceived); //Prints SlaveReceived value in LCD received from Master
Serial.println(«Slave Received From Master:»); //Prints in Serial Monitor
Serial.println(SlaveReceived);
delay(500);
lcd.clear();
}
|
1 |
voidloop(void) { lcd.setCursor(,);//Sets Currsor at line one of LCD lcd.print(«>> Slave <<«);//Prints >> Slave << at LCD lcd.setCursor(,1);//Sets Cursor at line two of LCD lcd.print(«MasterVal:»);//Prints MasterVal: in LCD lcd.print(SlaveReceived);//Prints SlaveReceived value in LCD received from Master Serial.println(«Slave Received From Master:»);//Prints in Serial Monitor Serial.println(SlaveReceived); delay(500); lcd.clear(); } |
После того как вы соберете всю схему проекта и загрузите обе программы в платы Arduino вы можете приступать к тестированию работы проекта. Вращая потенциометр на одной стороне вы должны увидеть изменяющиеся значения на экране ЖК дисплея на другой стороне.
Теперь, когда вы разобрались, как работать с интерфейсом I2C в плате Arduino, вы можете использовать описанные в данной статье приемы для подключения к плате Arduino любых датчиков, работающих по данному протоколу.
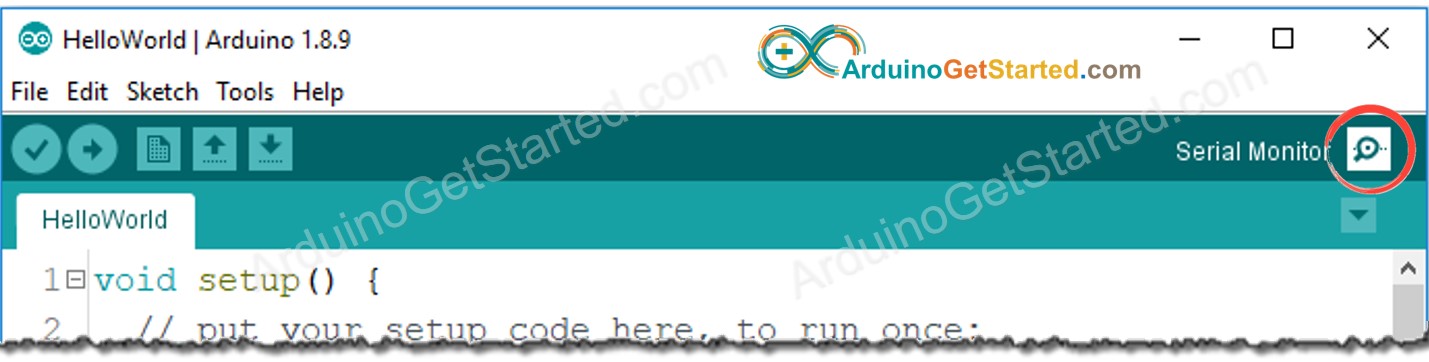
if(typeof __ez_fad_position != ‘undefined’){__ez_fad_position(‘div-gpt-ad-arduinogetstarted_com-large-mobile-banner-2-0’)};How To Use Serial Monitor
Click the Serial Monitor icon
Items on Serial Monitor
- Output console: display data received from Arduino.
COM6
Send
Autoscroll
Show timestamp
Clear output
9600 baud
Newline
Autoscroll checkbox: option to select between automatically scroll and not scroll.
COM6
Send
Autoscroll
Show timestamp
Clear output
9600 baud
Newline
Show timestamp checkbox: option to show timestamp prior to data displayed on Serial Monitor.
COM6
Send
Autoscroll
Show timestamp
Clear output
9600 baud
Newline
Clear output button: clear all text on the output console.
COM6
Send
Autoscroll
Show timestamp
Clear output
9600 baud
Newline
Baud rate selection: select communication speed (baud rate) between Arduino and PC. This value MUST be the same as the value used in Arduino code (in Serial.begin() function).
COM6
Send
Autoscroll
Show timestamp
Clear output
9600 baud
Newline
※ NOTE THAT:
When we select baud rate (even the value is not changed), Arduino is reset. Therefore, this is one way to reset Arduino.
- Textbox: user can type characters to send to Arduino
COM6
Send
Autoscroll
Show timestamp
Clear output
9600 baud
Newline
Ending selection: select the ending characters appended to data sent to Arduino. Selection includes:
-
No line ending: append nothing
-
Newline: append newline (LF, or ‘\n’) character
-
Carriage return: append carriage return (CR, or ‘\r’) character
-
Both NL and CR: append both newline and carriage return (CRLF, or ‘\r\n’) characters
COM6
Send
Autoscroll
Show timestamp
Clear output
9600 baud
Newline
Send button: when the button is pressed, Serial Monitor sends data in textbox plus the ending characters to Arduino
Arduino String Serial Command Value Entry
To enter a value into a variable, under serial control, you can use the following as part of the switch statement.
This simply uses the functions substring() and toInt() to retrieve a
number string from the serial port and convert it to internal number
format.
If the serial data input begins with a v then this section of the
switch statement is activated. if there is more data after the ‘v’ i.e.
you typed a number, then valStr is set to a new string that starts from
index 1 of sdata to the end i.e. avoiding the ‘v’ character.
valStr is then decoded from string to int using the toInt() function
and the value placed in variable ‘val’. ‘val’ is then printed back to the
serial port to show what happened.
If you only typed ‘v’ then only the last two print statements are
executed since the string’s length is now one. In this way you can either change or just query the value of
‘val’.
Считывание последовательной передачи данных через аналоговый контакт [1]
Данный пример показывает, как считывать на аналоговом входе информацию, идущую из физического мира, используя при этом потенциометр.
Потенциометр – это простое механическое устройство, дающее сопротивление, уровень которого можно настраивать при помощи поворота регулирующей ручки. Если пустить напряжение через потенциометр в аналоговый вход на Arduino, можно измерить уровень сопротивления (от потенциометра) в виде аналогового значения. В данном примере мы займемся отслеживанием состояния потенциометра, установив последовательную передачу данных между Arduino и вашим компьютером.
Step 4: Serial.readString() Example
Code:
String a;
void setup() {
Serial.begin(9600); // opens serial port, sets data rate to 9600 bps
}
void loop() {
while(Serial.available()) {
a= Serial.readString();// read the incoming data as string
Serial.println(a);
}
}
«Serial. readString ()» function read serial data as a string. So, when some data are given in serial, Serial.readString () function read as string. In the picture uses a virtual terminal as serial monitor. I wrote «My name is Mamun» after some time it gives return «My name is Mamun». From here it is clearly understandable how does the «Serial.readString()» function work.
Youtube
https://youtube.com/watch?v=WeI-0QAardk
Our Serial.read() protocol
Let’s make these the protocol rules that we’ll enforce in our Arduino program.
- New messages will be read as soon as they arrive
- Messages will be no longer than 12 bytes
- Every message will end with a newline character ‘\n’ – which we will call out terminating character
This is a pretty basic protocol, but it will help us with our strategy.
First we need a place to store the incoming bytes from the serial receive buffer – we can use a char array for that. Then we need to check if anything is even available in the serial receive buffer – we can use Serial.available for that. Then we need to actually read in a byte – we can use Serial.read() for that.
Before we put the byte into our char array, we’ll need to check the incoming byte to make sure it is not a terminating character.
- Create a character array to store incoming bytes
- Check to see if there is anything in the serial receive buffer to be read – Serial.available()
- While there is something to be read then…
- Read in the byte to a temporary variable – Serial.read()
- Check to see if what we read is part of our message OR a terminating character
- If it is part of our message, then save it to a character array
- If it is a terminating character, then output the message and prepare for the next message
- If the message has exceeded the max message length in the protocol, then stop reading in more bytes and output the message (or doing something else with it)
Description
Prints data to the serial port as human-readable ASCII text. This command can take many forms. Numbers are printed using an ASCII character for each digit. Floats are similarly printed as ASCII digits, defaulting to two decimal places. Bytes are sent as a single character. Characters and strings are sent as is. For example:
-
Serial.print(78) gives «78»
-
Serial.print(1.23456) gives «1.23»
-
Serial.print(‘N’) gives «N»
-
Serial.print(«Hello world.») gives «Hello world.»
An optional second parameter specifies:
-
The base (format) to be printed for integral data types (byte, char, int, long, short, unsigned char, unsigned int, unsigned long, word). The permitted values are:
-
BIN: binary, or base 2
-
OCT: octal, or base 8
-
DEC: decimal, or base 10
-
HEX: hexadecimal, or base 16
-
-
The number of decimal places to be printed for floating point numbers (double, float).
For example:
-
Serial.print(78, BIN) gives «1001110»
-
Serial.print(78, OCT) gives «116»
-
Serial.print(78, DEC) gives «78»
-
Serial.print(78, HEX) gives «4E»
-
Serial.print(1.23456, 0) gives «1»
-
Serial.print(1.23456, 2) gives «1.23»
-
Serial.print(1.23456, 4) gives «1.2345»
You can pass flash-memory based strings to Serial.print() by wrapping them with F(). For example:
Serial.print(F(«Hello World»))
Функция Serial.available()
Функция Serial.available() позволяет проверить, можно ли прочитать данные из последовательного порта. Arduino имеет 64-байтовый буфер последовательного порта. Функция вызывается без параметров, возвращает количество доступных для чтения байт. Serial.available() позволяет исполнить часть программы, которая считывает данные из последовательного порта только при их появлении. Примеры использования Serial.available():
if(Serial.available())
{
//выполнить, если имеются данные
}
———————————————————
while(!Serial.available()); // ждать данные с последовательного порта
В первом примере показано использование условия (if) для проверки доступных данных, и если данные прочитаны, выполняется фрагмент кода. Этот синтаксис, помещенный в функцию loop(), не блокирует его выполнение.
Во втором примере программа будет остановлена до тех пор, пока в буфере не появляться данные, прочитанные из последовательного порта. Ниже приведено практическое использование Serial.available():
void setup()
{
Serial.begin(9600);
}
void loop()
{
if(Serial.available())
{
int x=Serial.available();
Serial.println(x);
}
delay(80);
}
Программа проверяет, поступили ли данные из последовательного порта. Если в буфере содержится информация, то программа проверяет, сколько байтов поступило и отправляет эту информацию на терминал.
Когда вы запустите программу и включаете терминал, то изначально не увидите никакой информации. После ввода текста или числа и отправки через терминал, Arduino начнет циклично отправлять количество символов, доступных в буфере последовательного порта.
The Code Without a Flush
void setup() {
  // Give some time to open serial monitor after programming
  delay(2500);
  Serial.begin(9600);

  // Store the current time (start the clock)
  unsigned long millisNoFlushStart = millis();
  // Transmit some psuedo-random text
  Serial.println(F("How long will it take to transmit the following:"));
  Serial.println(F("abcdefghijklmnopqrstuvwxyz"));
  Serial.println(F("done"));
  // Store the current time (stop the clock)
  unsigned long millisNoFlushStop = millis();
  Serial.print(F("Without flush, Serial.println()s return control in: "));
  Serial.print( millisNoFlushStop - millisNoFlushStart);
  Serial.println(F(" milliseconds."));
}
void loop() {}
Results
So this code is “done” in 20 milliseconds. This sounds pretty good, right? Okay, let’s look what happens if you call Serial.flush() before counting the time.
Функции Serial.print() и Serial.println()
Функция Serial.print() позволяет отправлять информацию через последовательный порт. Можно отправлять как текстовые, так и переменные значения или непосредственно числа. Данные отправляются в кодировке ASCII. Это означает, что число, например, 12, будет отправлено как два символа 1 и 2. Вот типичный синтаксис Serial.print():
Serial.print(78); // число 78
Serial.print(1.23456); // количество 1.23
Serial.print(‘N’); // символ: N
Serial.print(«Hello world.»); // текст: Hello world.
Serial.print(78, BIN); // двоичное число: 1001110
Serial.print(78, OCT); // исходное восьмеричное число: 116
Serial.print(78, DEC); // десятичное число: 78
Serial.print(78, HEX); // шестнадцатеричное число: 4E
Serial.println(1.23456, 0); // первая цифра: 1
Serial.println(1.23456, 2); // три первые цифры: 1.23
Мы отправляем отдельные символы, заключая их в апострофы. Тексты размещаем в двойных кавычках. Числа без кавычек. Можно преобразовать числа в соответствующий формат — по умолчанию установлен десятичный формат.
Вариантом Serial.print() является функция Serial.println(), который отличается добавлением символа конца строки в конце сообщения. В следующем примере показаны различия в использовании этих двух функций:
Serial.print(‘A’);
Serial.print(‘B’);
Serial.println(‘C’); // ABC
Serial.print(‘D’); // DE
Serial.println(‘E’); // F
Serial.println(‘F’); // G
Serial.print(‘G’);
Функции Serial.find() и Serial.findUntil()
Функция Serial.find() считывает содержимое буфера в поисках конкретной строки. Функция возвращает true, когда строка найдена и false, когда данные не найдены. Ниже приведен пример кода программы:
void setup()
{
Serial.begin(9600);
}
void loop()
{
if(Serial.find(«test»)) Serial.println(«ok.»);
}
В данном примере программа считывает данные из буфера и когда полученные данные соответствуют строке поиска (test), то отображается сообщение (ok).
Serial.find() ожидает данные в течение времени, определенного с помощью функции Serial.setTimeout(). В случаях, когда в буфере имеется большое количество данных, то их можно обработать почти мгновенно. Когда же буфер пуст, функция ожидает следующую порцию данных в течение некоторого времени и заканчивается, возвращая соответствующее значение.
Serial.findUntil() — это вариант Serial.find(), который отличается от предшественника дополнительным аргументом, позволяющим прервать загрузку буфера последовательного порта. Пример синтаксиса показан ниже:
Serial.findUntil ( «text», «K»);
Функция будет считывать данные из последовательного порта, пока не будет найдена строка поиска (text) или прочитан символ «K», или пока не пройдет определенное время (по умолчанию – 1 секунда).
How to use Arduino Serial Read?
- Arduino Serial read command is used for reading any data available at the Serial Port of Arduino board.
- I have also designed a Proteus simulation which you can download from the below button, and I have explained this simulation in the last step of this tutorial:
Download How to use Arduino Serial Read ?
- For example, you have some serial module, let’s say GPS module (most of the GPS module works at serial port).
- So, when you connect your GPS module with Arduino, you have to connect the TX pin of GPS with the RX pin of Arduino.
- Now the TX pin of GPS will be sending/transmitting the data and because this pin is connected with the RX pin of Arduino, so Arduino will keep receiving the data.
- Now the data is coming to Arduino but you have to write some code to read this incoming serial data and then save it in some variable.
- And in order to read this data, we need to use the Arduino Serial Read command.
- Arduino Serial read command reads the incoming data from Serial Port and then saves it in some variable.
- Here’s the syntax of the Arduino Serial Read command:
char data = Serial.read();
One important thing is, in order to make Arduino Serial Read command work, you have to first initialize the Serial Port in Arduino, as shown below:
Serial.begin(9600);
Note:
- Arduino USB Port which is plugged into the computer and is used for uploading code also works on the same serial port.
- So, if you have anything plugged in pin # 0 of Arduino then you can’t upload the code in Arduino.
Now, let’s design a simple example in which we will be receiving data from Serial Port and then saving it in some variable.
So, connect your Serial device with your Arduino board and now upload the below code to your Arduino board:
void setup() {
  Serial.begin(9600); // Serial Port initialization
}

void loop() {
  if(Serial.available()) // Chek for availablity of data at Serial Port
  {
    char data = Serial.read(); // Reading Serial Data and saving in data variable
    Serial.print(data); // Printing the Serial data
  }
}
- Now, you need to open the Serial Monitor of Arduino which is used for debugging purposes.
- So, whenever you write something on Serial Port, it got printed on the Serial monitor.
- So, whatever you will be receiving in the Serial Port you will get in the Serial Monitor.
- Here are some random data of GSM module coming on serial port and showing in serial monitor: