What sort of computer and operating system do I need to run Algodoo?
Minimum system requirements:
- Windows XP, Windows Vista or Windows 7, Mac OS X 10.5
- 1 GHz CPU
- 256 MB of RAM
- Video card with 96MB of memory with OpenGL support and the latest drivers
- 40 MB of free hard disk space
- An internet connection when unlocking Algodoo
For SMART Board:
- Windows XP SP3, Windows Vista or Windows 7
- SMART Notebook 10.8
Recommended system requirements:
- Windows XP, Windows Vista or Windows 7, Mac OS X 10.6
- 1.6 GHz CPU or better. Faster processors give faster simulations.
- 512 Mb of RAM
- Video card with 256MB of memory with OpenGL support and the latest drivers
- 100 MB of free hard disk space
- An internet connection
Algodoo как сделать двигатель
Привет! Сегодня я расскажу о том, как делать важную часть любого механизма – двигатель. Конечно, эти знания достаточно малы, но я думаю (и надеюсь), вам они помогут. Возможно, моя система покажется вам неверной, тогда можем исправить ее.
Для начала, давайте разделим все двигатели на несколько категорий:
В этой статье речь пойдет о поршневых двигателях. Просто в турбинах я не силен, а ракеты – совсем другая тема.
Поршневые двигатели можно разделить по количеству цилиндров, их расположению и компоновке поршней.
По количеству цилиндров все ясно – одноцилиндровые и многоцилиндровые.
Цилиндры могут располагаться в ряд, или в несколько рядов, в таком случае они чаще всего бывают V -образные, оппозитные и радиальные.
По компоновке – чаще всего делаются поршни с прямым соединением, то есть шатун крепится напрямую к поршню. Но иногда поршень крепится на шток, скользящий по направляющим, и шатун соединен уже со штоком.
На рисунке ниже, вы видите одноцилиндровый, двухцилиндровый рядный, и четырехцилиндровый V -образный двигатели.
Следует заметить, что в отличие от реальных двигателей, в алгоду они имеет довольно толстые детали, чтобы предотвратить их прохождение друг через друга.
В алгоду нет огня, поэтому сделать ДВС в принципе невозможно (если не считать скриптовые двигатели с похожим циклом). Но есть несколько достойных замен на выбор, это такие двигатели:
Существуют также различные работающие курьезы, но я не буду отвлекать ваше внимание на них…
Немного о принципе работы этих типов.
Все они работают с помощью скриптов, только пружинный может без них. В коллизионном меняется группа столкновений поршня или специальной детали, и они вытесняют друг друга. Но вытеснитель закреплен на цилиндре, поэтому поршень движется до следующей мертвой точки, где процесс обращен в обратную сторону. В пружинном через переменную изменяется длина пружины либо, если без скриптов, у пружины ставиться отрицательное затухание, таким образом поршень опять движется. Спавновый двигатель напоминает паровой – в цилиндр спавняться объекты, которые вытесняют поршень, а потом стираются.
Пружинный двигатель достаточно прост, поэтому я ограничусь его изображением.
А вот на спавновые и коллизионные мы рассмотрим поподробнее.
У них обоих в верхней части цилиндра находится объект, с которым поршень соприкасается, находясь в своей самой верхней точке. Если это спавновый двигатель, то в коллайдере записан код спавна объектов. А если коллизионный – код переключения группы столкновений поршня.
Вот пример спавнового и коллизионного двигателей
После этой теории следует переходить к практике. Привожу порядок своих действий при постройке двигателей:
- Сделать главный вал
- Сделать поршень, представить его крайнее верхнее и нижнее положения
- Сделать вокруг поршня цилиндр
- Найти рабочий ход (расстояние между одной и той же точкой поршня в верхнем и нижнем положении)
- Найти радиус кривошипа (половина рабочего хода), сделать шатун.
- Сделать коллайдеры и вытеснители.
- Настроить коды и группы столкновений.
Вот вроде бы и все. Примеры двигателей и некоторые модификации можете посмотреть в прикрепленной сцене.
Algodoo
Algodoo creates a new synergy between science and art
Algodoo is a unique 2D-simulation software from Algoryx Simulation AB. Algodoo is designed in a playful, cartoony manner, making it a perfect tool for creating interactive scenes. Explore physics, build amazing inventions, design cool games or experiment with Algodoo in your science classes. Algodoo encourages students and children’s own creativity, ability and motivation to construct knowledge while having fun. Making it as entertaining as it is educational. Algodoo is also a perfect aid for children to learn and practice physics at home.
Functionality
With Algodoo you can create simulation scenes using simple drawing tools like boxes, circles, polygons, gears, brushes, planes, ropes and chains. Easily interact with your objects by click and drag, tilt and shake. Edit and make changes by rotating, scaling, moving, cutting or cloning your objects.
Physical elements
You can also add more physics in your simulation like fluids, springs, hinges, motors, thrusters, light rays, tracers, optics and lenses. Algodoo also allows you to explore and play around with different parameters like gravity, friction, restitution, refraction, attraction, etc.
Analyze and visualize
For deeper analysis you can also show graphs or visualize forces, velocities and momentum. You can also enhance your visualization by showing X/Y components and angles.
Algobox – Sharing scenes
In Algobox, our scene library with over 50 000 scenes, you can easily save and share your creations with friends or browse and download other user made scenes. Algobox is easily accessed from within Algodoo or from this website under Scenes.
Community
With a large and active community, engaging educators, parents and kids you can discuss and share your thoughts about Algodoo.
Technology
Algodoo is based on the latest technologies, from Algoryx Simulation AB, for interactive multiphysics simulation, including variational mechanical integrators and high performance numerical methods.Algodoo runs on Windows and Mac OS. Algodoo is optimized for the Intel powered convertible Classmate PC and interactive whiteboard systems like SMART Board.
Additional information
-
Version
2.1.0 -
Last update
2019-12-15 -
Downloads
1.2K -
License
Free -
Size
41.1MB -
Requires
Windows XP, Windows Vista or Windows 7
Category
Free Developer Tools/ Programming languages
Back
Variable Types
Variables in Algodoo are typeless, meaning they can contain any form of data dynamically without having to cast the variable to a new type. Some basic types used in Algodoo are:
Integer — A number without decimal digits:
_hs = 64;
Float — A number containing decimal digits:
math.pi = 3.14;
String — A chain of symbols, usually as text. Assigned using «»:
scene.my.wikia = "Algodoo Wiki";
Boolean — A variable only able to take the state True and False:
_visible = true;
More advanced variables do exist, often containing basic variables in return:
Array — A variable containing multiple values of any type as a list. Assigned using square brackets with every value separated using comma. Values contained inside the array don’t have to be of the same variable type:
_data = ];
Code — Stores executable thyme code. The code gets executed by placing variable in code. It can also return values:
_code = {e.this.text = "Hello World"};
Function — Similar to Code, except the Thyme code is executable. It is also able to take and return variables. A function gets stored in form of:
(par1, par2,…)=>{code here}
_function = (f, g)=>{f + g};
Code is called as:
var(par1, par2,…):
e.other.pos = ;
Functions and regular Codes return the value that was used in the last line. In this example, the result of f + g would be the last value used.
This also shows that the events listed above are merely a special type of function, using the parameter e, which contains all information about the event in form of a class.
Classes are the only variable type that can’t be made by the user. They act like arrays, with the difference of their content being named variables as well. Their contents can be accessed with the syntax: var.content. While it is not possible to make the variable’s classes, as Thyme does not auto-cast to this type, it is possible to edit and even create new variables within an existing class. The only class type variables available to the user is the event data value’s «e». Most of Algodoo’s global variable organization (scene.my, app.camera, etc.) and variables referring to objects. For example: When copying an object into a textbox, or using entityByGeomId().
Displaying the e-value of an onClick event as text:
ClassObject with children:
clickCount = 1;
handled = false;
pos = ;
this -> {
    inertiaMultiplier = 1.0;
    resources = [];
    timeToLive = ∞;
    textureClamped = ;
    ...
This also shows the reason why we use e.this…, e.other…, e.pos, etc. When using the event variable. «This», «Other», and often more variables are actually variables stored within the class type variable e, and we access them this way.
Beginner Scripts
Circle Spawner
(e)=>{
    Scene.addCircle{
        onclick = (e)=>{};
        oncollide = (e)=>{};
        ondie = (e)=>{};
        onhitbylaser = (e)=>{};
        onkey = onkey;
        onspawn = (e)=>{};
        inertiamultiplier = inertiamultiplier;
        resources = resources;
        timetolive = timetolive;
        textureclamped = textureclamped;
        adhesion = adhesion;
        attractiontype = attractiontype;
        attraction = attraction;
        texture = texture;
        update = update;
        vel = vel;
        restitution = restitution;
        materialvelocity = materialvelocity;
        showforcearrows = showforcearrows;
        refractiveondex = refractiveindex;
        texturematrix = texturematrix;
        protractor = protractor;
        collideset = collideset;
        drawborder = drawborder;
        reflectiveness = reflectiveness;
        friction = friction;
        materialname = materialname;
        pos = pos;
        density = density;
        colorhsva = colorhsva;
        angvel = 0;
        poststep = poststep;
        edgeblur = edgeblur;
        angle = angle
    }
}
Box Spawner
(e)=>{scene.addBox({size := ; density := 2.00; pos := e.pos; restitution := 0.5; friction = 0.5; angle := 0})}
Self Collision
(e)=>{heteroCollide = false}
Collide Water
(e)=>{collideWater = true}
Change Collision of other objects or itself
(e)=>{e.this.collideSet = 1} or (e)=>{e.other.collideSet = 1}
Change Shape Color : R=red, G=green, B=blue, A=visibility-attribute: value-range = 0.0 to 1.0
(e)=>{color = }
Text Color
(e)=>{textColor = }
Text Size
(e)=>{textScale = 3}
Density
(e)=>{density = 10.02}
Attraction
(e)=>{attraction = 50}
To repel — use a negative number with parentheses.
(e)=>{attraction = (-20)}
Killer
(e)=>{killer = true}
Set destroy key (With spawned objects)
(e)=>{buttonDestroy := "e"}
Set Collision (With spawned objects)
(e)=>{collideSet := n} // n is equal to any integer from 0 to 1023
Add Text (With spawned objects)
(e)=>{text := "Hello World!"}
Teleport a Object
(e)=>{e.other.pos} //x,y are coordinates where object will be teleported
The statements below are whole-SCENE variables (the variables only exist in one place). So you don’t need a colon (:) in front of the equal-sign.
Anti-Gravity
(e)=>{Sim.gravityAngleOffset = 3.1415927}
Pause Simulation
(e)=>{sim.running = false}
Change Zoom Level
(e)=>{scene.camera.zoom = 17.700001}
Change Camera Pan
(e)=>{scene.camera.pan = }
Change Simulation Wind Angle
(e)=>{sim.windangle = 3.1415927} // value is in radians, not degrees
Change Simulation Wind Strength
(e)=>{sim.windstrength = 10} // in m/s squared ---> (m/s)^2
Capacitors
A capacitor is a device that holds a small charge and quickly releases it. They can be used in the real world to convert AC to DC, up voltage by turning current from DC to AC, and more.
They’re even more useful in Algodoo since capacitors can power light bulbs, batteries, protection circuits, and even more. They’re quite easy to make. Put this in your code to create a basic capacitor. Set _charge to 0 and set _action1 and _action2 to the code you want.
postStep:
(e)=>{_charge = _charge = 1;
charge > 0 ? {_action1(e)} : {_action2(e)}}
onHitByLaser:
(e)=>{_charge = 3}
The scripting menu of the glowing part of an LED by little.
So, what simulation methods are actually used in Algodoo?
Warning – technical description…
Well, Algodoo basically simulates mechanical systems that are described by Newton’s equations. However, rather than starting with Newton’s laws, resulting in coupled differential equations and thereafter discretizing these, we start with a Lagrangian formulation of mechanics. The Lagrangian is discretized in
time and space, and thereafter we apply a discrete variational principle resulting in difference (or “stepping”)
equations for the system. In this way we can describe particle systems, rigid body systems
with constraints and motors, impacts, contacts and dry friction, as well as incompressible fluids and visco-elasto-plastic materials.
Create Educational Scenes
In session 2 you will learn more about how to create educational scenes with Algodoo. In our step-by-step lesson tutorials you will learn how to create your own educational scenes and what educational aspects and related questions that should be considered. The lesson tutorials require a little more of your patience and skills, yet at the same time they will encourage you to find your own ways of creating components and scenes within Algodoo.
-
-
Start by opening the “Float and Sink” lesson tutorial. In this lesson you will learn how to work with water and density inside Algodoo. Take time stepping through the guide and answer the given questions. Tip: When opening a lesson tutorial. Move the tutorial window to the upper right corner in Algodoo. In this way you will be given more space for creating your scenes.
-
-
-
Step forward to the next lesson tutorial – “Friction of a sliding object”. In this tutorial you will learn more about working with friction and different materials and how to visualize forces and velocities.
-
-
Start the last lesson tutorial – “Rainbows”. This tutorial will teach you how to create and experiment with optics.
Are simulations in Algodoo accurate and correct, or is this just a toy?
Algodoo is indeed a digital toy, and nevertheless simulations are of very high quality,
using cutting edge scientific methods for multiphysics simulation.
However, there are some things to keep in mind:
The time step in Algodoo is by default 1/60 second (60 Hz), so any modeling of real-world physics happening at shorter time scales will be hard to reproduce. Typically this also means that the physics occuring on very short length scales is hard to resolve with this timestep, so we don’t recommend sub-centimeter physics at all. This scale limitation also holds for fluids.
When simulating a scene, Algodoo is solving a large system of equations using numerical methods. In order to ensure interactivity, the solution is approximate and this may lead to artefacts in certain cases.
The simulation engine in Algodoo is rather complex, and as with all software it may contain bugs. If you have found an inconsistency in the simulation that you believe should not be there, you should report this!
We do our very best to make sure Algodoo has high fidelity physics, but legally Algoryx has to issue the usual statement that: The software is provided as is, without warranty of any kind, express or implied, including but not limited to the warranties of merchantability, fitness for a particular purpose and noninfringement of third party rights. In no event shall the authors or copyright holders, Algoryx Simulation AB, be liable for any claim, damages or other liability, whether in an action of contract, tort or otherwise, arising from, out or in connection with the software or the use or other dealings in the software.
Algodoo Lessons
In session 3 you will take a closer look at Algodoo Lessons. This is a library with more than 60+ teacher-created lessons, each and every one corresponding to different areas in the curriculum. Algodoo Lessons is also designed for easily drafting, saving and sharing with other teachers or students who need content support when using Algodoo.
-
-
Start by opening the lesson library. You will first enter a Welcome screen. Step through the Quick tour that will guide you through basic features and the lesson layout.
-
-
-
You can search among all Algodoo lessons using the search table or by using the search tab in the upper right corner.
- Start by entering the browsing table and look for lessons by selecting your “Language”, “Target group”, “Lesson category” and “Teaching discipline”. All lessons that match your preferences will then be listed.
- Example: Language – English, Target – Key stage 3, Category – Demonstration, Discipline – Static forces
- Try searching for lessons with the quick search.
Search words: Force, friction, energy, optics, etc.
-
Open and read your first lesson. Get familiar with the lesson layout and structure. Remember that all lessons in the lesson library are split into three different sections: 1 – General info table about the lesson, 2 – attached scenes to download and run, and 3 – a step-by step description on how to perform the lesson within Algodoo.
- Run a search for a specific lesson. Open a lesson from the list.
- Read the lesson information to get familiar with the content.
- Open the attached scene or follow the step-by step guide on how to design the scene.
- Reflect over the lesson content and design.
-
-
-
For creating and sharing your own lessons you need a personal account (see step 2). You create a lesson by clicking the “New lesson” button and enter the necessary fields.
- First open/create a scene that you want to add to the lesson library.
- Click the “New lesson” button.
- Enter the general information about the lesson you want to create.
- Attach a scene.
- Add steps on how to perform the lesson.
- Save lesson as a draft. You can then complete it later on.
- List your drafts by clicking the drafts-icon. Open your lesson again. Make some changes. If ready for publishing, click the publish button or save the lesson as a draft again.
-
Well done! Your are now a complete Algodooer.
If you like, explore more options in the lesson library, examine how to translate a lesson (there is a translate button for translating a lesson in to you language) or update your account info.
Аналоги
Очень грустная новость для всех тех, кто ждет Algodoo – для мобильных устройств Android игрушка находится в стадии разработки. Мы предложим несколько увлекательных песочниц, максимально похожих на обозреваемую нами игру.
Universe Sandbox
Не менее увлекательная песочница, однако вместо физики здесь выступает астрономия. Пускай она не такая скучная, но все же непонятная и неизведанная. Вряд ли найдется человек, который знает, что произойдет при столкновении планет, планеты с солнцем и многое другое.
Universe Sandbox – уникальная игра, позволяющая последить за космическими процессами и узнать больше о солнечной системе, которая сегодня для нас остается далёким и неизведанным местом.
Когда ты вам надоест наблюдать за движениями, происходящими в космосе, вы сможете попробовать себя в роли творца. Игра предлагает большое количество различных возможностей. Если вы хотите узнать, как будет выглядеть планета под другим углом или увидеть столкновение нескольких галактик между собой – в Universe Sandbox с лёгкостью можно это устроить.
Большое количество креатива вкупе с вашей фантазией поможет вам «залипнуть» в игре надолго! А скачать ее вы сможете у нас совершенно бесплатно.
Powder Toy
Одна из похожих на Algodoo песочница, появившаяся для Android совсем недавно. Во многом она похожа на стандартный Paint, но благодаря большому количеству уникальных элементов вы сможете творить настоящие чудеса.
Здесь вы найдете много интересного: взрывающиеся порошки и жидкости, газы, твердые и газообразные вещества, радиоактивные элементы и многое другое. И самое главное – все они между собой взаимодействуют. Одни при взаимодействии вызывают позитивные реакции, а другие – взрывы и ядерные излучения.
Когда вы приспособитесь к управлению, можно смело начинать создавать свои творения: атомные бомбы, ядерные боеголовки и мощные пушки. А если вам не хватит доступных элементов, можно перейти в браузер прямо из приложения для загрузки новых шаблонов, разработанных другими пользователями.
Raxx: The Painted Dog (2011)
Пес Raxx застрял в мире рисунков! И Вам предстоит вернуть его домой. Используя волшебные мелки, изменяйте пейзаж и помогите ему в нелегком прохождении! Не забывайте собирать восхитительные сахарные косточки, поскольку Вы путешествуете на большое расстояние. Полная восхитительных пейзажей и мультяшной рисованной графики, «Raxx: The Painted …
Год выпуска: 2011Жанр: Головоломка, логическийРазработчик: BigfishgamesИздательство: BigfishgamesСайт разработчика: http://www.bigfishgames.com/Язык интерфейса: АнглийскийПлатформа: PCОперационная система:Процессор: 1.6 GHzОперативная память: 1024 MBМесто на жестком диске: 104 MBЗвуковое устройство: DirectX: 9.0
Learn the basics
The aim in session 1 is to get familiarized with Algodoo. You will first learn how to create a basic Algodoo scene. When done with that you will learn more about the different tools in Algodoo. The last step in this session is how to master the magic Sketch tool.
Open Tutorials
Open Algodoo built-in tutorials by clicking the Tutorial button in the Algodoo welcome screen (or click the ?-mark in the Algodoo top menu)
Tutorial – Crash course
Start the “Crash course” tutorial. In this guide you will create your first Algodoo scene by stepping through basic features.
Tutorial – Tools
When done with the “Crash course” step forward to the next tutorial – “Tools”. In this tutorial you will learn more about the different tools in Algodoo. Take your time to read the info text about the tools for learning more about specific settings and different tips and tricks.
Tutorial – Sketch tool
Start the last basic tutorial – “Sketch tool”. The sketch tool is a universal tool that lets you master most of the other tools by using different gestures that minimize the time required for swapping and changing between different tools when creating your scenes.
War Thunder v.1.37.45.84 (2012)
War Thunder — компьютерная многопользовательская онлайн-игра, посвященная боевой авиации, бронетехнике и флоту времен Второй Мировой войны и послевоенного периода. Проект разрабатывается и издается компанией Gaijin Entertainment, известной в первую очередь, своими игровыми авиасимуляторами для ПК и консолей. По состоянию на 1 июля 2013 го …
Год выпуска: 2012Жанр: Авиа симулятор / 3D / Massively multiplayerРазработчик: Gaijin EntertainmentИздательство: Gaijin EntertainmentСайт разработчика: http://gaijinent.com/Язык интерфейса: русскийПлатформа: PCВерсия: 1.37.45.84Минимальные системные требования:Процессор: 2,2 ГГцОперативная память: 1 Гб
List of useful Thyme Variables and Expressions
The following list contains a series of Thyme expressions. Should you find that you know code that should belong in this list, feel free to add it as long as it is no duplicate.
- app.camera.* — All camera influencing variables are listed here
- sim.gravity* — All gravity influencing variables are listed under sim prefixed by gravity
- rotation = math.atan2(e.other.pos(1)-pos(1),e.other.pos(0)-pos(0)) — Determines the angle between 2 objects in the coordinate system and rotates the first object accordingly.
- vel = vel + /sim.frequency + *sim.gravityforce/sim.frequency — Neutralizes the effect of standard scene gravity with the first part and applies new gravity in your specified Angle to the object using the second part. Leave out the 2nd part to achieve zero-gravity.
- rand.uniform01 — Generate a random float integer between 0 and 1, with a random length
- rand.normal — Same as rand.uniform01, but it has a 50% chance to invert the output thus doubling the amount of possible outcomes using negative integers.
About Algodoo
Algodoo is an easy-to-use drawing tool empowered by physics simulations. Everything you draw can come to life! Making use of the same core technology as in AGX Dynamics, Algodoo is designed and developed to be both educational and entertaining.
As the number one software for creating interactive physics simulations, Algodoo is the perfect tool for learning, exploring, experimenting and laborating with real physics. The Algodoo software is designed and optimized for future classroom solutions like 1:1 computing, interactive whiteboard systems and other modern technology. Also including content like lesson plans, pre-made scenes and tutorials, making Algodoo both easy to learn and use.
Обзор
Игру относят к категории «Разное», и она отлично подойдёт для тех, кто хочет скрасить одиночество и ненадолго отвлечься. В нескольких словах Algodoo отлично подойдёт для развития малышей, помогая изучать физику разных тел в увлекательной и понятной форме.
Если и есть предмет, с которым сопротивляется большое количество детей, то это определенно физика. В этой науке сложно понять не только сложные моменты, но и более простые детали: от силы тяжести и тяготения до взаимодействия с различными предметами. А чтобы быстрее усвоить материал, была и разработана программа, вместе с которой вы не просто учитесь, а получаете удовольствие.
Концепция здесь одна: дети не просто развиваются, а с увлечением проводят время. В приложении доступно большое количество предметов и инструментов, с помощью которых можно рисовать разные предметы. Вам будет очень просто создать поверхности, и творить вы можете все, что угодно.
Программа является отличным средством для изучения физики не только в домашних условиях, но и в учебном заведении. На сегодняшний день большинство школ оснащено компьютерами, поэтому можно с лёгкостью обучаться в интересной атмосфере.
А ещё один плюс – простой интерфейс и удобное управление Algodoo. Достаточно двух пальцев, чтобы управлять элементами в игре и создавать настоящие шедевры!
Похожие записи:
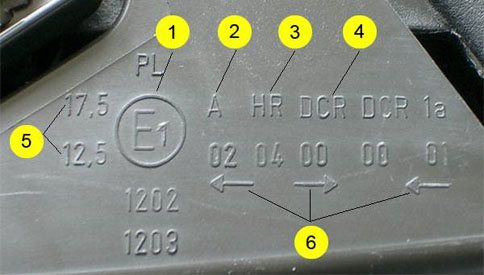 Маркировка фар: расшифровка аббревиатур и сокращений! важно!
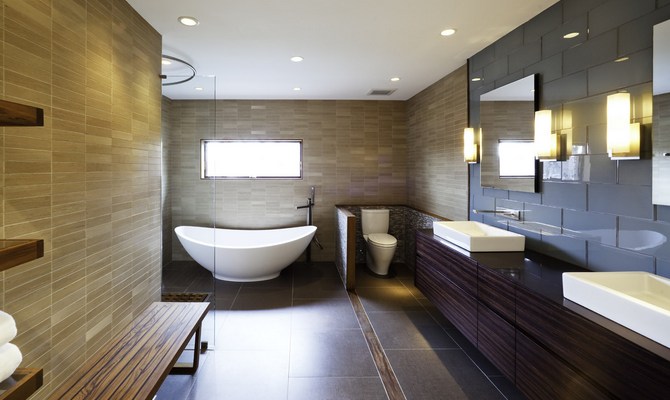 Светильники точечные в ванную комнату
 ? lcd 1602 русский шрифт на ардуино
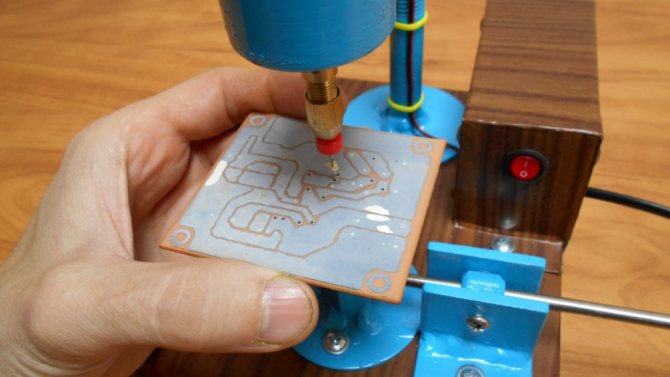 Можно ли собрать сверлильный станок чпу для печатных плат своими руками?
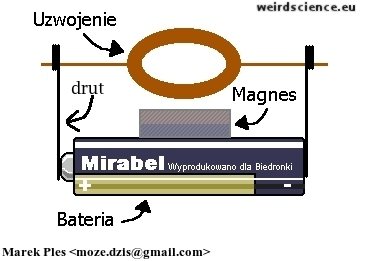 Делаем самодельный двигатель из батарейки, проволоки и магнита
 Розетки с таймером: виды, принцип работы, какую лучше выбрать и почему