Wrapping Up
This article was a quick guide on how to get pressure, temperature and humidity readings from a BME280 sensor with the ESP32 using Arduino IDE.
Now, you can take this project further and display your sensor readings in an OLED display; create a datalogger; or create a web server to display the latest sensor readings. Here’s a list of projects that might help with these ideas:
- ESP32 Publish Sensor Readings to Google Sheets
- ESP32 OLED Display with Arduino IDE
- ESP32 Web Server with BME280 – Weather Station
- Low Power Weather Station Datalogger (MicroPython)
- ESP32/ESP8266 Insert Data into MySQL Database using PHP and Arduino IDE
If you want to learn more about the ESP32, make sure you enroll in our course: “Learn ESP32 with Arduino IDE“.
Thanks for reading.
Library
The cactus_io_BME280_I2C library provides the following functions:
- BME280_I2C() Creates an object using default address of 0x77
- or BME280_I2C(int address) Creates an object using alternative address. For example BME280_I2C(0x76)
- begin() Called to initialise the sensor after the object is created
- setTempCal(float) Allows you to define a temp calibration offset if it reads high
- readSensor() Called to read data from the sensor
- getTemperature_C() Returns a float value in degrees celsius
- getTemperature_F() Returns a float value in degrees fahrenheit
- getHumidity() Returns a float as a percentage humidity
- getPressure_MB() Returns a float in millibars
- getPressure_HP() Returns a float in hectapascals
How the Code Works
Continue reading this section to learn how the code works, or skip to the “Demonstration” section.
Libraries
The code starts by including the needed libraries: the wire library to use I2C, and the Adafruit_Sensor and Adafruit_BME280 libraries to interface with the BME280 sensor.
Sea level pressure
A variable called SEALEVELPRESSURE_HPA is created.
This variable saves the pressure at the sea level in hectopascal (is equivalent to milibar). This variable is used to estimate the altitude for a given pressure by comparing it with the sea level pressure. This example uses the default value, but for more accurate results, replace the value with the current sea level pressure at your location.
I2C
This example uses I2C communication protocol by default. As you can see, you just need to create an Adafruit_BME280 object called bme.
To use SPI, you need to comment this previous line and uncomment one of the following lines.
setup()
In the setup(), start a serial communication:
And the sensor is initialized:
Note: when testing the sensor, if you can’t get any sensor readings, you may need to find your BME280 sensor I2C address. With the BME280 wired to your Arduino, run this I2C scanner sketch to check the address of your sensor. Then, pass the address to the begin() method.
Printing values
In the loop(), the printValues() function reads the values from the BME280 and prints the results in the Serial Monitor.
Reading temperature, humidity, pressure, and estimate altitude is as simple as using the following methods on the bme object:
- bme.readTemperature() – reads temperature in Celsius;
- bme.readHumidity() – reads absolute humidity;
- bme.readPressure() – reads pressure in hPa (hectoPascal = millibar);
- bme.readAltitude(SEALEVELPRESSURE_HPA) – estimates altitude in meters based on the pressure at the sea level.
Grove – BME280 Environmental Sensor (Temperature Humidity Barometer) ($17.00)
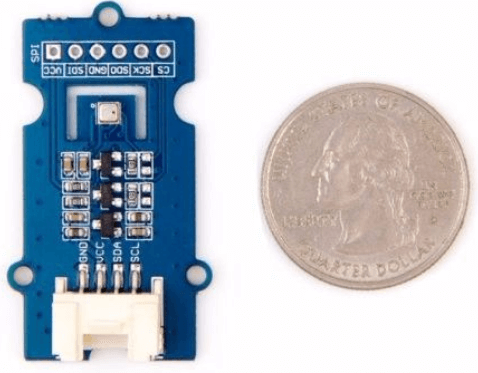
- This is Seeed very own Grove- BME280 Environmental Sensor based on Bosch BME28 which is low-cost, high-precision and supports both I2C and SPI communication.
- Grove BME280 provides a precise measurement of not only barometric pressure and temperature, but also the humidity in the environment.
- Owing to its high accuracy on measuring the pressure, and the pressure changes with altitude, we can calculate the altitude with ±1 meter accuracy, which makes it a precise altimeter as well.
- In addition, you don’t even need to worry about the I2C collisions as it provides both I2C and SPI interfaces.
- To use SPI, simply de-solder the bonding pads on the back of this BME280 breakout board.
- For I2C, the board also provides 2 I2C addresses for you to select as you want.
- We also have a highly abstracted library for users to build projects quicker with the BME280!
Specifications:
| Parameter | Grove – BME280 Environmental Sensor |
|---|---|
| Dimensions | 40mm x20mm x15mm |
| Weight | G.W 10g |
| Supply Voltage | 5V or 3.3V |
| Current Consumption | 0.4 mA |
| Humidity Accuracy | ±3% |
| Temperature Range | -40 to 85 |
| Temperature Accuracy | ±1 |
| Air pressure Range | 300 – 1100 hPa |
| Air Pressure Accuracy | ±1.0 hPa |
You may be wondering, what exactly is grove? Grove is Seeed’s very own modular, standardized connector prototyping system. Grove takes a building block approach to assemble electronics and compared to the jumper or solder based system, it is easier to connect, experiment and build which simplifies the learning system for hobbyists. Do not worry as it is not to the point where it becomes dumbed down.
Принцип действия барометра на BMP280, BMP180, BME280
Датчики давления работают на преобразовании давления в движение механической части. Состоит датчик давления из преобразователя с чувствительным элементом, корпуса, механических элементов (мембран, пружин) и электронной схемы.
Датчик BMP280 создан специально для приложений, где требуются малые размеры и пониженное потребление энергии. К таким приложениям относятся навигационные системы, прогноз погоды, индикация вертикальной скорости и другие. Датчик обладает высокой точностью, хорошей стабильностью и линейностью. Технические характеристики датчика BMP280:
- Габариты 2 х 2,5 х 0,95 мм.
- Давление 300-1100гПа;
- Температуры от 0С до 65 С;
- Поддержка интерфейсов I2C и SPI;
- Напряжение питания 1,7В – 3,6В;
- Средний ток 2,7мкА;
- 3 режима работы – режим сна, режим FORCED (проведение измерения, считывание значения, переход в спящий режим), режим NORMAL (перевод датчика в циклическую работу – то есть устройство самостоятельно через установленное время выходит из режима сна, проводит измерения, считывает показания, сохраняет измеренные значения и переходит снова в режим сна).
Датчик BMP180 – это дешевый и простой в применении сенсорный датчик, который измеряет атмосферное давление и температуру. Используется обычно для определения высоты и в метеостанциях. Состоит устройство из пьезо-резистивного датчика, термодатчика, АЦП, энергонезависимой памяти, ОЗУ и микроконтроллера.
Технические характеристики датчика BMP180:
- Пределы измеряемого давления 225-825 мм рт. ст.
- Напряжение питания 3,3 – 5В;
- Ток 0,5мА;
- Поддержка интерфейса I2C;
- Время срабатывания 4,5мс;
- Размеры 15 х 14 мм.
Датчик bme280 содержит в себе 3 устройства – для измерения давления, влажности и температуры. Разрабатывался для малого потребления тока, высокой надежности и долгосрочной стабильной работы.
Технические характеристики датчика bme280:
- Размеры 2,5 х 2,5 х 0,93 мм;
- Металлический LGA-корпус, оснащенный 8-ю выходами;
- Напряжение питания 1,7 – 3,6В;
- Наличие интерфейсов I2C и SPI;
- Потребляемый ток в режиме ожидания 0,1 мкА.
Если сравнивать все устройства между собой, то датчики очень похожи. По сравнению со своим предшественником, к которым относится BMP180, более новый датчик BMP280 заметно меньше по размерам. Его восьмиконтактный миниатюрный корпус требует аккуратности во время монтажа. Также устройство поддерживает интерфейсы I2C и SPI, в отличие от предшественников, которые поддерживали только I2C. По логике работы датчика изменений практически нет, была только усовершенствована температурная стабильность и увеличено разрешение АЦП. Датчик BME280, измеряющий температуру, влажность и давление, также похож на BMP280. Отличие между ними заключается в размерах корпуса, так как BME280 имеет датчик влажности, который немного увеличивает габариты. Количество контактов и их расположение на корпусе совпадают.
How the Code Works
Continue reading this section to learn how the code works, or skip to the “Demonstration” section.
Libraries
The code starts by including the needed libraries: the wire library to use I2C, and the Adafruit_Sensor and Adafruit_BME280 libraries to interface with the BME280 sensor.
SPI communication
As we’re going to use I2C communication, the following lines that define the SPI pins are commented:
Note: if you’re using SPI communication, you use the ESP32 SPI pins. For SPI communication on the ESP32 you can use either the HSPI or VSPI pins, as shown in the following table.
| SPI | MOSI | MISO | CLK | CS |
| HSPI | GPIO 13 | GPIO 12 | GPIO 14 | GPIO 15 |
| VSPI | GPIO 23 | GPIO 19 | GPIO 18 | GPIO 5 |
Sea level pressure
A variable called SEALEVELPRESSURE_HPA is created.
This variable saves the pressure at the sea level in hectopascal (is equivalent to milibar). This variable is used to estimate the altitude for a given pressure by comparing it with the sea level pressure. This example uses the default value, but for more accurate results, replace the value with the current sea level pressure at your location.
I2C
This example uses I2C communication protocol by default. As you can see, you just need to create an Adafruit_BME280 object called bme.
To use SPI, you need to comment this previous line and uncomment one of the following lines depending on whether you’re using hardware or software SPI (hardware SPI uses the ESP32 default HSPI pins; software SPI uses the pins defined on the code).
setup()
In the setup(), start a serial communication:
And initialize the sensor:
We initialize the sensor with the 0x76 address. In case you’re not getting sensor readings, check the I2C address of your sensor. With the BME280 sensor wired to your ESP32, run this I2C scanner sketch to check the address of your sensor. Then, change the address if needed.
Printing values
In the loop(), the printValues() function reads the values from the BME280 and prints the results in the Serial Monitor.
Reading temperature, humidity, pressure, and estimate altitude is as simple as using the following methods on the bme object:
- bme.readTemperature() – reads temperature in Celsius;
- bme.readHumidity() – reads absolute humidity;
- bme.readPressure() – reads pressure in hPa (hectoPascal = millibar);
- bme.readAltitude(SEALEVELPRESSURE_HPA) – estimates altitude in meters based on the pressure at the sea level.
Скетч 2: метеостанция с веб-сервером
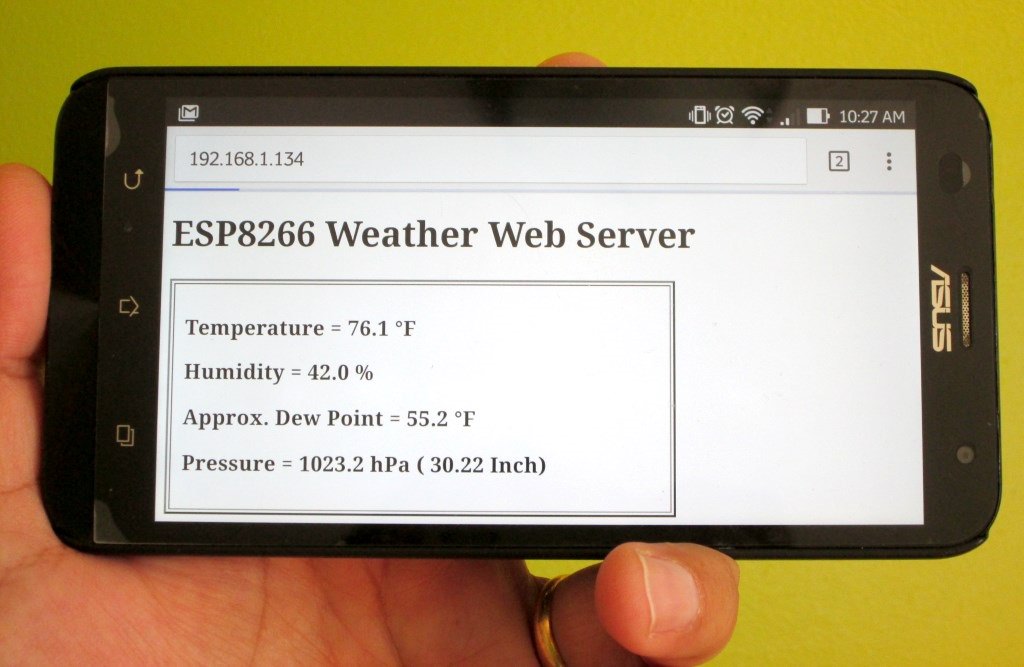
Еще один хороший вариант использование датчика BME280 – метеостанция с возможностью удаленного мониторинга через браузер.
В данном случае дисплейный модуль не задействован. ESP8266 подключается к Wi-Fi сети и поднимает веб-сервер, содержащий обновляемую показателями датчика страницу, которую можно открыть в браузере.
Хорошая статья на эту тему находится на англоязычном блоге Embedded Lab и там же можно скачать архив с готовым скетчем
Хочу только обратить внимание, что:
- У автора той статьи задействованы пины D3 и D4, тогда как у меня D5 и D6. Можно переподключить провода как предлагает он, а можно собрать устройство по моей схеме и переправить пины в скетче.
- Перед компиляцией скетча нужно ввести в него SSID и пароль своей Wi-Fi сети
Возможные ошибки при подключении и устранение их
Наиболее часто встречающаяся ошибка – неправильные данные о давлении и температуре, которые отличаются на несколько порядков от реального значения. Причиной этого чаще всего становится неправильное подключение – например, в библиотеке указано, что нужно подключать по I2C, а датчик подключен по SPI.
Также при использовании “китайских” датчиков можно столкнуться с нестандартными I2C или SPI адресами. В этом случае рекомендуется просканировать все присоединенные устройства с помощью одного из популярных скетчей и выяснить, по какому адресу откликается ваш датчик давления.
Еще одной проблемой может стать несоответствие рабочего напряжения питания модуля базовому напряжению используемого контроллера. Так, для работы с датчиком на 3,3 В вам потребуется создать делитель напряжения или использовать один из существующих готовых модулей согласования уровней. Кстати, такие модули достаточно дешевы и начинающим рекомендуется использовать их.
Небольшие отклонения от реальной величины могут быть связаны с калибровкой сенсора. Например, для датчика BMP180 все данные рассчитываются и задаются в скетче. Для получения более точного значения высоты нужно знать текущее значение давления над уровнем моря для данных координат.
Introducing BME280 Sensor Module
The BME280 sensor module reads barometric pressure, temperature, and humidity. Because pressure changes with altitude, you can also estimate altitude. There are several versions of this sensor module. We’re using the module illustrated in the figure below.
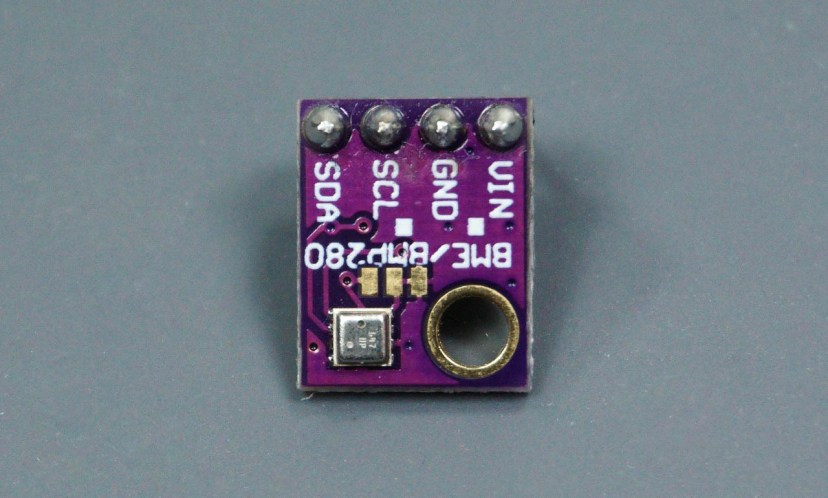
This sensor communicates using I2C communication protocol, so the wiring is very simple. You can use the default ESP32 I2C pins as shown in the following table:
| BME280 | ESP32 |
| Vin | 3.3V |
| GND | GND |
| SCL | GPIO 22 |
| SDA | GPIO 21 |
There are other versions of this sensor that can use either SPI or I2C communication protocols, like the module shown in the next figure:
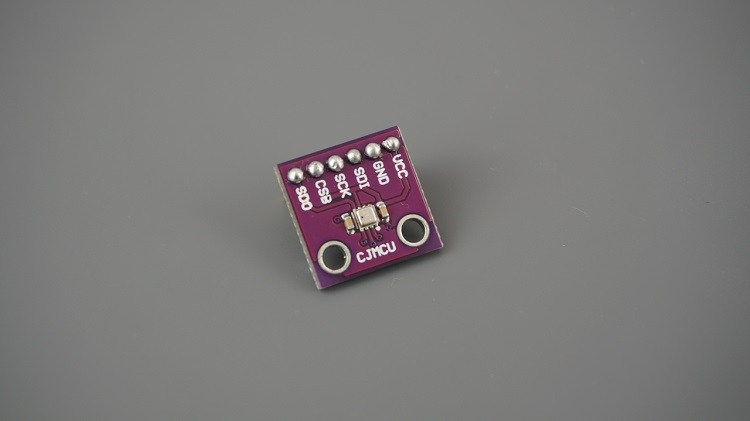
If you’re using one of these sensors, to use I2C communication protocol, use the following pins:
| BME280 | ESP32 |
| SCK (SCL Pin) | GPIO 22 |
| SDI (SDA pin) | GPIO 21 |
If you use SPI communication protocol, you need to use the following pins:
| BME280 | ESP32 |
| SCK (SPI Clock) | GPIO 18 |
| SDO (MISO) | GPIO 19 |
| SDI (MOSI) | GPIO 23 |
| CS (Chip Select) | GPIO 5 |
Отображение температуры, влажности, давления и высоты на веб-сервере ESP8266
Теперь мы собираемся настроить ESP8266 в режим станции (STA) и создать веб-сервер для выдачи веб-страниц любому подключенному клиенту в существующей сети.
Если вы хотите узнать о создании веб-сервера с ESP8266 в режимах AP/STA, ознакомьтесь с этим руководством:
Создание простого веб-сервера на ESP8266 NodeMCU в Arduino IDE
Прежде чем вы отправитесь загружать скетч, вам нужно внести одно изменение, чтобы он у вас заработал. Чтобы ESP8266 мог установить соединение с существующей сетью, вам необходимо изменить следующие две переменные в соответствии с учетными данными вашей сети.
Как только вы это сделаете, попробуйте скетч в работе.
Подключение BMP280 к Arduino по I2C/TWI
Так как датчик может работать по I2C и SPI, подключение можно реализовать двумя методами. При подключении по I2C нужно соединить контакты SDA и SCL.
Схема подключения BMP280 к Arduino
Для подключения понадобятся сам датчик BMP280, плата Ардуино, соединительные провода. Схема подключения показана на рисунке ниже.
Землю с Ардуино нужно соединить с землей на датчике, напряжение 3.3 В — на 3.3 В, SDA — к пину А4, SCL — к А5. Контакты А4 и А5 выбираются с учетом их поддержки интерфейса I2C.
Существуют несколько модулей с этим датчиком. Первый вариант — это модуль для работы в 3.3 В логике, данные модули будут подешевле; второй вариант — для работы в 5.0 В логике, на нём присутствуют: линейный стабилизатор напряжения на 3.3 В и преобразователи уровней 3.3/5.0 В на линиях SCK/SCL и SDI(MOSI)/SDA. Первый подойдёт для ардуин работающих от 3.3 В и Raspberry Pi / Orange Pi / Banana Pi и т.д., а второй — для обычных ардуин на 5.0 В.
Подключение BMP280 с встроенными стабилизатором напряжения на 3.3 В и преобразователями уровней 3.3/5.0 В на линиях SCK/SCL и SDI(MOSI)/SDA к Arduino.
| Arduino Mega | Arduino Uno/Nano/Pro Mini | BMP280 модуль | Цвет проводов на фото |
|---|---|---|---|
| GND | GND | GND | Черный |
| 5V | 5V | Vin | Красный |
| 20 (SDA) | A4 | SDA/SDI | Зелёный |
| 21 (SCL) | A5 | SCL/SCK | Жёлтый |
Подключение BMP280 без встроенного стабилизатора напряжения на 3.3 В к Arduino. В данном случае нужно использовать внешний преобразователь уровней на линиях SCK/SCL и SDI(MOSI)/SDA.
| Arduino Mega | Arduino Uno/Nano/Pro Mini | BMP280 модуль | Цвет проводов на фото |
|---|---|---|---|
| GND | GND | GND | Черный |
| 3.3V | 3.3V | VCC/3.3V | Красный |
| 20 (SDA) | A4 | SDA/SDI | Зелёный |
| 21 (SCL) | A5 | SCL/SCK | Жёлтый |
Примеры скетча
После запуска вы можете инициализировать датчик с помощью:
if (!bmp.begin()) {
Serial.println(«Could not find a valid BMP280 sensor, check wiring!»);
while (1);
}
|
1 |
if(!bmp.begin()){ Serial.println(«Could not find a valid BMP280 sensor, check wiring!»); while(1); } |
вернет True, если датчик был найден, и False, если нет. В случае с False, проверьте соединение датчика с платой Arduino!
Считать температуру и давление легко, просто вызовите функции:
bmp.readTemperature(); // Температура в градусах Цельсия.
bmp.readPressure(); // Атмосферное давление в гПа
|
1 |
bmp.readTemperature();// Температура в градусах Цельсия. bmp.readPressure();// Атмосферное давление в гПа |
Копируйте и скомпилируйте нижеприведённый скетч в Arduino IDE.
#include <Adafruit_BMP280.h>
Adafruit_BMP280 bmp280;
void setup() {
Serial.begin(9600);
Serial.println(F(«BMP280»));
while (!bmp280.begin(BMP280_ADDRESS — 1)) {
Serial.println(F(«Could not find a valid BMP280 sensor, check wiring!»));
delay(2000);
}
}
void loop() {
float temperature = bmp280.readTemperature();
float pressure = bmp280.readPressure();
float altitude = bmp280.readAltitude(1013.25);
Serial.print(F(«Temperature = «));
Serial.print(temperature);
Serial.println(» *C»);
Serial.print(F(«Pressure = «));
Serial.print(pressure);
Serial.println(» Pa»);
Serial.print(F(«Altitude = «));
Serial.print(altitude);
Serial.println(» m»);
Serial.println();
delay(2000);
}
|
1 |
#include <Adafruit_BMP280.h> Adafruit_BMP280bmp280; voidsetup(){ Serial.begin(9600); Serial.println(F(«BMP280»)); while(!bmp280.begin(BMP280_ADDRESS-1)){ Serial.println(F(«Could not find a valid BMP280 sensor, check wiring!»)); delay(2000); } } voidloop(){ floattemperature=bmp280.readTemperature(); floatpressure=bmp280.readPressure(); floataltitude=bmp280.readAltitude(1013.25); Serial.print(F(«Temperature = «)); Serial.print(temperature); Serial.println(» *C»); Serial.print(F(«Pressure = «)); Serial.print(pressure); Serial.println(» Pa»); Serial.print(F(«Altitude = «)); Serial.print(altitude); Serial.println(» m»); Serial.println(); delay(2000); } |
Результат
Температура рассчитывается в градусах Цельсия, вы можете преобразовать ее в градусы Фаренгейта, используя классическое уравнение F = C * 9/5 + 32.
Давление возвращается в единицах СИ Паскалей. 100 Паскалей = 1 гПа = 1 миллибар. Часто барометрическое давление сообщается в миллибарах или миллиметрах ртутного столба. Для дальнейшего использования 1 паскаль = 0,00750062 миллиметров ртутного столба или 1 миллиметр ртутного столба = 133,322 Паскаля. Таким образом, если вы возьмете значение паскаля, скажем, 100734 и разделите на 133,322, вы получите 755,57 миллиметров ртутного столба.
Также возможно превратить BMP280 в альтиметр. Если вы знаете давление на уровне моря, библиотека может рассчитать текущее атмосферное давление в высоту.
Software
The hookup and Arduino Sketch is for connecting a single Adafruit BME280 breakout board.
You will need to download the cactus.io BME280_SPI library to work with this sample sketch. The library supports reading the barometric pressure,
humidity and temperature from the sensor.
We create the BME280 object in one of two ways. The first way is if we are using the hardware SPI pins as shown above. Uncomment line 10 in the code below
and comment out line 11.
To use software SPI which allows us to use alternate digital pins we need to comment out line 10 and uncomment line 11. We also need to define what pins we are using. This is
done in lines 4 to 7. We need to change the defines pin numbering to correspond to the SPI functions. For example if digital pin 7 is connected to CS on the
breakout board we would change line 7 to #define BME280_CS from 10 to 7.
To get the data from the sensor we need to call bme.readSensor(). We can then call the various functions to get the temperature, humidity and pressure.
The sensor returns the temperature in degrees celsius by design. We can call the method in the BME280 library called getTemperature_C to get the celsius
value or getTemperature_F for the value in fahrenheit.
The barometric pressure from the sensor is returned in Pascals. 100 Pascals = 1hPa = 1 millibar. The library method getPressure_MB will return the value in millibars.
When we create the BME280 object in the sketch we define the hardware pins that are used for chip select, data in and out and finally the serial clock.
We have found that when the BME280 is enclosed inside a case or nearby a circuit board the heat generated by voltage regulators can affect the temperature
reading from the BME280. We have included a function in the library that allows us to apply a temperature calibration offset to the value returned by getTemperature_C
or _F. Basically it justs adds the calibration offset. So if the temperature is reading 2 degrees high then we use this function:
bme.setTempCal(-2); which will subtract 2 degrees from the temperture reading.
- The sketch Supports only SPI bus connection.
- The sketch Supports only one sensor connected.
- Its blocking code.
Обзор модуля атмосферного давления BMP280
Модуль представляет из себя высокоточный цифровой измеритель атмосферного давления на базе микро-чипа BMP280 от фирмы BOSH. После изготовления каждый датчик проходит индивидуальную калибровку в заводских условиях. Его малые размеры, низкое энергопотребление и высокая измерительная способность позволили завоевать популярность среди множества разработчиков Arduino-проектов. Модуль BMP280 был разработан фирмой как более технологичная модель своего предшественника BMP180. Данная модификация, в отличие от своего младшего брата, предоставляет пользователю целых 2 последовательных интерфейса обмена данными (SPI и I2C), а также 3 режима работы:
NORMAL – в данном режиме модуль просыпается с определённой периодичностью, выполняет необходимые измерения и снова засыпает. Частота измерений задаётся программным путём, а результат считывается при необходимости.
SLEEP – режим максимально пониженного энергопотребления.
FORCED – этот режим позволяет будить модуль подачей внешнего управляющего сигнала. После выполнения измерений, модуль автоматически переходит в режим пониженного энергопотребления.
Помимо способности измерять показания атмосферного давления, разработчик наделил BMP280 возможностью определять температуру окружающей среды. Все производимые вычисления могут быть отфильтрованы настраиваемым программным фильтром. На рисунке №1 показан внешний вид модуля и его электрическая схема.
Рисунок №1 — внешний вид и схема модуля BMP280
Как видно из вышеприведенной схемы на модуле предусмотрены конденсаторы для фильтрации по питанию и подтягивающие резисторы интерфейсов ввода/вывода.
Описание библиотеки для работы с датчиком. Пример скетча
Для работы с датчиком BMP180 существуют различные библиотеки, упрощающие работу. К ним относятся SFE_BMP180, Adafruit_BMP085. Эти же библиотеки подходят для работы с датчиком BMP080. Для датчика bmp280 используется похожая библиотека Adafruit_BMP280.
Первый пробный скетч будет заставлять датчик считывать показания давления и температуры. Код подойдет как для датчика BMP180 , так и для BMP280, нужно только подключить правильную библиотеку и указать верные контакты, к которым подключен модуль. В первую очередь в коде нужно подключить все библиотеки и инициализировать работу датчика. Для определения давления нужно сначала узнать температуру. Для этого используется следующий элемент кода.
status = pressure.startTemperature();// Считываются данные с датчика о температуре if(status!=0){ delay(status); // Ожидание status = pressure.getTemperature(T); // Сохранение полученных данных о температуре if(status!=0){ Serial.print("Temperature: "); // Выведение на экран слова «Температура» Serial.print(T,2); // Вывод на экран значения температуры. Serial.println("deg C, "); //Печать символа градуса Цельсия.
Затем нужно получить информацию об атмосферном давлении.
status = pressure.startPressure(3); // происходит считывание давления if(status!=0){ delay(status); // Ожидание status = pressure.getPressure(P,T); // получение давления, сохранение if(status!=0){ Serial.print("Absolute pressure: "); // Вывод на экран слов «Атмосферное давление» Serial.print(P,2); // Вывод на экран значения переменной mBar Serial.print(" mbar, "); // Вывод на экран текста "mBar" Serial.print(P*0.7500637554192,2); // вывод на экран значения в mmHg (мм.рт.ст.) Serial.println(" mmHg");} // вывод на экран единицы измерения давления "mmHg" (мм. Рт.ст.).
После загрузки скетча в окне мониторинг порта появятся данные о температуре и атмосферном давлении.
Датчик BME280 также показывает давление и температуру, дополнительно он может считывать показания о влажности, который по умолчанию выключен. При необходимости можно произвести настройки датчика и начать считывать показания о влажности. Диапазон измерения от 0 до 100%. Библиотека, которая нужна для работы с датчиком, называется Adafruit_BME280.
Код похож на тот, что описан выше, только к нему еще добавляются строки для определения влажности.
void printValues() { Serial.print("Temperature = "); Serial.print(bme.readTemperature()); Serial.println(" C"); //определение температуры, вывод ее на экран в градусах Цельсия. Serial.print("Pressure = "); Serial.print(bme.readPressure() / 100.0F); Serial.println(" hPa"); //определение давления, вывод его на экран Serial.print("Humidity = "); Serial.print(bme.readHumidity()); Serial.println(" %"); //определение влажности в процентах, вывод измеренного значения на экран. Serial.println(); }
Installing Necessary libraries
Communicating with a BME280 module is a bunch of work. Fortunately, Adafruit BME280 Library was written to hide away all the complexities so that we can issue simple commands to read the temperature, relative humidity & barometric pressure data.
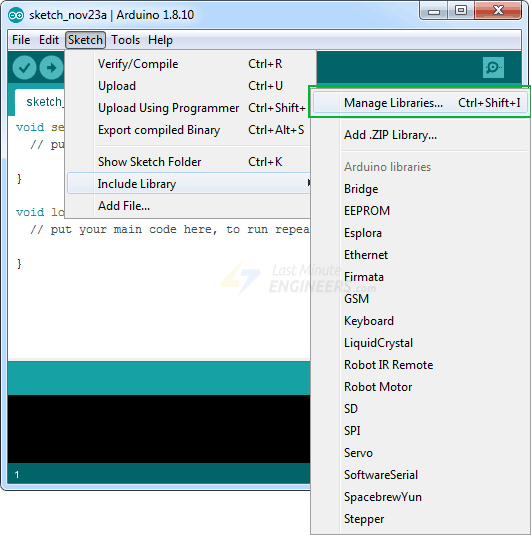
To install the library navigate to the Sketch > Include Library > Manage Libraries…Wait for Library Manager to download libraries index and update list of installed libraries.
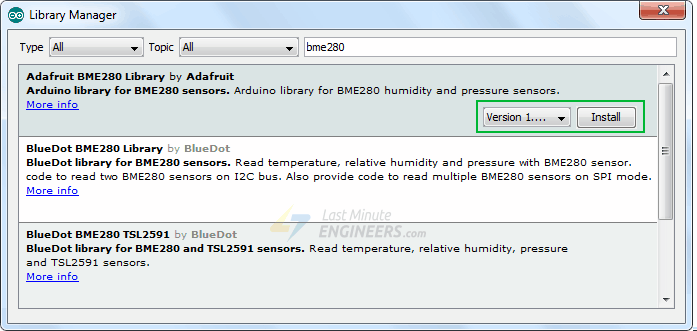
Filter your search by typing ‘bme280’. There should be a couple entries. Look for Adafruit BME280 Library by Adafruit. Click on that entry, and then select Install.
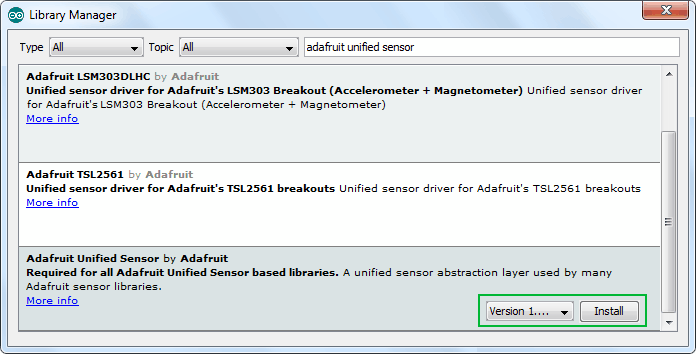
The BME280 sensor library uses the Adafruit Sensor support backend. So, search the library manager for Adafruit Unified Sensor and install that too (you may have to scroll a bit)
Подключение модуля GY-BMP280-3.3 по шине SPI
Схема подключения к Arduino по шине SPI
- VCC —> Arduino VCC (3.3 V)
- GND —> Arduino GND
- SCL —> Arduino D13 ( SPI / SCK )
- SDO —> Arduino D12 ( SPI / MISO )
- SDA —> Arduino D11 ( SPI / MOSI )
- CSB —> Arduino D10 ( SPI / CS,SS )
Скетч для работы с Arduino Uno по шине SPI:
Arduino
#include <Wire.h>
#include <SPI.h>
#include <Adafruit_Sensor.h>
#include <Adafruit_BMP280.h>
#define BMP_SCK 13
#define BMP_MISO 12
#define BMP_MOSI 11
#define BMP_CS 10
//Adafruit_BMP280 bme; // I2C
Adafruit_BMP280 bme(BMP_CS); // hardware SPI
//Adafruit_BMP280 bme(BMP_CS, BMP_MOSI, BMP_MISO, BMP_SCK);
void setup() {
Serial.begin(9600);
Serial.println(F(«BMP280 test»));
if (!bme.begin()) {
Serial.println(F(«Could not find a valid BMP280 sensor, check wiring!»));
while (1);
}
}
void loop() {
Serial.print(F(«Temperature = «));
Serial.print(bme.readTemperature());
Serial.println(» *C»);
Serial.print(F(«Pressure = «));
Serial.print(bme.readPressure());
Serial.println(» Pa»);
Serial.print(F(«Approx altitude = «));
Serial.print(bme.readAltitude(1013.25)); // this should be adjusted to your local forcase
Serial.println(» m»);
Serial.println();
delay(2000);
}
|
1 2 3 4 5 6 7 8 9 10 11 12 13 14 15 16 17 18 19 20 21 22 23 24 25 26 27 28 29 30 31 32 33 34 35 36 37 38 39 40 |
#include <Wire.h> #define BMP_SCK 13 //Adafruit_BMP280 bme; // I2C Adafruit_BMP280bme(BMP_CS);// hardware SPI //Adafruit_BMP280 bme(BMP_CS, BMP_MOSI, BMP_MISO, BMP_SCK); voidsetup(){ Serial.begin(9600); Serial.println(F(«BMP280 test»)); if(!bme.begin()){ Serial.println(F(«Could not find a valid BMP280 sensor, check wiring!»)); while(1); } } voidloop(){ Serial.print(F(«Temperature = «)); Serial.print(bme.readTemperature()); Serial.println(» *C»); Serial.print(F(«Pressure = «)); Serial.print(bme.readPressure()); Serial.println(» Pa»); Serial.print(F(«Approx altitude = «)); Serial.print(bme.readAltitude(1013.25));// this should be adjusted to your local forcase Serial.println(» m»); Serial.println(); delay(2000); } |
Скетч такой же, как и в первом примере, за исключением изменения нескольких строк:
Arduino
//Adafruit_BMP280 bme; // I2C — раскомментировать для шины I²C
Adafruit_BMP280 bme(BMP_CS); // hardware SPI — раскомментировать для шины SPI
//Adafruit_BMP280 bme(BMP_CS, BMP_MOSI, BMP_MISO, BMP_SCK);
|
1 2 3 |
//Adafruit_BMP280 bme; // I2C — раскомментировать для шины I²C Adafruit_BMP280bme(BMP_CS);// hardware SPI — раскомментировать для шины SPI //Adafruit_BMP280 bme(BMP_CS, BMP_MOSI, BMP_MISO, BMP_SCK); |
Две последнии строчки отличаются режимом работы SPI — аппаратным или программным. Под программным SPI понимается использование драйвера Arduino SPI для эмуляции аппаратного SPI с использованием «битовой синхронизации». Это позволяет подключить SPI-устройство к любым контактам Arduino.
Результат работы скетча выводится на Монитор порта (Serial Monitor, вызывается клавишами CTRL+SHIFT+M) среды программирования Arduino IDE.
Wrapping Up
The BME280 provides an easy and inexpensive way to get pressure, temperature and humidity readings. The sensor communicates via I2C communication protocol, which means that wiring is very simple, you just need to connect the sensor to the Arduino I2C pins.
Writing the code to get the sensor readings is also very straightforward thanks to the BME280_Adafruit library. You just need to use the readTemperature(), readHumidity() and readPressure() methods. You can also estimate altitude using the readAltitude() method.
We have guides for other sensors and modules with the Arduino that you may find useful:
- DHT11/DHT22 Humidity and Temperature Sensor With Arduino
- DS18B20 Temperature Sensor with Arduino
- I2C OLED Display with Arduino
- Relay Module with Arduino
- Ultrasonic Sensor HC-SR04 with Arduino
If you want to learn more about Arduino, take a look at our resources:
- Arduino Step-by-step projects course
- Free Arduino Projects and Tutorials
- Arduino Mini Course
Thanks for reading.
bme280.setup()
Initializes module. Initialization is mandatory before read values.
Parameters
- (optional) — Controls oversampling of temperature data. Default oversampling is 16x.
- (optional) — Controls oversampling of pressure data. Default oversampling is 16x.
- (optional) — Controls oversampling of humidity data. Default oversampling is 16x
- (optional) — Controls the sensor mode of the device. Default sensor more is normal.
- (optional) — Controls inactive duration in normal mode. Default inactive duration is 20ms.
- (optional) — Controls the time constant of the IIR filter. Default filter coefficient is 16.
- (optional) — If 0 then the BME280 chip is not initialised. Useful in a battery operated setup when the ESP deep sleeps and on wakeup needs to initialise the driver (the module) but not the chip itself. The chip was kept powered (sleeping too) and is holding the latest reading that should be fetched quickly before another reading starts (). By default the chip is initialised.
| , , | Data oversampling |
|---|---|
| Skipped (output set to 0x80000) | |
| 1 | oversampling ×1 |
| 2 | oversampling ×2 |
| 3 | oversampling ×4 |
| 4 | oversampling ×8 |
| 5 | oversampling ×16 |
| Sensor mode | |
|---|---|
| Sleep mode | |
| 1 and 2 | Forced mode |
| 3 | Normal mode |
Using forced mode is recommended for applications which require low sampling rate or hostbased synchronization. The sensor enters into sleep mode after a forced readout. Please refer to BME280 Final Datasheet for more details.
| t standby (ms) | |
|---|---|
| 0.5 | |
| 1 | 62.5 |
| 2 | 125 |
| 3 | 250 |
| 4 | 500 |
| 5 | 1000 |
| 6 | 10 |
| 7 | 20 |
| Filter coefficient | |
|---|---|
| Filter off | |
| 1 | 2 |
| 2 | 4 |
| 3 | 8 |
| 4 | 16 |
Example
Or simpler and more efficient
Use for «game mode» — Oversampling settings pressure ×4, temperature ×1, humidity ×0, sensor mode: normal mode, inactive duration = 0.5 ms, IIR filter settings filter coefficient 16.
Example of readout in forced mode (asynchronous)
Software
The hookup and Arduino Sketch is for connecting a single Adafruit BME280 breakout board using either address 0x77 or 0x76.
You will need to download the cactus.io BME280_I2C library to work with this sample sketch. The library supports reading the barometric pressure,
humidity and temperature from the sensor.
To get the data from the sensor we need to call bme.readSensor(). We can then call the various functions to get the temperature, humidity and pressure.
The sensor returns the temperature in degrees celsius by design. We can call the method in the BME280 library called getTemperature_C to get the celsius
value or getTemperature_F for the value in fahrenheit.
The barometric pressure from the sensor is returned in Pascals. 100 Pascals = 1hPa = 1 millibar. The library method getPressure_P will return the
value in Pascals. The method getPressure_MB will return the value in millibars.
When we create the BME280 object in the sketch we can use the default which is BME280_I2C bme which will create an object using the default 0x77 address.
To create an object using the alternative address (0x76) we need to declare it as BME280_I2C bme(0x76).
We have found that when the BME280 is enclosed inside a case or nearby a circuit board the heat generated by voltage regulators can affect the temperature
reading from the BME280. We have included a function in the library that allows us to apply a temperature calibration offset to the value returned by getTemperature_C
or _F. Basically it justs adds the calibration offset. So if the temperature is reading 2 degrees high then we use this function:
bme.setTempCal(-2); which will subtract 2 degrees from the temperture reading.
The default calibration offset is 0. So you only have to use this function if you want to apply a calibration value other than 0.
- The sketch Supports only I2C bus connection.
- The sketch Supports only one sensor connected.
- Its blocking code.