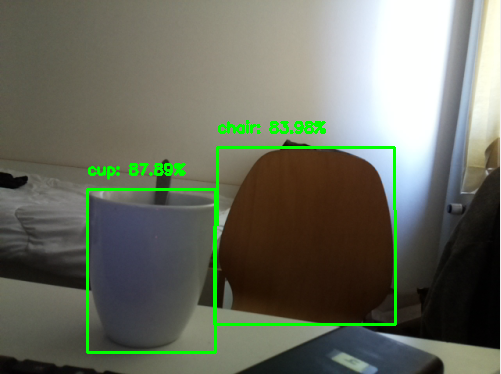
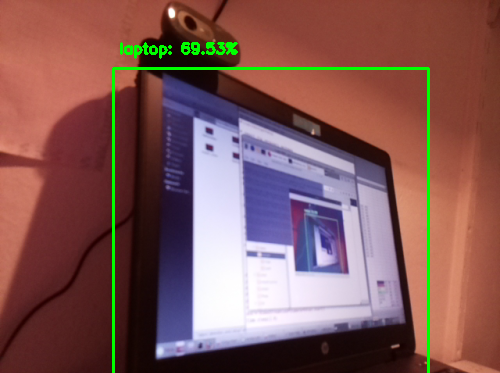
Object detection on pretrained model
1. Install EdgeTPU examples:
sudo apt-get install edgetpu-examplessudo chmod a+w /usr/share/edgetpu/examplestree — dirsfirst

In folder «/usr/share/edgetpu/examples» one can find already pretrained models in tflite-formats optimized for EdgeTPU.
2. Unfortunately Coral USB vendor does not provide ready script to rundetection using webcam, so one should use custom script:
wget https://bitbucket.org/ElencheZetetique/fixed_scripts/src/master/Coral_USB/Object_detection_webcam_Coral_USB.py
3. Run the script using SSD Mobilnet V1 COCO:
python3 webcam_object_detection_edgetpu.py-m /path/to/ssd_mobilenet_v1_coco_quant_postprocess_edgetpu.tflite -l /path/to/coco_labels.txt -c 0.5
Note: If white LED on Coral USB does not blink it means that either the modelis broken or not optimized for using together with Raspberry Pi.
What’s Relevant in the Repository
The inference-engine provides the API used to initiate neural network inferences and retrieve the results of those inferences. In addition to the API, the inference engine directory also includes plugins for different hardware targets such as CPU, GPU, and the MYRIAD VPU. When the API is called it will rely on the plug-ins to execute inferences on these hardware targets.For execution on the Intel NCS 2 (or the original Intel Movidius NCS) the inference engine needs to call the MYRIAD VPU plug-in. Therefore, the bare minimum which will need to be built to use an Intel NCS 2 is the inference engine API and the MYRIAD plug-in. The other plug-ins in the repository will not be needed and depending on your platform may not apply.
Setting Up to Build
To prepare the system for building, the build tools, the git submodules, and the dependencies need to be on the build system. Each of these are explained in this section.
Trained Neural Network
There are a few ways a trained neural network in IR format can be obtained:
- Run the model optimizer to convert a trained network in one of the supported frameworks to IR.
- Use the model downloader tool from the open_model_zoo repository
- Download the IR files from download.01.org directly
Downloading directly from download.01.org is the simplest. The following commands will create a directory in the current user’s home directory and then download an age and gender recognition network that is already in IR format.
Note: After the above commands are successfully executed the following files will be on the system: ~/models/age-gender-recognition-retail-0013.xml, and ~/models/age-gender-recognition-retail-0013.bin. These files will be passed to the benchmark_app when executed below.
Note: The Intel NCS 2 device requires IR models that are optimized for the 16 bit floating point format known as FP16. The open model zoo also contains models in FP32 and Int8 depending on the specific model.
Особенности конструкции
Compute Stick базируется на визуальном чипе (Vision Processing Unit, или VPU) под названием Myriad 2, который представляет собой сверхэкономичный процессор с потреблением не более 1 Вт. Чип Myriad 2 базируется на 12 параллельно работающих 128-битных векторных VLIW-ядрах с архитектурой SHAVE, работающих с алгоритмами машинного зрения, такими как детектирование объектов или распознавание лиц.
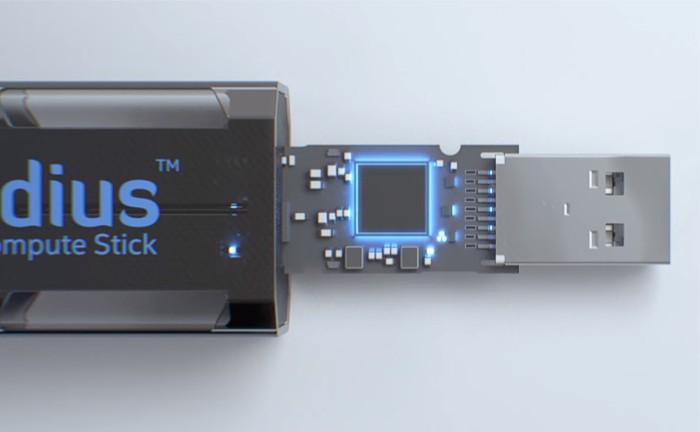
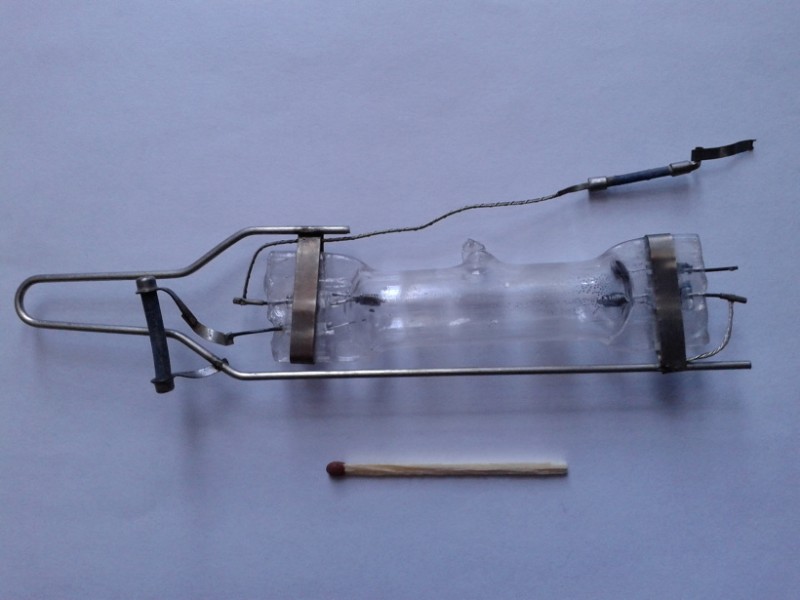
Neural Compute Stick изнутри
Процессор Myriad 2 поддерживает 16/32-битные вычисления с плавающей запятой и 8/16/32-битные целочисленные операции. Чип оснащен 2 МБ распределенной памяти, подсистемой памяти с производительностью до 400 Гбит/с и кэш-памятью L2 объемом 256 КБ. Номинальная тактовая частота чипа составляет 600 МГц при питающем напряжении 0,9 В. Производится Myriad 2 с соблюдением норм 28 нм технологического процесса.
Согласно данным официальных представителей Movidius, чип обеспечивает производительность на уровне более чем 100 гигафлопс и способен нативно запускать нейронные сети на базе фреймворка Caffe.
Neural Compute Stick оснащен скоростным портом USB 3.0 Type-A, его габариты составляют 72,5 х 27 х 14 мм. Минимальные требования для запуска устройства на хост-системе с процессором архитектуры x86_64 составляют: ОС Ubuntu версии 16.04, порт USB 2.0 (лучше USB 3.0), 1 ГБ оперативной памяти и 4 ГБ свободного дискового пространства.
https://youtube.com/watch?v=VioTPaYcF98
Основное визуальное отличие USB-сопроцессора Neural Compute Stick от своего прототипа Fathom заключается в том, что новая розничная версия выполнена в корпусе из алюминия (прототип был представлен в пластике).
Как создать цифровую витрину для налогового мониторинга
ИТ в госсекторе

CMake/make Options
The -DENABLE_MKL_DNN=OFF and -DENABLE_CLDNN=OFF options for cmake in the above command prevents attempting to build the CPU and GPU plugins respectively. These plugins only apply to x86 platforms. If building for a platform that can support these plugins the OFF can be changed to ON in the cmake command.
The -DENABLE_GNA=OFF option prevents attempting to build the GNA plugin which applies to the Intel Speech Enabling Developer Kit, the Amazon Alexa* Premium Far-Field Developer Kit, Pentium Silver J5005 processor, Intel Celeron processor J4005, Intel Core i3 processor 8121U, and others.
The -DENABLE_SSE42=OFF option prevents attempting to build for Streaming SIMD Extensions 4.2 which likely aren’t available for most SBC platforms.
The -DTHREADING=SEQ option builds without threading. Other possible values are OMP which will build with OpenMP* threading and the default value of TBB which is to build with Intel Threading Building Blocks (IntelTBB).
The make command above can also take a -j<number of jobs> parameter to speed up the build via parallelization. Typically the number of cores on the build machine is a good value to use with the -j option. For example with a build system that has 4 CPU cores, a good place to start would be -j4. When building on a lower performance system such as Raspberry P,i omitting the -j option seems to be the most reliable.
Verifying the Build
After successfully completing the inference engine build, the result should be verified to make sure everything is working. When building on the same platform that will be the deployment platform, this is relatively straight forward. If there is a separate system on which the software will be deployed then the Deploying section below should be followed to get the required components on the system prior to verifying.
To verify that the Intel NCS 2 device and the OpenVINO toolkit is working correctly, the following items need to be considered. Each item is discussed below in more detail.
- A program that uses the OpenVINO toolkit inference engine API.
- A trained Neural Network in the OpenVINO toolkit Intermediate Representation (IR) format.
- Input for the Neural Network.
- Linux* USB driver configuration for the Intel NCS 2 device.
Аппаратное обеспечение Intel для машинного обучения
У Intel есть продукты общего назначения – центральные процессоры, которые могут использоваться как для обучения, так и для использования нейронной сети. Для обучения модели предпочтительны серверные микропроцессоры Intel Xeon (https://www.intel.ru/content/www/ru/ru/products/processors/xeon/view-all.html) (в первую очередь это связано со скоростью работы), довольно частая практика – это использование облачных вычислений для тренировки модели, в этом случае, сервера, на которых это облако работает, могут функционировать под управлением Intel Xeon. Для того, чтобы использовать полученную модель подойдут процессоры Intel Xeon, Core, Atom, требования к вычислительным мощностям при работе с готовой моделью ниже, чем к процессу ее обучения, поэтому тут можно обойтись менее производительными устройствами.
Также есть специализированные решения, которые изначально проектировались для работы в рамках направления Deep Learning. В первую очередь хотелось бы сказать про процессор (если его вообще так можно назвать) Intel Nervana, он в первую очередь ориентирован на тренировку нейронных сетей.
Для запуска натренированной сети предоставляется целый набор различных устройств. Это Intel FPGA – программируемые логические схемы. После покупки Intel фирмы Altera чипы Stratix, Arria, MAX теперь выпускаются под брендом Intel.
Для этих целей также может использоваться Intel Iris Graphics – интегрированное в микропроцессор графические ядро. Есть специализированные устройства для распознавания речи (Intel GNA (IP)). Более подробно про аппаратные и программные средства Intel для работы в области искусственного интеллекта можете прочитать здесь. Для нас наибольший интерес представляют чипы Movidius Myriad, в частности Myriad 2, на котором построен Movidius NCS, обзору которого будет посвящен данный цикл статей.
Разработка под Intel NCS
Для разработки под Intel NCS вам потребуется непосредственно само устройство и SDK для него. В состав SDK входит NC Toolkit и NC API. NC Toolkit включает в себя Profiler, Checker и Compiler. Profiler использует готовую нейронную сеть (на базе Caffe или Tensorflow), позволяет строить для нее графическое представление, выполняет сеть на NCS и собирает различные метрики (количество flops, размер, время работы для каждого слоя). Checker используется для запуска процедуры распознавания для конкретного изображения и проверки результатов классификации. Compiler преобразует Caffe/Tensorflow модель в граф, с которым может работать Intel Movidius. NCAPI используется в приложениях, которые работаю с NCS через USB. Workflow работы с NCS выглядит следующим образом.
На этом мы закончим краткий обзор Intel Movidius Neural Compute Stick. В следующей статье мы разберем установку NCSDK на VirtualBox и запуск тестового приложения.
Verifying Installation
After successfully completing the inference engine build, you should verify that everything is set up correctly. To verify that the toolkit and Intel NCS 2 work on your device, complete the following steps:
- Run the sample program benchmark_app to confirm that all libraries load correctly
- Download a trained model
- Select an input for the neural network
- Configure the Intel NCS 2 Linux* USB driver
- Run benchmark_app with selected model and input.
Sample Programs: benchmark_app
The Intel OpenVINO toolkit includes some sample programs that utilize the inference engine and IIntel NCS 2. One of the programs is benchmark_app, a tool for estimating deep learning inference performance. It can be found in ~/dldt/inference-engine/bin/intel64/Release.
Run the following command in the folder to test benchmark_app:
It should print a help dialog, describing the available options for the program.
Downloading a Model
The program needs a model to pass the input through. Models for Intel OpenVINO toolkit in IR format can be obtained by:
- Using the Model Optimizer to convert an existing model from one of the supported frameworks into IR format for the Inference Engine
- Using the Model Downloader tool to download from the Open Model Zoo
- Download the IR files directly from download.01.org
For our purposes, downloading directly is easiest. Use the following commands to grab an age and gender recognition model:
Note: The Intel NCS 2 requires models that are optimized for the 16-bit floating point format known as FP16. Your model, if it differs from the example, may require conversion using the Model Optimizer to FP16.
Input for the Neural Network
The last item needed is input for the neural network. For the model we’ve downloaded, you need a 62×62 image with 3 channels of color. This article includes an archive that contains an image that you can use, and is used in the example below. Copy the
archive to a USB Storage Device, connect the device to your board, and use the following commands to mount the drive and copy its contents to a folder called OpenVINO on your home directory:
Use the lsblk command to list the available block devices, and make a note of your connected USB drive. Use its name in place of sdX in the next command:
The OpenVINO folder should contain two images, a text file, and a folder named squeezenet. Note that the name of the archive may differ – it should match what you have downloaded from this article.
Configure the Intel NCS 2 Linux* USB Driver
Some udev rules need to be added to allow the system to recognize Intel NCS 2 USB devices. Inside the tar.gz file attached there is a file called 97-myriad-usbboot.rules_.txt. It should be downloaded to the user’s home directory. Follow the commands below to add the rules to your device:
Note: If the current user is not a member of the users group then run the following command and reboot your device:
While logged in as a user in the users group:
The USB driver should be installed correctly now. If the Intel NCS 2 is not detected when running demos, restart your device and try again.
Running benchmark_app
When the model is downloaded, an input image is available, and the Intel NCS 2 is plugged into a USB port, use the following command to run the benchmark_app:
This will run the application with the selected options. The –d flag tells the program which device to use for inferencing – MYRIAD activates the MYRAID plugin, utilizing the Intel NCS 2. After the command successfully executes the terminal will display statistics for inferencing.
If the application ran successfully on your Intel NCS 2, then Intel OpenVINO toolkit and Intel NCS 2 are set up correctly for use on your device.
Inferencing at the Edge
Now that you’ve confirmed your ARMv7 is setup and working with Intel NCS 2, you can now start building and deploying your AI applications or use one of the prebuilt sample applications to test your use-case. Next, we will try to do a simple image classification using SqueezeNetv1.1 and an image downloaded to the board. To simplify things the attached archive contains both the image and the network. The SqueezeNetv1.1 network has already been converted to IR format for use by the Inference Engine.
The following command will take the cat.jpg image that was included in the archive, use the squeezenet1.1 network model, use the MYRIAD plugin to load the model to the connected Intel NCS 2, and infer the output. As before, the location of the sample application is <OpenVINO folder>/inference-engine/bin/armv7/Release/
The program will output a list of the top 10 results of the inferencing and an average of the image throughput.
OpenVINO™ Toolkit Program: benchmark_app
When the inference engine was built via cmake/make some sample applications were built as well. All the build samples can be found in the <directory where cloned>/dldt/inference-engine/bin/<arch>/Release directory. For the purpose of verifying the build, the benchmark_app in this directory can be used. To see the possible arguments to this application the following command can be used from within the Release directory:
Running the command above will show that the following options, among others, which are relevant to verifying the build with an Intel NCS 2 device.
| Argument | Description |
| -i «<path>» | Is the path to an image file or directory. |
| -m «<path>» | Is the path to the trained model’s .xml file. This is one of the two files created when a trained model is converted to the IR format. There is an assumption that the other file, the .bin file exists in the same directory as this xml file. |
| -pp «<path>» | Is the path to the directory that contains the inference engine plugins. This is where the Myriad plugin is located on the file system. The Myriad plugin is the libmyriadPlugin.so shared object library. After the build completes this is in the …/Release/lib directory. |
| -d «<device>» | Specifies the target device on which to run the inference. To verify the Intel NCS 2 device pass -d MYRIAD |
| -api «<sync|async>» | Specifies if the Inference Engine API to call should be synchronous or asynchronous. The best performance will be seen when passing «async». |
Компактный нейронный сопроцессор
Компания Movidius, принадлежащая Intel и занимающаяся разработкой визуальных процессоров для интернета вещей, представила миниатюрное компактное устройство Neural Compute Stick. Новинка позиционируется как вычислительный сопроцессор с функциональностью искусственного интеллекта, позволяющий добавить возможность машинного обучения подключенному ПК простым подключением к порту USB.
Ключевая особенность устройства заключается в том, что для процесса машинного обучения или развертывания новой нейронной сети с применением Neural Compute Stick не требуется подключение к интернету: USB-сопроцессор функционирует совершенно автономно.
В сентябре 2016 г. компания Movidius была приобретена Intel за неназванную сумму. По итогам сделки в Intel объявили о планах использовать технологии Movidius при разработке устройств интернета вещей, дополненной, виртуальной и совмещенной реальности, таких как роботах, дронах, автоматических цифровых камерах безопасности и т.д.
Впервые USB-сопроцессор Neural Compute Stick был представлен в качестве прототипа под рабочим названием Fathom в апреле 2016 г. – тогда еще независимой компанией Movidius. Некоторое время после приобретения компании новости о разработках Movidius исчезли со страниц новостных сайтов. Теперь Neural Compute Stick коммерциализирован и официально поступает в продажу, однако технологическая идея устройства претерпела минимальные изменения по сравнению с Fathom.
USB-сопроцессор Movidius Neural Compute Stick
Устройство Neural Compute Stick выполнено на базе точно такого же процессора, который используется во множестве устройств с машинным зрением — например, автономном дроне DJI. Потребителю или производителю техники, желающему усилить возможности искусственного интеллекта своей системы, достаточно подключить один или несколько сопроцессоров Neural Compute Stick к порту (портам) USB.
Running Machine Learning in Python
The Python wrappers for the Intel OpenVINO toolkit require NumPy and OpenCV support so before we do anything else, lets go ahead and install both those packages for Python 3.5.
$ sudo apt-get install python3-numpy$ pip3 install opencv-python
and install some other additional libraries needed by the code.
$ sudo apt-get install libgtk-3-dev$ sudo apt-get install libavcodec-dev$ sudo apt-get install libavformat-dev$ sudo apt-get install libswscale-dev
We’ll be using a modified version of the demo script. While I managed to get it to mostly run, it had problems opening the camera stream, so I had to kludge things a little bit to make them work.
Open the script in your favourite editor
$ cd ~/inference_engine_vpu_arm/deployment_tools/inference_engine/samples/python_sample/object_detection_demo_ssd_async$ vi object_detection_demo_ssd_async.py
then modify lines 83 through to 85,
if args.input == 'cam': input_stream = 0 else:
to have the full path to our V4L device.
if args.input == 'cam': input_stream = '/dev/video0' else:
First of all this will stop the script hanging with a pipeline error, and secondly avoid the infamous error you get when trying to force quit the script after it hangs.
We can reuse the same model we downloaded for our earlier example. So going ahead and dropping the copy of our new script into our home directory we can set it going,
$ cd ~/inference_engine_vpu_arm/deployment_tools/inference_engine/samples/python_sample/object_detection_demo_ssd_async$ python3 ./object_detection_demo_ssd_async.py -m ../../build/face-detection-adas-0001.xml -i cam -d MYRIAD -pt 0.5
If all goes well you should see a window open up on your desktop with a video feed from the Pi Camera Module, with real time inferencing overlaid on top.
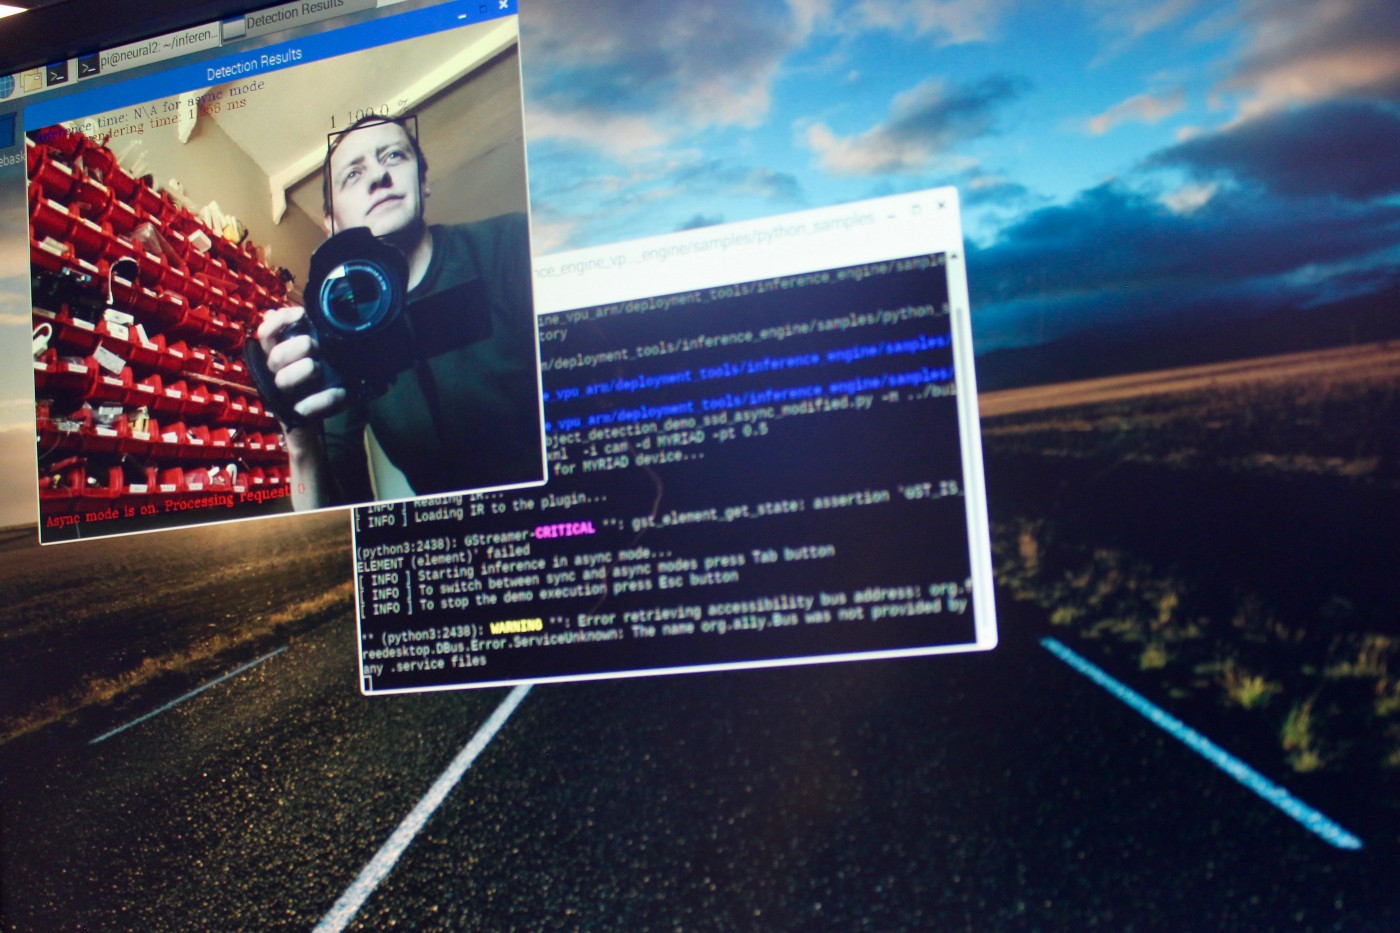
Video with real time inferencing overlaid streamed directly to the Raspberry Pi monitor.
This will work just fine on the primary display for your Raspberry Pi, so if you have a monitor attached the window should just pop open.
If you’re running headless the easiest thing is to enable VNC, and connect to your Raspberry Pi that way. Although bear in mind that if you don’t have a monitor connected you‘ll need to set a default resolution using , as the default display is just 720×480 pixels in size. Go to and then and select a display size that’ll fit on your local machine’s display
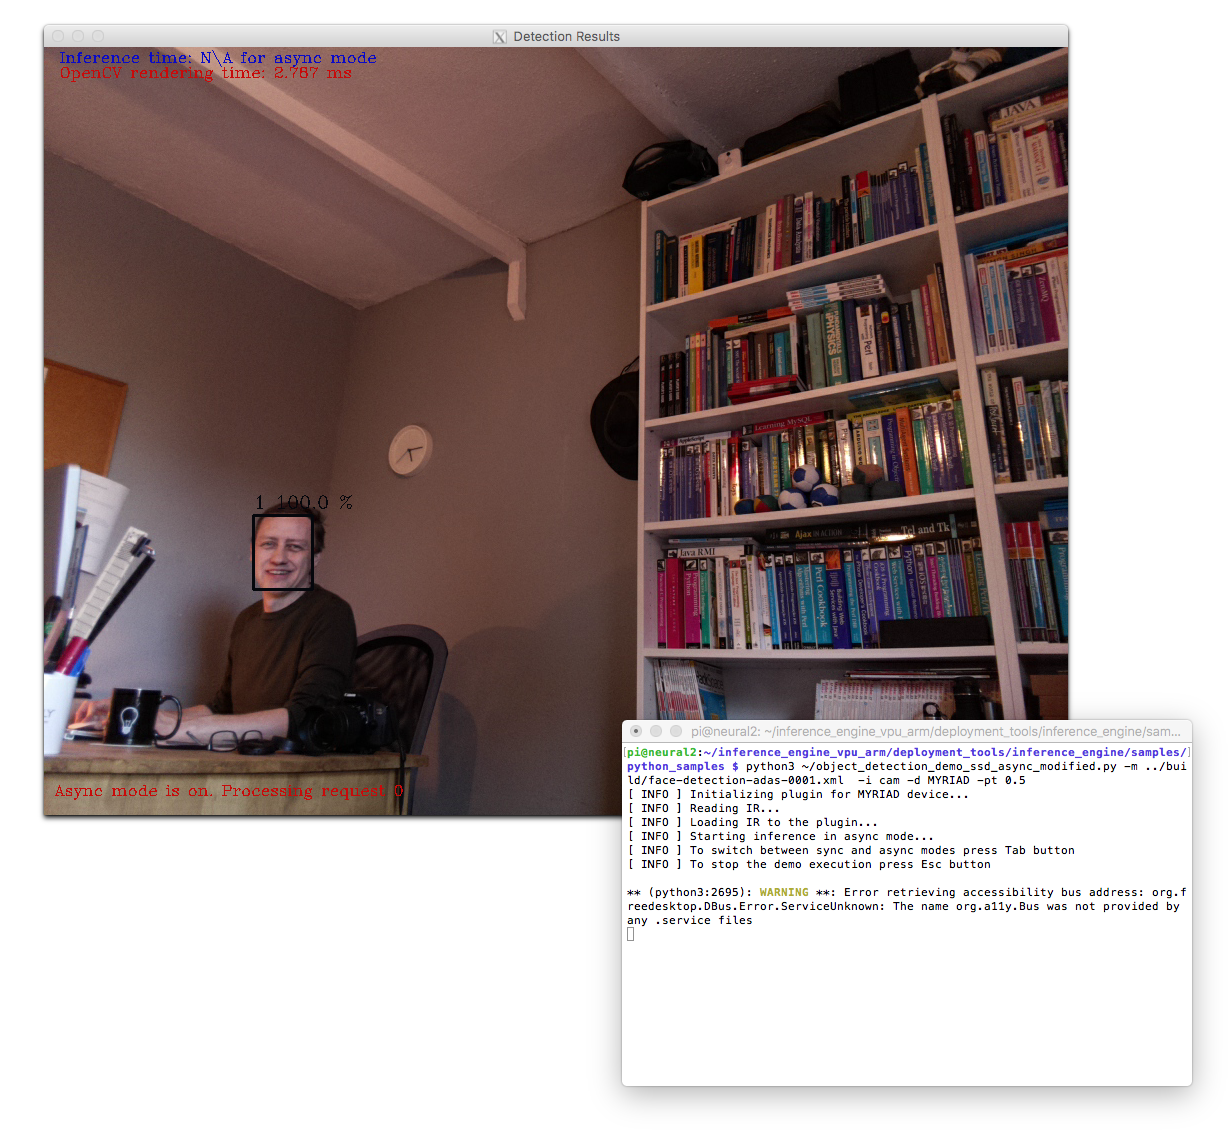
Real time video with inferencing results on my macOS desktop.
If you’re are connected to the Raspberry Pi from your local machine it is possible to get the window to display on your local desktop, so long as you have an X Server running and have enabled X11 forwarding to your local machine.
$ ssh -XY pi@neural.localpassword:
Otherwise the script will close with a error.
Building
The first step to beginning the build is telling the system where the installation of OpenCV is. Use the following command:
The toolkit uses a CMake building system to guide and simplify the building process. To build both the inference engine and the MYRIAD plugin for Intel NCS 2 use the following commands:
If the make command fails because of an issue with an OpenCV library, make sure that you’ve told the system where your installation of OpenCV is. If the build completes at this point, Intel OpenVINO toolkit is ready to run. The builds are placed in <dldt>/inference-engine/bin/armv7/Release/.
ncappzoo Compatibility Requirements
Hardware compatibility
The projects in the ncappzoo are periodically tested on Intel x86-64 Systems unless otherwise stated in the project’s README.md file. Although not tested on other harware platforms most projects should also work on any hardware which can run the OpenVINO toolkit including the Raspberry Pi 3/3B/3B+/4B hardware
The projects in the ncappzoo work on both the Intel NCS2 and the original Intel Movidius NCS devices.
Operating System Compatibility
The projects in the ncappzoo are tested and known to work on the Ubuntu 18.04 OS. These projects will likely work on other Linux based operating systems as well but they aren’t tested on those unless explicitly stated in the project’s README.md file and there may be some tweaks required as well. If any specific issues are found for other OSes please submit a pull request as broad compatibility is desirable.
OpenVINO and DLDT Compatibility
The projects in the master branch depend on the Deep Learning Deployment Toolkit (DLDT) portion of the OpenVINO toolkit. There are two flavors of the the OpenVINO toolkit’s DLDT:
- The open source distribution of the OpenVINO toolkit DLDT. This is the means by which the Intel NCS2 device can be used with most single board computers on the market and is also helpful for other non-Ubuntu development systems. Here are some links regarding the open source distribution of the OpenVINO with the Intel NCS2:
Note: When using the open source distribution of the OpenVINO toolkit, you may need to modify your shell’s path and environment variables to point to the toolkit’s directories.
The projects in the ncappzoo work with both flavors of the OpenVINO Toolkit and unless otherwise specified in a project’s README.md file all projects are targeted for the OpenVINO Toolkit 2020.1 release.
OpenCV Compatibility
Some projects also rely on OpenCV. For these projects, OpenCV distributed with the OpenVINO release is the recommended version. Other versions may also work but are not tested an may require tweaks to get working.
Raspberry Pi Compatibility
The ncappzoo is compatible with the Raspberry Pi 3 B+ and the Raspberry Pi 4. Some additional configuration steps are required:
Intel Distribution of OpenVINO for Raspbian* OS
The Intel Distribution of OpenVINO toolkit for Raspbian OS does not include the Model Optimizer. To use the ncappzoo, you must clone the open source version of the OpenVINO Deep Learning Development Toolkit (DLDT) and use that version of the Model Optimizer. Clone the repository, install dependencies for TensorFlow* and Caffe*, and set up your PATH and PYTHONPATH variables to point to the Model Optimizer:
Open Source OpenVINO Deep Learning Development Toolkit (DLDT)
To setup the open source version of OpenVINO with your Raspberry Pi, add to the PATH, PYTHONPATH, and LD_LIBRARY_PATH environment variables the location of the build Inference Engine libraries and Python API.
Похожие записи:
 Разница между переменным и постоянным током
 Как выбрать светодиодные лампы для автомобиля
 Проводим нагрузочное тестирование скоростных usb-библиотек для stm32f103c8t6
 Можно ли устанавливать ксенон в линзованные фары в 2020 году
 Подключение ламп дрл на 125, 250, 400 ватт и их технические характеристики
 Сколько миллиампер в ампере